> ## Documentation Index
> Fetch the complete documentation index at: https://docs.mileapp.dev/llms.txt
> Use this file to discover all available pages before exploring further.

# Component: Photo

The **Photo Component** lets field workers capture or upload images as part of a task. It is the standard way to attach visual proof to a task — package photos, site conditions, signed forms, damaged goods, or any other field documentation.

## What is the Photo Component?

The Photo component renders as a tile in the mobile app. Each tile can hold one image; tapping the **+** button opens the device camera (and optionally the gallery picker). The component enforces a configurable range for how many photos must be captured and how many are allowed per task.

**Use Cases:**

* **Proof of delivery** — Capture the package at the drop-off location
* **Pickup verification** — Photograph the parcel and pickup point on collection
* **Damage report** — Document damaged goods on arrival
* **Site inspection** — Record the condition of a location during a visit
* **Receipt or signed form** — Attach a scanned document to the task

## Photo Component Properties

<div align="center">
  <img src="https://mintcdn.com/mileapp-c1584fbc/9a5Ka_AG8JS8Qn6V/images/flow/component-photo-settings.png?fit=max&auto=format&n=9a5Ka_AG8JS8Qn6V&q=85&s=08a0a1856d5042fbd5cb097818d59d7e" alt="Photo component configuration" width="600" data-path="images/flow/component-photo-settings.png" />

  <p><i>Photo component settings panel</i></p>
</div>

**Photo component settings:**

1. **Title** — Component label shown to field workers (e.g., "Pickup Picture", "Delivery Proof Photos")
2. **Component Type** — Set to Photo
3. **Minimum Count of Photos** — Minimum number of photos the worker must capture before the page can be completed. Setting this above `0` effectively makes the component required.
4. **Maximum Count of Photos** — Maximum number of photos allowed for this component (range 1–10, default 10)
5. **Photo Categories** — Optional list of labels that classify each captured photo (e.g., `front`, `back`, `damage`). Type a category name and press Enter to add it.
6. **Visible** — Controls display on Create Task (web and mobile) and View Task (mobile). Hidden components still export their data.
7. **Watermark** — When on, captured photos are stamped with a timestamp and the device's GPS location.
8. **Select from Gallery** — When on, the worker can pick an existing image from the device gallery instead of taking a new one.

<Note>
  A Photo component is "required" implicitly: set **Minimum Count of Photos** to `1` or more, and the worker cannot save the task until at least that many photos are captured.
</Note>

## How to Configure the Photo Component

### Step 1: Add the Component

In the Flow Builder, open the target page and click **Add Component**. Set **Component Type** to **Photo**.

### Step 2: Set the Title

Enter a descriptive **Title** (e.g., "Pickup Picture", "Delivery Proof"). This label appears above the photo tiles on the mobile app.

### Step 3: Set Min and Max

* **Minimum Count of Photos** — How many photos must be captured before the task can be saved (use `0` for optional, `1+` to make it mandatory).
* **Maximum Count of Photos** — Cap the total number of photos the worker can add (1–10).

### Step 4: Configure Capture Options

* Turn on **Watermark** when you need verifiable proof — captured photos get a timestamp and GPS overlay.
* Turn on **Select from Gallery** to let the worker reuse an existing image instead of forcing a new capture.
* Leave **Visible** on for normal use. Turn it off only when the component should be hidden from both the web admin form and the mobile app but still exported on completed tasks.

### Step 5: Add Photo Categories (optional)

Use **Photo Categories** when you want to group photos into named slots (e.g., `front`, `back`, `damage`). Each tile then asks the worker to pick a category when capturing the photo. Leave empty if all photos can be uncategorized.

### Step 6: Save

Click **Save** in the Flow Builder. The component is now live in any task created from this flow.

## How Photos Work in Tasks

<div align="center">
  <img src="https://mintcdn.com/mileapp-c1584fbc/9a5Ka_AG8JS8Qn6V/images/flow/component-photo-mobile.png?fit=max&auto=format&n=9a5Ka_AG8JS8Qn6V&q=85&s=3e294d7ac0be7e5d69c43743d3e843df" alt="Photo component on mobile preview" width="300" data-path="images/flow/component-photo-mobile.png" />

  <p><i>
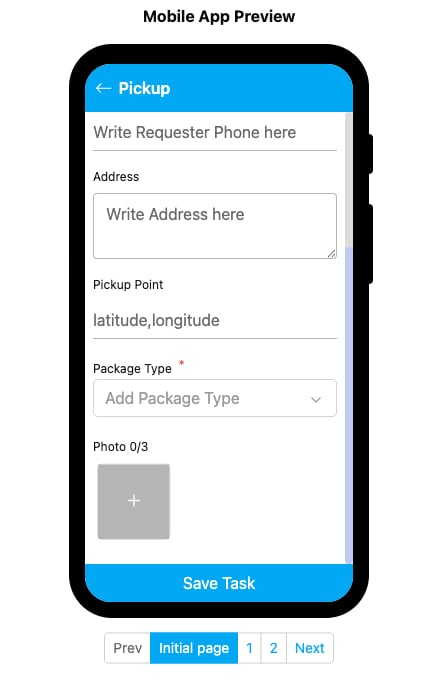
Photo component rendered on the mobile preview</i></p>
</div>

When a field worker opens a task on the mobile app:

1. The Photo section shows the title and a counter such as `Photo 0/3` (current/max).
2. Tap the **+** tile to launch the camera (or the gallery if **Select from Gallery** is enabled).
3. Captured photos appear as thumbnails on the tile grid; tap a thumbnail to view or delete.
4. If **Watermark** is on, the timestamp and coordinate are baked into the saved image.
5. The worker cannot save the task until the **Minimum Count of Photos** is satisfied.

Completed tasks that include required photo components appear in the **Gallery** menu, where you can browse every image grouped by task.

## Related

* [Component: Video](/pages/flow/flow-builder/component-video) — Capture or upload short videos for similar field documentation needs
* [Component: Signature](/pages/flow/flow-builder/component-signature) — Capture a hand-drawn signature instead of an image
* [Gallery](/pages/task/gallery) — Browse all photos attached to completed tasks
* [Flow Builder Overview](/pages/flow/flow-builder/introduction) — Reference for every part of the Flow Builder
