> ## Documentation Index
> Fetch the complete documentation index at: https://docs.mileapp.dev/llms.txt
> Use this file to discover all available pages before exploring further.

# Page: Initial Page

The **Initial Page** is the first page of every Flow. It is shown when a task is created, both on the web admin form and in the mobile app's New Task screen. Setting up the Initial Page correctly is what makes a task start with the right information before it is assigned to a field worker.

## What is the Initial Page?

Every Flow has exactly **one** Initial Page — it is created automatically when you create a Flow and cannot be deleted. The Initial Page is intended for information that needs to be known at task creation time, such as:

* **Customer / requester info** — name, address, coordinate
* **Order info** — order number, items, expected delivery time
* **Routing inputs** — Visit Name, Address, Coordinate, Open / Close Time, Tag

Components from the Initial Page are also commonly used as the **source of `Show As` and `Route As`**, which control how the task appears on the Task list and how the Routing/Visit form is auto-filled.

## Initial Page Properties

<div align="center">
  <img src="https://mintcdn.com/mileapp-c1584fbc/flgN9jdgNWcdngrB/images/flow/page-initial-page-panel.png?fit=max&auto=format&n=flgN9jdgNWcdngrB&q=85&s=293741ba8d0c0a9513902c76521024d6" alt="Initial Page in the pages list" width="400" data-path="images/flow/page-initial-page-panel.png" />

  <p><i>
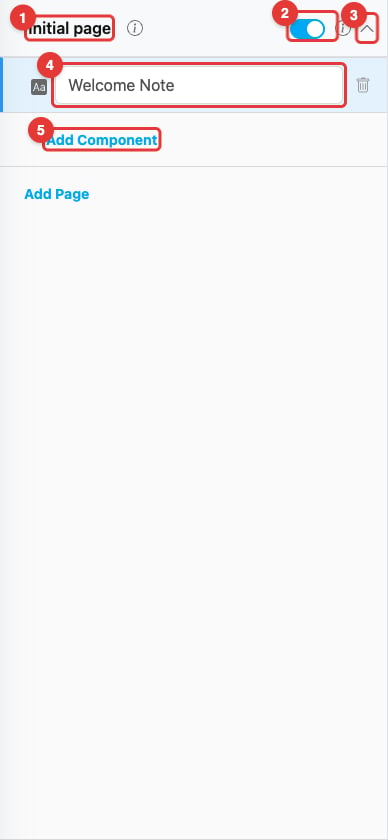
Initial Page in the Pages panel with one component inside</i></p>
</div>

1. **Page name** — `Initial page`. The name is fixed and cannot be renamed.
2. **Enable toggle** — Turns the Initial Page on or off. When off, the Initial Page is skipped during task creation. Most flows leave this on.
3. **Chevron** — Expand or collapse the page to see or hide its components.
4. **Component** — A component placed on the Initial Page (in this example, a View component titled *Welcome Note*). Use the title field to rename, the trash icon to delete, or drag the handle on the left to reorder.
5. **Add Component** — Add a new component to the Initial Page.

Unlike Mobile App Pages, the Initial Page **cannot be deleted, renamed, or reordered**.
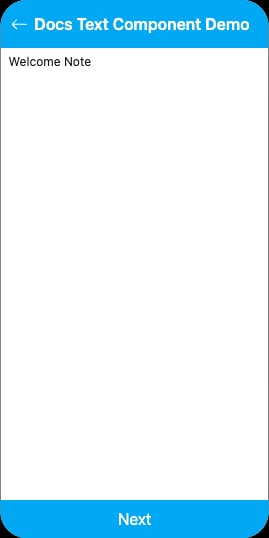
## Mobile Preview

When a field worker creates a task from the mobile app, the Initial Page appears as the first screen. The components placed on the Initial Page render in the order they appear in the Pages panel.

<div align="center">
  <img src="https://mintcdn.com/mileapp-c1584fbc/flgN9jdgNWcdngrB/images/flow/page-initial-page-mobile.png?fit=max&auto=format&n=flgN9jdgNWcdngrB&q=85&s=e74d8e9f1a976578bbf109b5b7fdb637" alt="Initial Page on mobile" width="300" data-path="images/flow/page-initial-page-mobile.png" />

  <p><i>Initial Page rendered on the mobile app preview</i></p>
</div>

## How Initial Page Data Flows

Components placed on the Initial Page can be referenced from any **Mobile App Page** later in the Flow. This is useful when you want a field worker to see information that was entered at task creation time (for example, the customer name) without re-typing it.

To reference an Initial Page component from a Mobile App Page:

1. Open the Mobile App Page in the Flow Builder.
2. Add a **View** component on that page.
3. In the **Value** field of the View component, select the Initial Page component you want to display (the dropdown lists components from the Initial Page that match the View's type).

Once linked, every task created with this Flow will automatically show the Initial Page value on the referencing page — no manual entry needed.

## How to Configure the Initial Page

### Step 1: Open the Flow

Select your Flow in the Flow Builder. The Initial Page is the first row of the **Pages** panel.

### Step 2: Add components

Click the chevron to expand the Initial Page, then click **Add Component**. Configure the component type and settings on the right-hand panel.

### Step 3: Map components for routing and task list

To make the task usable for Route Optimization and easy to scan in the task list, use the **Configuration** tab to map Initial Page components to system fields:

* Set **Show As: Title / Content / Label** on an Initial Page component so its value appears on the task card and on the task table of the **Task** menu.
* Set **Route As** on Initial Page components to feed the route planner. Available targets include **Visit Name**, **Address**, **Coordinate**, **Visit Duration**, **Tag**, **Visit Group**, **Visit Group Priority**, the time-window slots **Open Time / Open Time 1 / Open Time 2** and **Close Time / Close Time 1 / Close Time 2**, and any **Capacity Constraint** (such as Weight, Volume, or Width) defined in the **Routing/Configuration** menu. Up to 10 capacity constraint types can be defined per organization, so the exact targets in the dropdown depend on your organization's configuration and the component's input type. Note that **Route As is only configurable on Initial Page components** — Mobile App Page components cannot be mapped.

### Step 4: Save

Click **Save** at the bottom of the builder. Tasks created from now on will use the updated Initial Page.

## Related

* [Mobile App Page](/pages/flow/flow-builder/page-mobile-app-page) — Pages used after the Initial Page during task execution
* [Component: View](/pages/flow/flow-builder/component-view) — Used to display Initial Page values on later pages
* [Component: Input](/pages/flow/flow-builder/component-input-type/component-input) — Most common component for capturing Initial Page data
* [Flow Builder Overview](/pages/flow/flow-builder/introduction) — Reference for every part of the Flow Builder
