> ## Documentation Index
> Fetch the complete documentation index at: https://docs.mileapp.dev/llms.txt
> Use this file to discover all available pages before exploring further.

# How to set up an SMS Gateway

> Send your organization's OTP and Automation SMS through your own SMS provider instead of MileApp's default service.

<Note>
  Required permission:

  * View integration
  * Create integration
  * Edit integration
  * Delete integration
</Note>

The **SMS Gateway** integration lets your organization deliver SMS through its own provider — any provider with an HTTP "send SMS" API — instead of MileApp's default SMS service. You describe your provider as a plain HTTP request (an endpoint, a method, headers, and body or query fields), enter your own credentials directly into that request, and MileApp calls it for every SMS. Ready-made templates for common providers (such as Twilio and GoSMS) give you a head start, but any provider works.

While a gateway is connected, MileApp substitutes just two placeholders at send time — `{recipient}` (the destination phone number) and `{message}` (the SMS text) — and sends everything else exactly as you entered it. Organizations that do not connect a gateway are unaffected: their SMS continues to go through MileApp's default service.

## Where it's used

Once connected, your gateway delivers every SMS MileApp sends on your behalf:

* **OTP component** — the one-time-password SMS sent from a Flow's **OTP** component.
* **Automation notifications** — the SMS sent by an **Automation** notification action.

Both are delivered through your own gateway using your provider's credentials, so **no MileApp SMS credits are deducted** for either.

## Before you begin

Check your provider's "send SMS" API documentation and have these ready:

* The **endpoint URL** it exposes for sending an SMS, and the **HTTP method** it expects (usually `POST`, sometimes `GET`).
* Your **credentials** — an API token, an API key, or a username/password pair — and **where each value belongs** in the request (a header, the URL, or a request field).
* The names of the **fields** your provider expects for the recipient number and the message text (for example `to`/`text`, `msisdn`/`message`, `To`/`Body`).
* The **sender number** or sender ID your provider requires, if any.
* A **test phone number** (in international format, e.g. `+6281234567890`) that can receive one verification SMS.

<Note>
  The endpoint host must be publicly reachable. Private, loopback, and link-local addresses are rejected, and the scheme must be `http` or `https`.
</Note>

## Step 1: Open the SMS Gateway card

1. Go to [Setting ➝ Integration](https://web.mile.app/setting/integration).
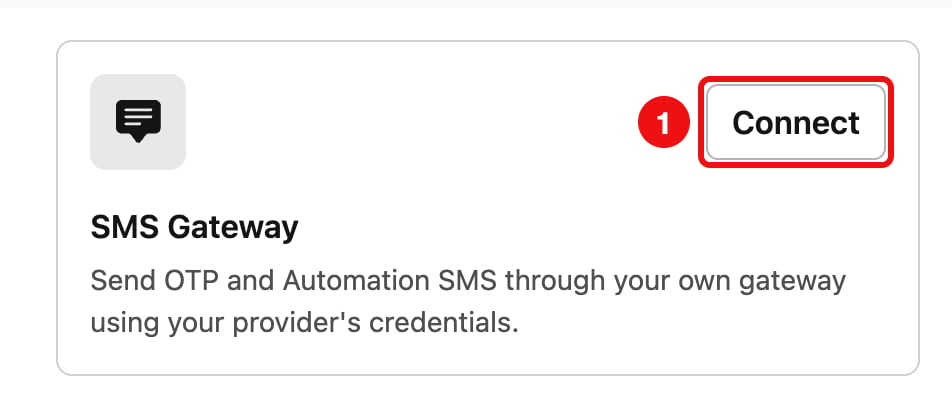
2. Find the **SMS Gateway** card. When no gateway is connected, it shows a **Connect** button.
3. Click **Connect** to open the **Configure SMS Gateway** form.

<div align="center">
  <img src="https://mintcdn.com/mileapp-c1584fbc/R0n-gWqOgowKF6Mj/images/setting/sms-gateway-card-disconnected.png?fit=max&auto=format&n=R0n-gWqOgowKF6Mj&q=85&s=f5faa101bbb8055f69a7d7437a068e8a" alt="SMS Gateway card in the disconnected state with the Connect button" width="600" data-path="images/setting/sms-gateway-card-disconnected.png" />
</div>

<p align="center"><em>The SMS Gateway card before a gateway is connected</em></p>

## Step 2: Choose a starting template and set the endpoint

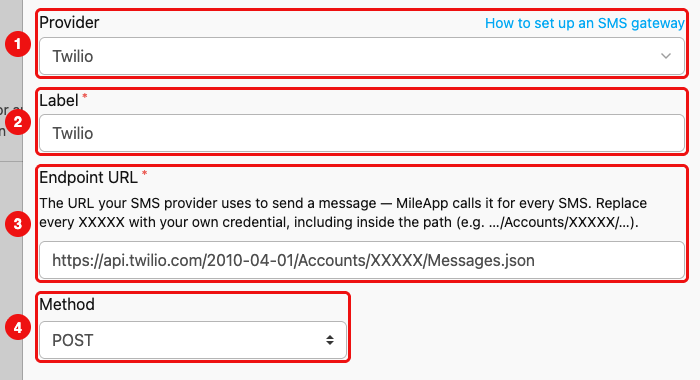
The **Provider** dropdown offers ready-made templates — **Twilio**, **GoSMS Gateway**, and **Other (set up manually)**. A template pre-fills the endpoint, method, and header and body rows with placeholder text (shown as `XXXXX` / `YYYYY`) that you replace with your own values. Pick the template closest to your provider, or **Other** to build the request from scratch. The template is only a starting point — every field stays fully editable.

1. **Provider** — pick a starting template (or **Other** for a fully manual setup).
2. **Label** — a name for this gateway, so you can recognise it later.
3. **Endpoint URL** — the URL MileApp calls to send each SMS. Enter it exactly as your provider's API documents it. If your provider puts a credential or account identifier **in the URL** (some do), place it there and replace the placeholder with your value.
4. **Method** — the HTTP method your provider expects (commonly `POST`; some providers use `GET`).
<div align="center">
  <img src="https://mintcdn.com/mileapp-c1584fbc/R0n-gWqOgowKF6Mj/images/setting/sms-gateway-modal-twilio.png?fit=max&auto=format&n=R0n-gWqOgowKF6Mj&q=85&s=ba8cd34610a063e63bacc6fe1781083b" alt="Configure SMS Gateway form showing the Provider, Label, Endpoint URL, and Method fields" width="600" data-path="images/setting/sms-gateway-modal-twilio.png" />
</div>

<p align="center"><em>Pick a Provider template (1), then set the Label (2), Endpoint URL (3), and Method (4) — replace every placeholder (XXXXX / YYYYY) with your own value</em></p>

<Note>
  Example — the **Twilio** template pre-fills the endpoint as `https://api.twilio.com/2010-04-01/Accounts/XXXXX/Messages.json`. Twilio puts the Account SID in the URL path, so you replace `XXXXX` there with your Account SID (an identifier, not a secret). Most other providers keep the endpoint fixed and put credentials in a header instead — see the next step.
</Note>

## Step 3: Enter your credentials

Credentials go directly into the request — you type each value into the **Headers** and **Body / Query** rows, which are always visible in the form. There is no separate "authentication" section; you put each credential wherever your provider expects it, and tick **Secret** on any sensitive value so it is encrypted at rest and shown blank when you reopen the form.

### Authentication

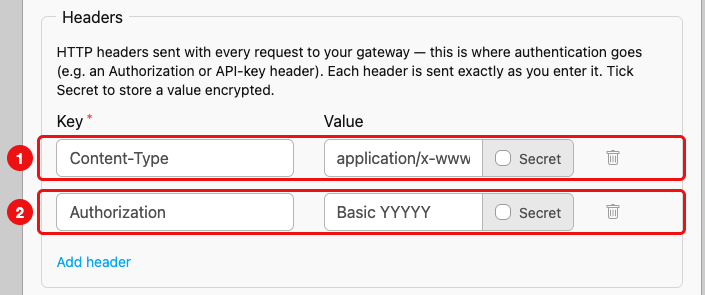
Most providers authenticate with an HTTP **header**. The templates pre-fill an `Authorization` header — replace its placeholder with your credential. MileApp sends every header exactly as you type it, so enter the value in the exact form your provider expects. Tick **Secret** on the credential value so it is encrypted at rest and shown blank when you reopen the form (the checkbox starts unticked, so remember to tick it once you've entered a real credential).

* **Bearer token** — `Authorization: Bearer <your token>`.
* **Basic auth** — `Authorization: Basic <Base64 of username:password>`. You Base64-encode the `username:password` (or, for Twilio, `AccountSID:AuthToken`) **yourself** — MileApp does not encode it for you.
* **API-key header** — a custom header such as `X-API-Key: <your key>`.
* **Query-parameter auth** — some providers (for example a GoSMS-style gateway on a `GET` request) pass credentials as query parameters instead of a header; enter those as **Secret** query rows in the Body / Query section.

The templates also pre-fill a **Content-Type** header at the top of the list — `application/x-www-form-urlencoded` for Twilio, `application/json` otherwise. Leave it as-is unless your provider expects a different content type; it is an ordinary editable header row.

<div align="center">
  <img src="https://mintcdn.com/mileapp-c1584fbc/R0n-gWqOgowKF6Mj/images/setting/sms-gateway-headers-auth.png?fit=max&auto=format&n=R0n-gWqOgowKF6Mj&q=85&s=77afcc11c50beaa3ec05db6c7fc71b23" alt="Headers section with the pre-filled Content-Type and Authorization rows highlighted" width="600" data-path="images/setting/sms-gateway-headers-auth.png" />
</div>

<p align="center"><em>The templates pre-fill a Content-Type header (1) and an Authorization header (2) — replace the Authorization placeholder with your credential and tick Secret</em></p>

### Recipient, message, and other fields

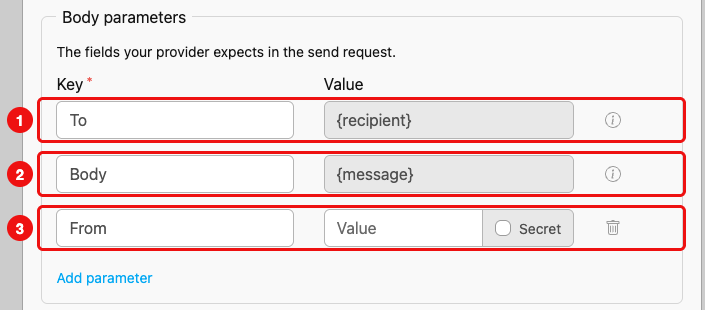
The **Body parameters** (shown as **Query parameters** when the method is `GET`) are the fields sent to your provider. Two rows are **locked** — `{recipient}` and `{message}` — because MileApp fills those at send time and needs both to deliver the SMS. You only set the **key** each one uses, to match your provider's field names. Add your own rows below them for anything else the request needs.

1. **`{recipient}` row** — set its key to your provider's recipient field (for example `to`, `msisdn`, or `To`). The value stays locked to `{recipient}`, and the row has no Secret checkbox.
2. **`{message}` row** — set its key to your provider's message field (for example `text`, `message`, or `Body`). The value stays locked to `{message}`, and the row has no Secret checkbox.
3. **Your own rows** — click **Add parameter** to add any other fields your provider requires, such as a sender number. These rows are fully editable and can be removed; tick **Secret** on any that hold a sensitive value.
<div align="center">
  <img src="https://mintcdn.com/mileapp-c1584fbc/R0n-gWqOgowKF6Mj/images/setting/sms-gateway-body-params.png?fit=max&auto=format&n=R0n-gWqOgowKF6Mj&q=85&s=8750c53e9ef9de9eca24bb50b452607b" alt="Body parameters with the locked recipient and message rows and a user-added sender row" width="600" data-path="images/setting/sms-gateway-body-params.png" />
</div>

<p align="center"><em>The recipient (1) and message (2) rows are locked — you only name their keys; use Add parameter for your own fields (3)</em></p>

<Note>
  `{recipient}` and `{message}` are the only placeholders MileApp substitutes at send time — the destination number and the SMS text. Everything else is sent exactly as you enter it. Tick **Secret** on any header or field value to store it encrypted.
</Note>

## Step 4: Verify and save

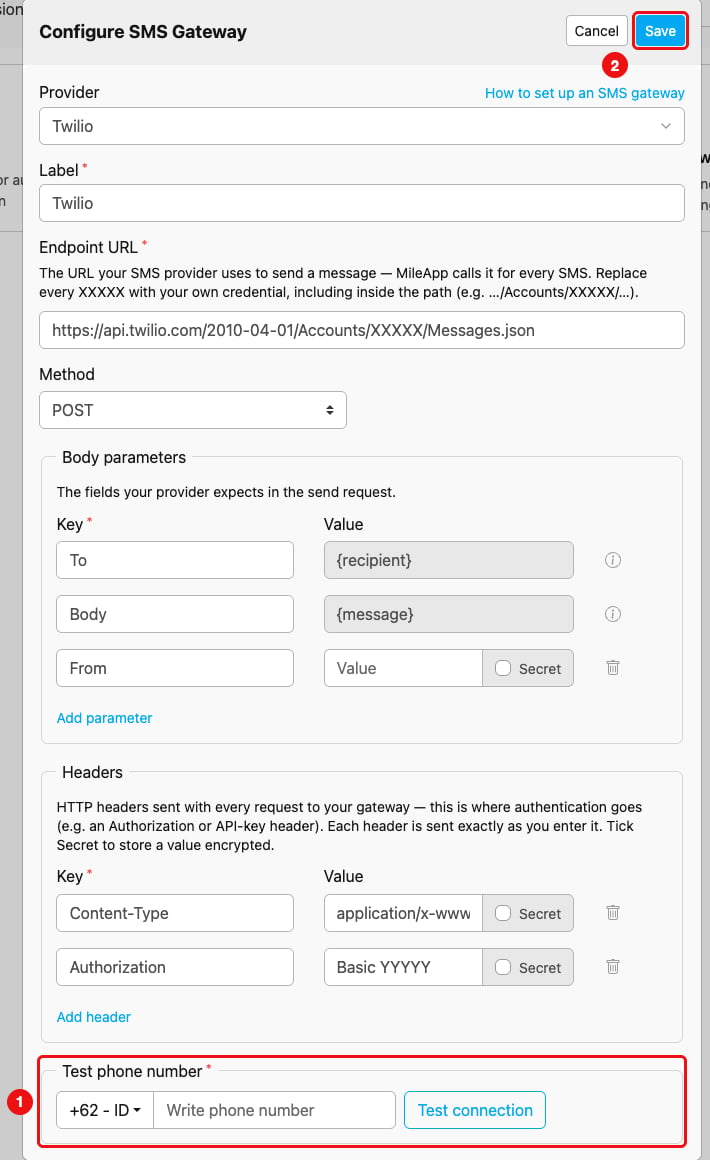
1. Enter a **Test phone number** using the dial-code picker and local number. This field is required.
2. Click **Save**. MileApp sends **one real SMS** to that number through your gateway to verify it works.

<div align="center">
  <img src="https://mintcdn.com/mileapp-c1584fbc/R0n-gWqOgowKF6Mj/images/setting/sms-gateway-test-save.png?fit=max&auto=format&n=R0n-gWqOgowKF6Mj&q=85&s=a5136a6af29749662595d1a86aeb7426" alt="The completed form with the Test phone number field and the Save button highlighted" width="600" data-path="images/setting/sms-gateway-test-save.png" />
</div>

<p align="center"><em>Enter a test number (1), then click Save (2) to verify and connect the gateway</em></p>

<Note>
  The test phone number is used only for verification — it is not stored on the gateway. Verifying does **not** deduct MileApp SMS credits.
</Note>

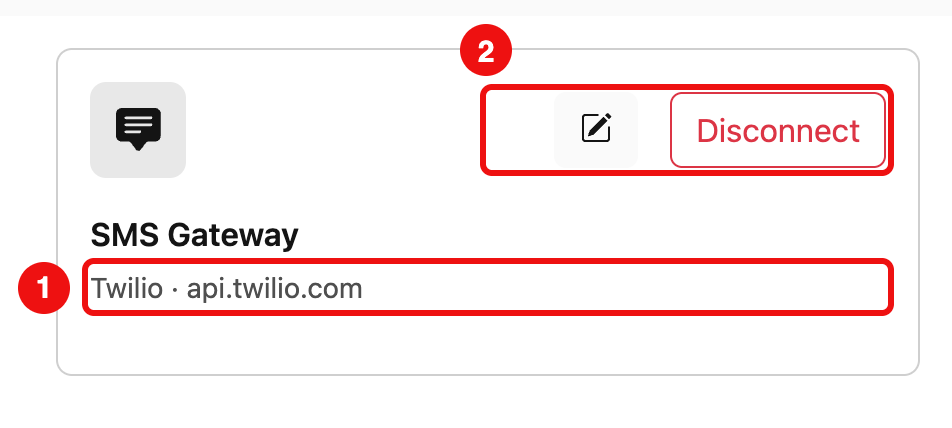
When verification succeeds, the card switches to the connected state and shows your gateway label and endpoint host, with **Edit** and **Disconnect** actions. There is no status badge.

<div align="center">
  <img src="https://mintcdn.com/mileapp-c1584fbc/R0n-gWqOgowKF6Mj/images/setting/sms-gateway-card-connected.png?fit=max&auto=format&n=R0n-gWqOgowKF6Mj&q=85&s=d1542f85fa0fd14cb8e4a720be80fe35" alt="SMS Gateway card in the connected state showing the gateway label and endpoint host with Edit and Disconnect actions" width="600" data-path="images/setting/sms-gateway-card-connected.png" />
</div>

<p align="center"><em>A connected gateway shows its label and endpoint host, with Edit and Disconnect actions</em></p>

## If verification fails

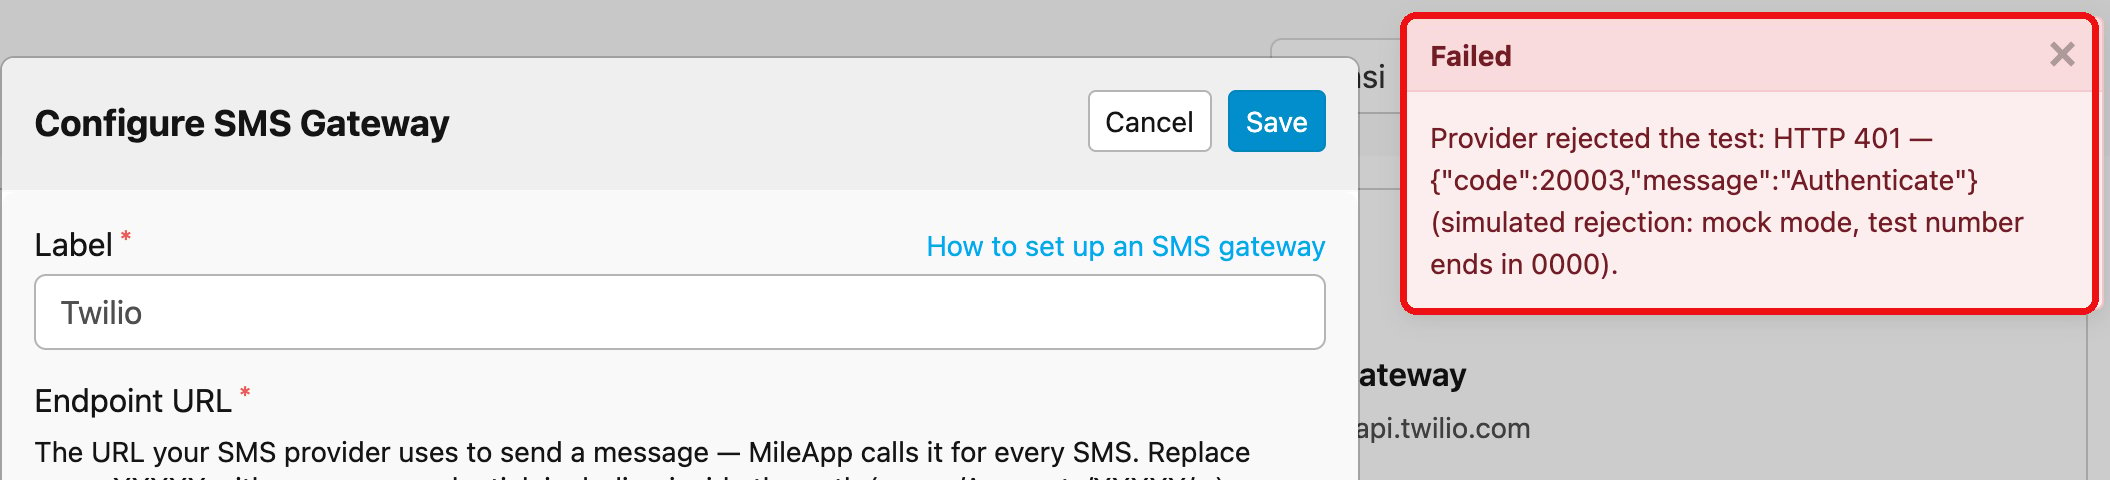
Saving **verifies and blocks on failure**. If your provider rejects the test SMS, the save is blocked, **nothing is saved**, and a red toast shows the provider's raw error. The form stays open so you can correct the value and save again.
<div align="center">
  <img src="https://mintcdn.com/mileapp-c1584fbc/R0n-gWqOgowKF6Mj/images/setting/sms-gateway-verify-failed.png?fit=max&auto=format&n=R0n-gWqOgowKF6Mj&q=85&s=4d05d5815cbe2cbfa05c2c9a6d3e29ac" alt="A red Failed toast showing the provider's raw error while the Configure SMS Gateway form stays open" width="600" data-path="images/setting/sms-gateway-verify-failed.png" />
</div>

<p align="center"><em>When verification fails, the provider's error is shown and the form stays open — nothing is saved</em></p>

Common causes are a wrong credential in the endpoint or a header, an authentication value in the wrong format (for example an unencoded Basic-auth header), a recipient or message field named differently from what your provider expects, or a sender number your provider does not accept. Fix the offending field and click **Save** again.

## Editing a gateway

Click the **edit** (pencil) icon on the connected card. The form reopens with your saved configuration. Any value marked **Secret** appears blank: **leave it blank to keep the stored secret**, or type a new value to replace it. Saving re-verifies the gateway exactly like the initial connection.

## Disconnecting a gateway

Click **Disconnect** and confirm. Your SMS will be sent through MileApp's default service again, and MileApp credits will be charged as usual.

## Notes

1. **Billing** — while a gateway is connected, OTP and Automation SMS go through your endpoint and **no MileApp credits are deducted**. Organizations without a gateway are charged as usual.

2. **No silent fallback** — if your gateway is connected but a send fails, the SMS fails rather than reverting to MileApp's default service. Fix the configuration or disconnect the gateway to return to the default service.

3. **Security** — the endpoint host must be publicly reachable (private, loopback, and link-local addresses are rejected) and the scheme must be `http` or `https`. Secret values are encrypted at rest and are never shown again after saving.

<Warning>
  Every save or edit sends one real SMS through your provider to verify the gateway, so saving is slightly slower than a plain form save — and a failed verification blocks the save entirely.
</Warning>