> ## Documentation Index
> Fetch the complete documentation index at: https://docs.mileapp.dev/llms.txt
> Use this file to discover all available pages before exploring further.
# Activity in Task
An **Activity** is a way to run a multi-step process as a single, connected group of tasks. Each Activity is created from a **Workflow** — a reusable template, configured in the Flow menu, that defines the steps that should run together. When you create an Activity, MileApp creates one task per Workflow step in one go and groups them under a single parent.
## Understanding Activity
* **Activity (main task)** — the parent row that represents the whole multi-step process. Its title is the Workflow's name.
* **Step task (subtask)** — one task per Workflow step, listed under the parent Activity in the order the Workflow defines.
* **Workflow** — the template that lists the steps, the Flow each step uses, and any field mappings that copy data from one step to the next. Workflows are configured in the Flow menu.
A single Workflow can have up to 10 steps, and step tasks always belong to exactly one Activity — they cannot exist on their own.
## Creating an Activity
### Step 1: Open the Create Activity form
Go to the **Task** menu, then open the **New** dropdown and choose **Activity**.
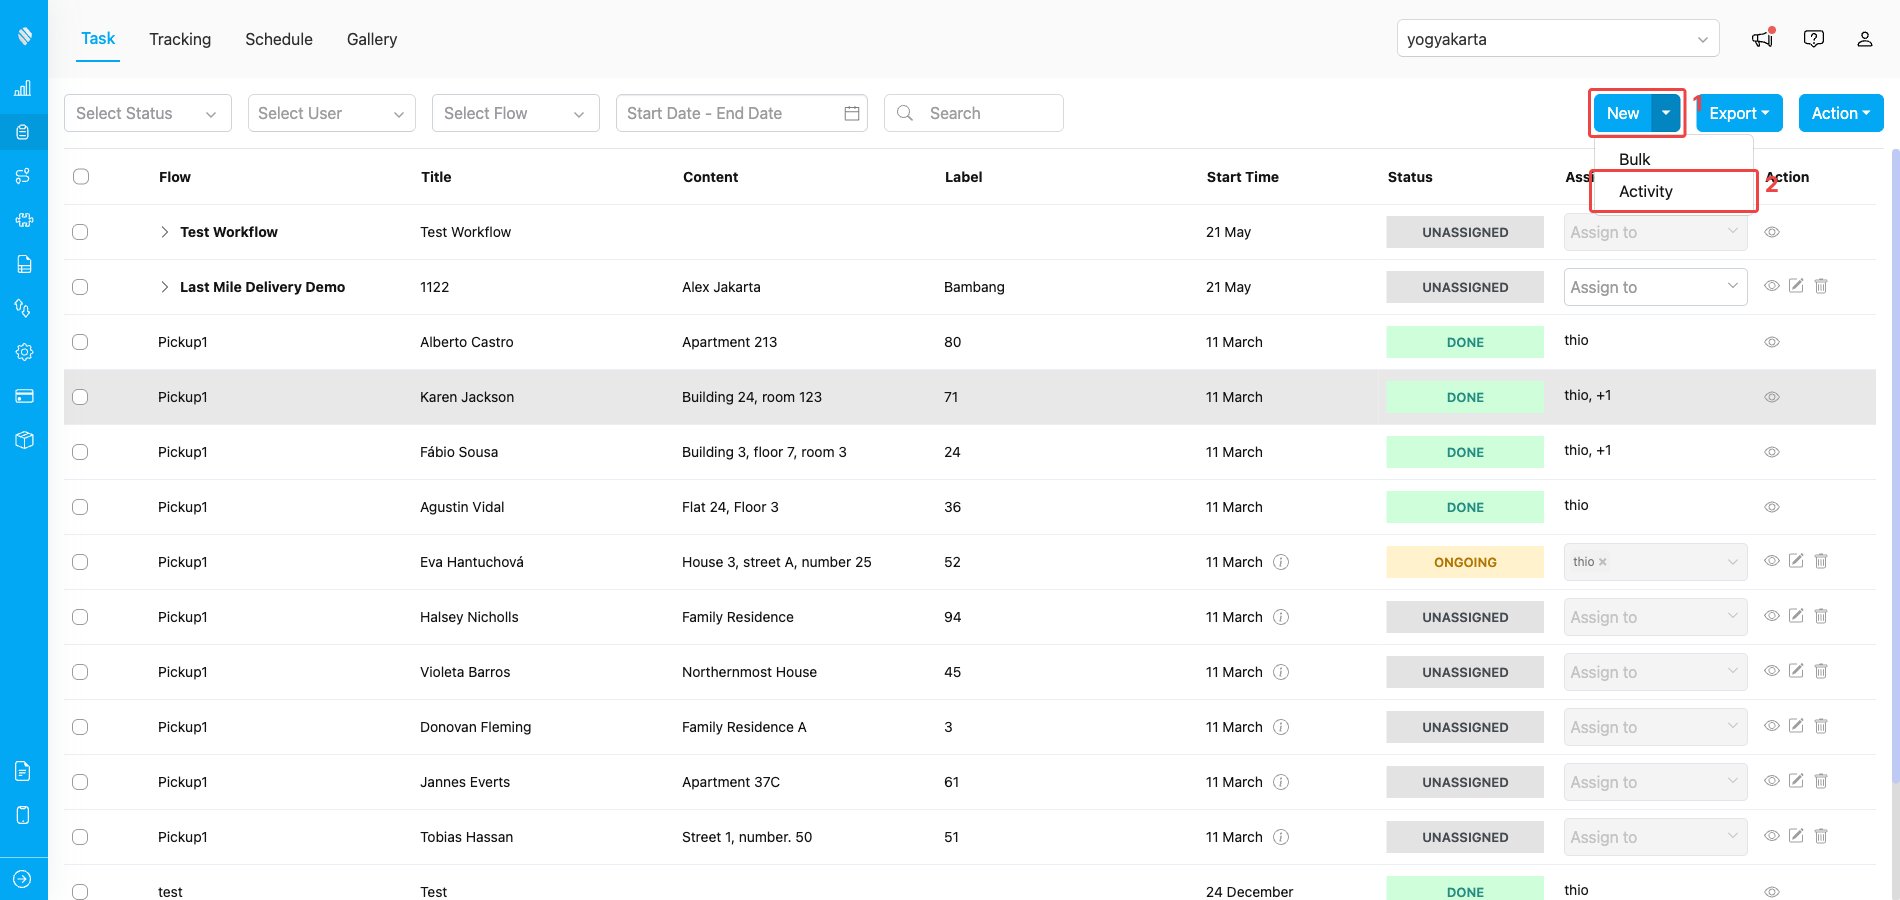
Opening the Create Activity form from the Task page
1. **New** — click the dropdown arrow next to the **New** button at the top-right of the Task page.
2. **Activity** — pick the **Activity** option from the dropdown to open the Create Activity form.
### Step 2: Select a Workflow
The Create Activity modal opens with one field at the top: a Workflow dropdown. Pick the Workflow you want to run.
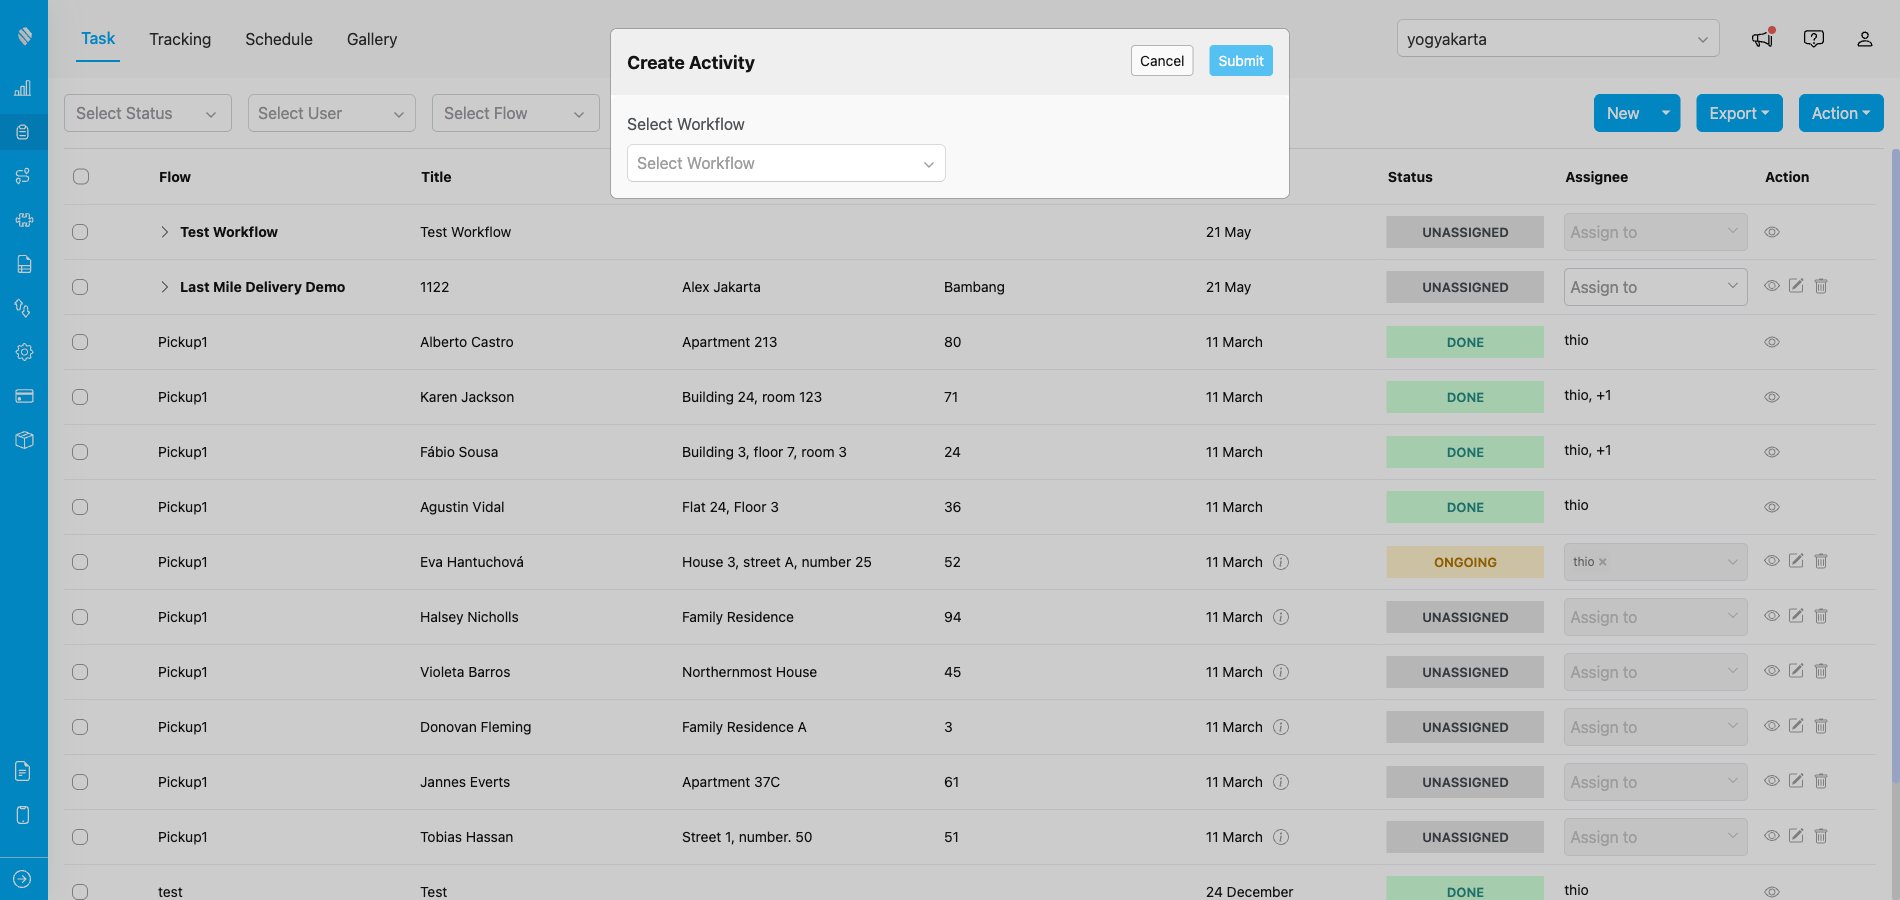
The Create Activity modal — only the Workflow dropdown is visible until you pick one
Clicking the dropdown lists every Workflow available in your organization. Pick the one whose steps match the process you want to run.
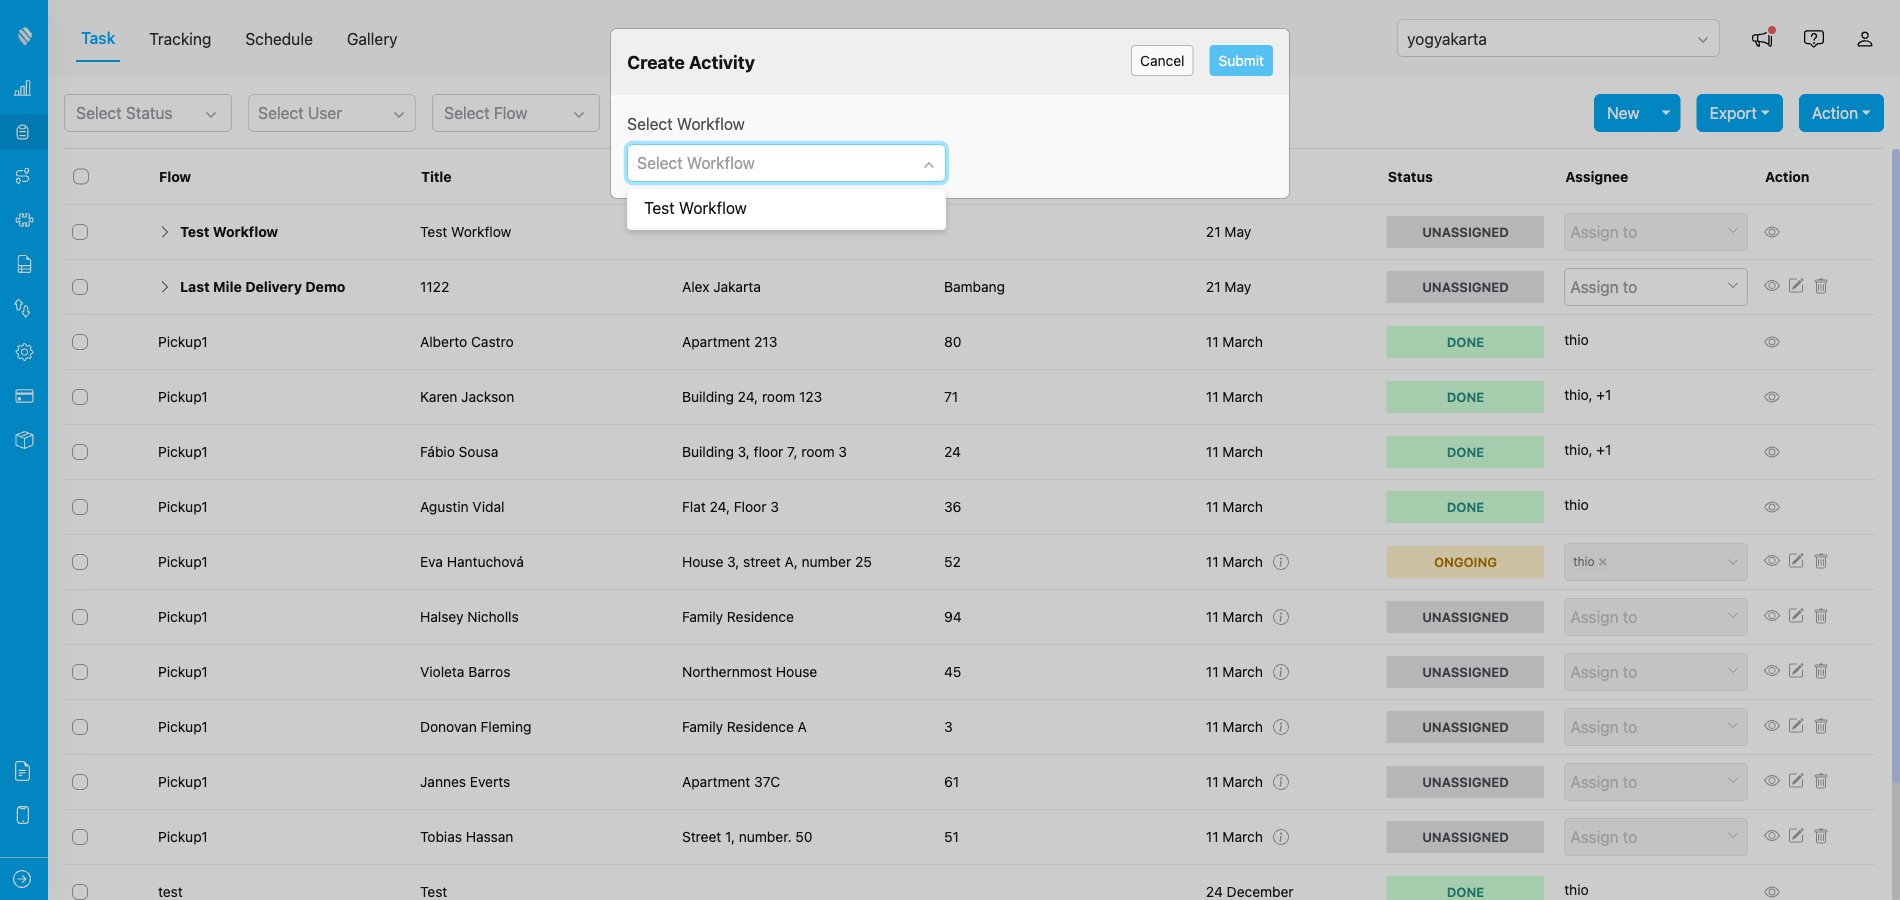
Workflow dropdown showing the Workflows you can choose
### Step 3: Fill in the step form
Once you pick a Workflow, the form expands and shows **one section per step**, in the order defined by the Workflow. For each step you fill in:
* The fields from the step's Flow (any field already covered by a Workflow field mapping is pre-filled with the value from the earlier step).
* **Start time** and **End time** — when that step's task should run.
* **Assignee** — the user who should own that step's task (optional; can be left empty and assigned later).
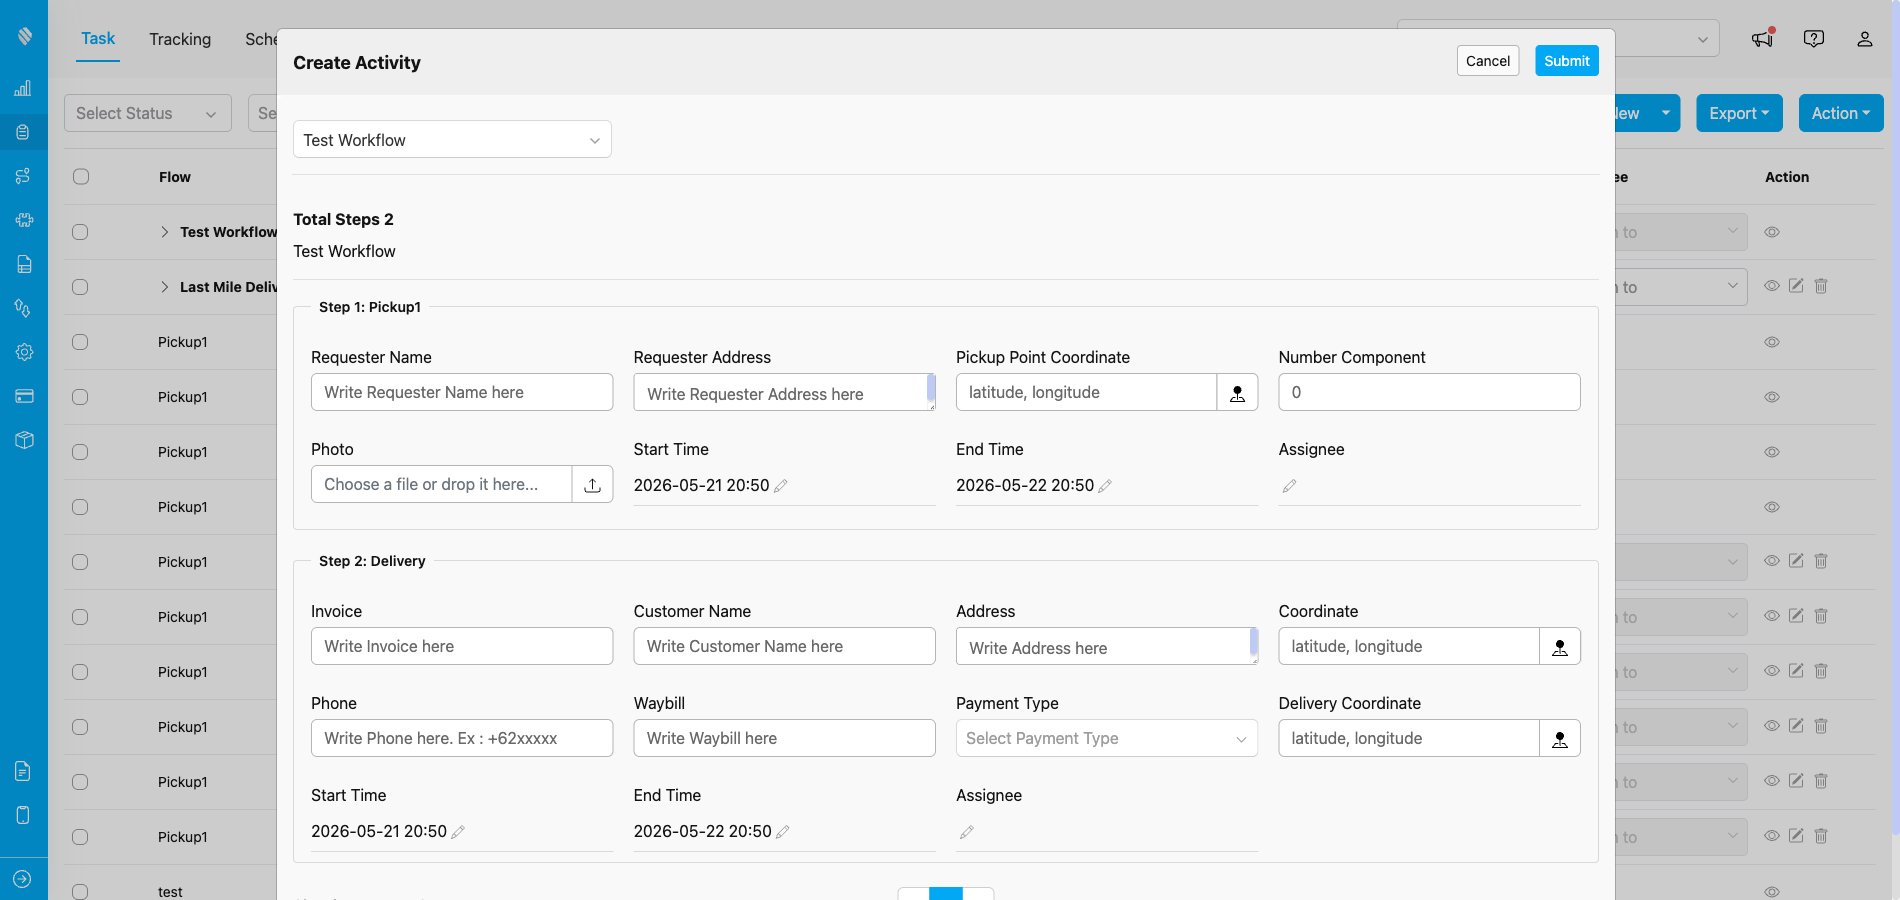
Multi-step form showing every Workflow step on one screen — here, Step 1: Pickup1 and Step 2: Delivery
### Step 4: Submit the Activity
Click **Submit** to create the Activity. MileApp creates the parent Activity together with one task per Workflow step in a single operation, and a confirmation toast appears.
The parent Activity's **Start time** and **End time** are calculated automatically — the earliest start time and the latest end time across all step tasks. The Activity status is **Ongoing** if at least one step has an assignee; otherwise it stays **Unassigned**.
## Viewing Activities in the Task List
### Activity row (collapsed)
In the Task list, each Activity is represented by a single parent row that can be expanded to reveal its step tasks underneath.
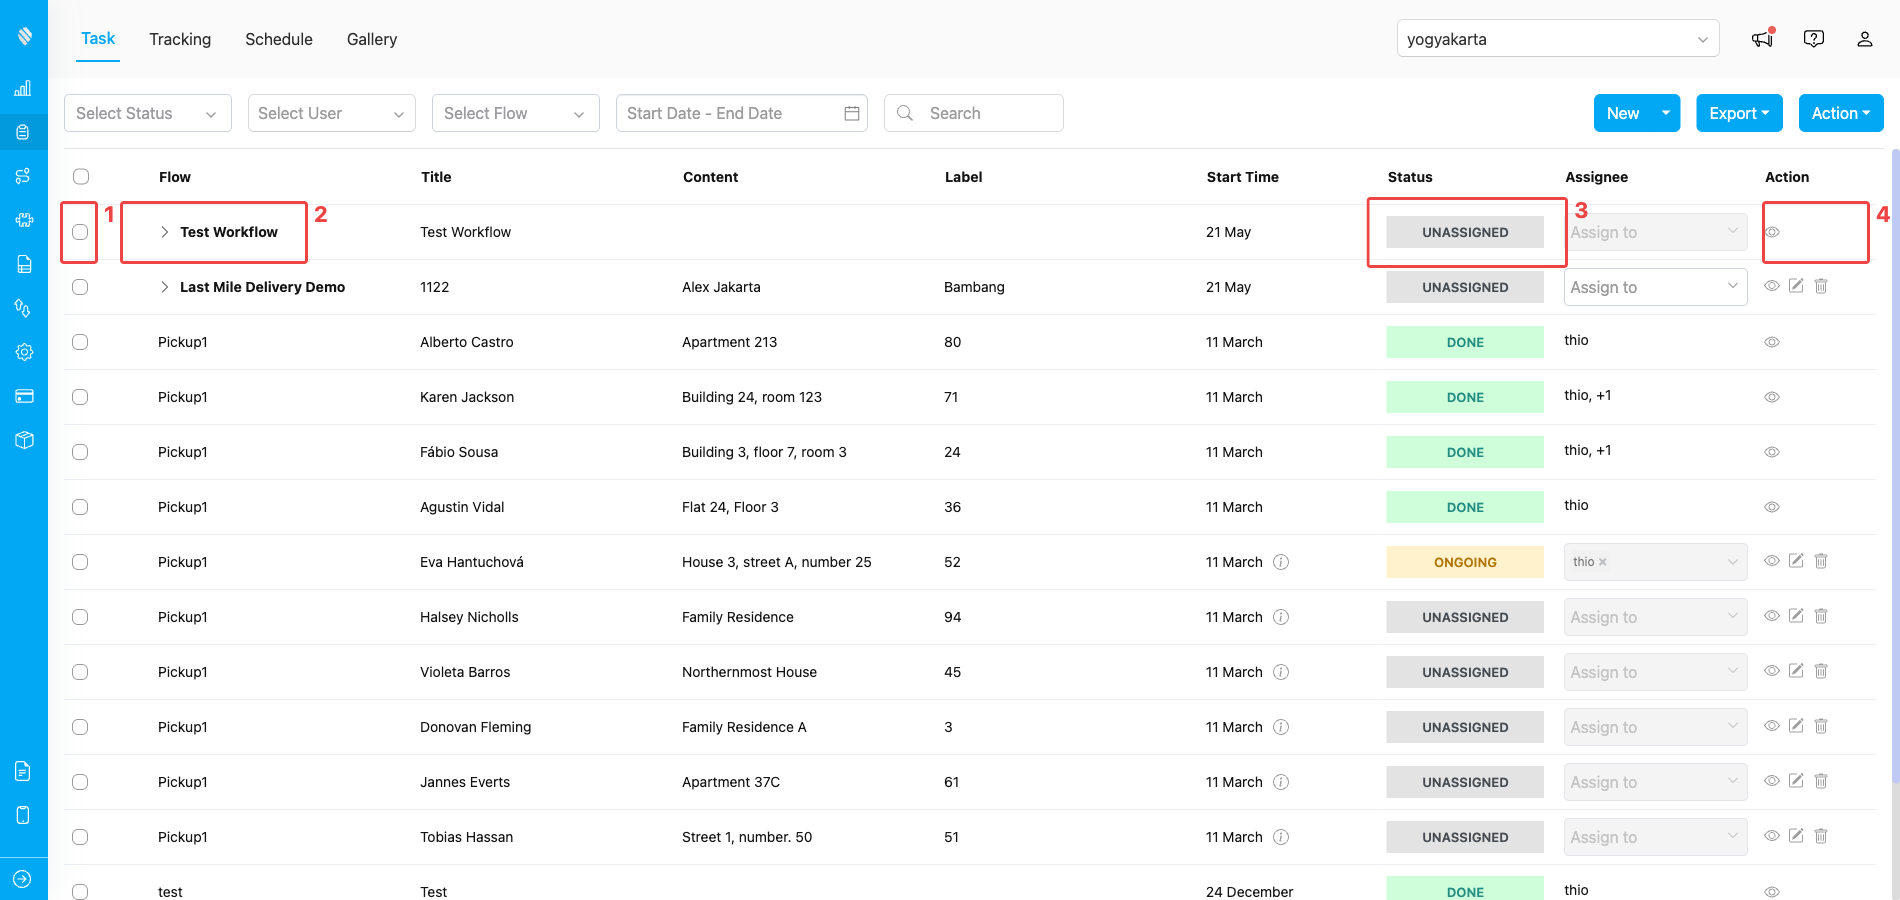
How a collapsed Activity row looks in the Task list
1. **Row selector** — the checkbox at the left of the row, used to select the Activity for bulk actions.
2. **Workflow name with chevron (►)** — the Activity title is the Workflow's name. Click the chevron icon next to the name to expand or collapse the step tasks under it.
3. **Status** — the overall status of the Activity, aggregated from its step tasks.
4. **Row actions** — the action icons on the right of the row (e.g., the eye icon to view the Activity).
The same row also reports the **Start time** (earliest start time across all step tasks) and the **Assignee** (combined list of assignees from every step).
### Activity row (expanded)
Click the chevron (►) next to the Workflow name to expand the row. The step tasks appear indented underneath the parent, in the order defined by the Workflow.
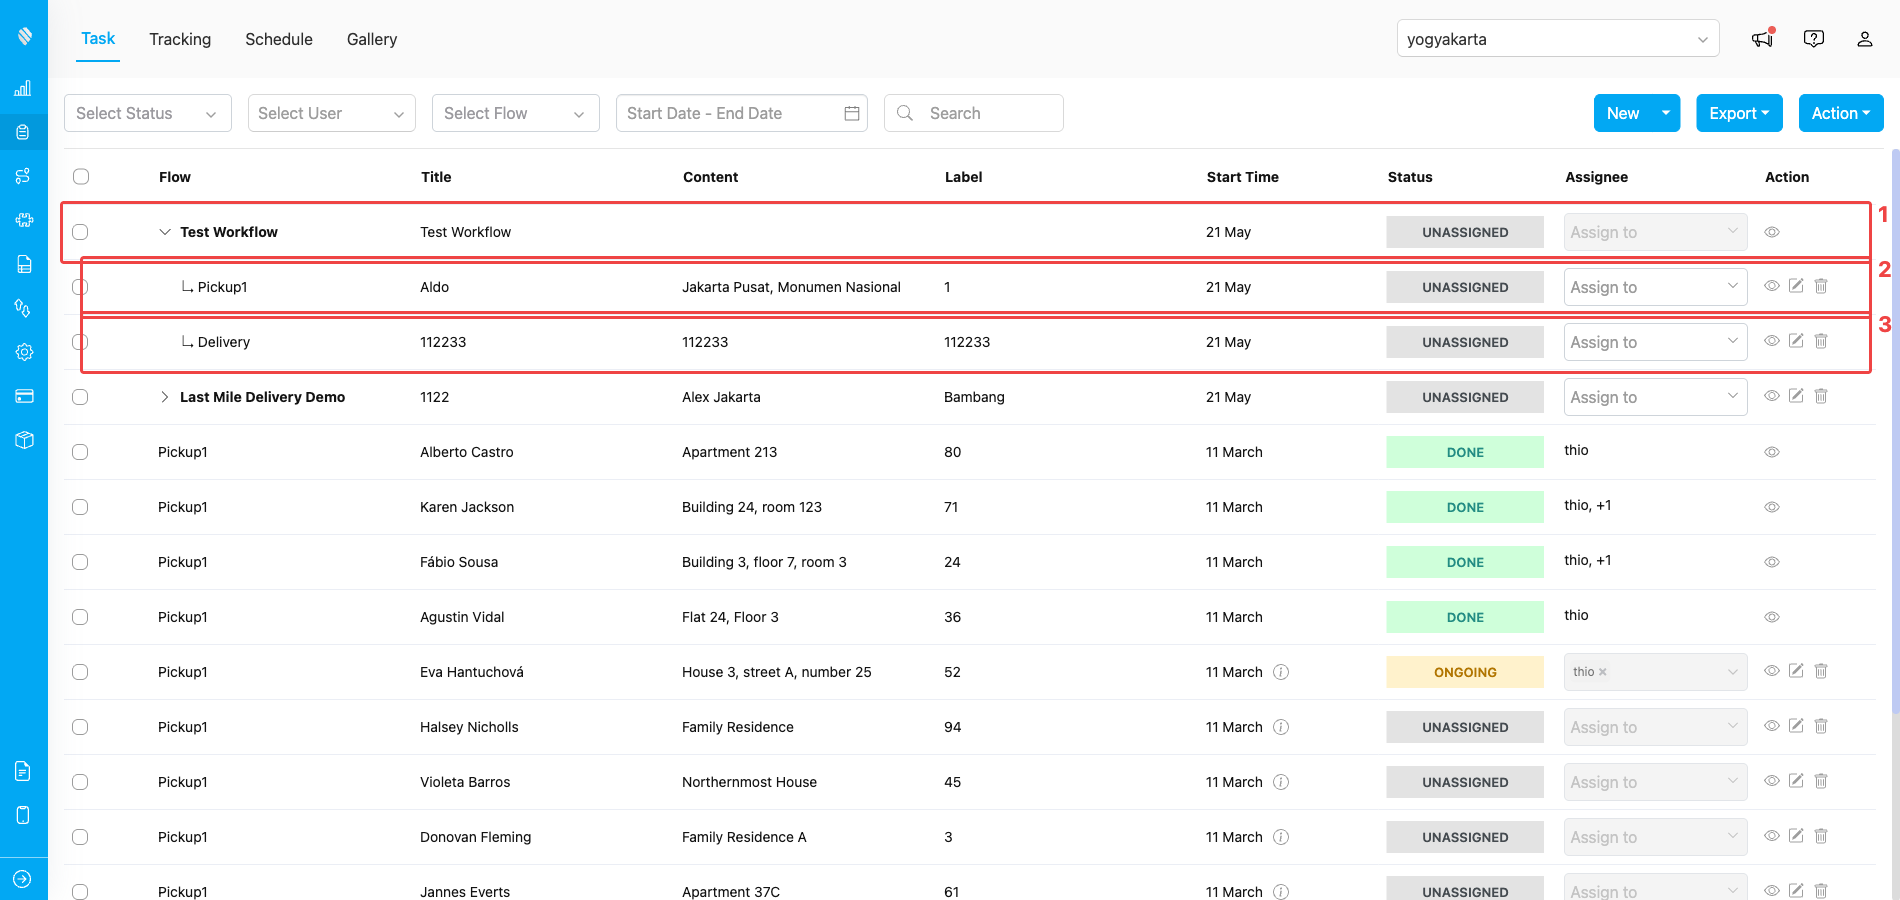
An expanded Activity revealing the step tasks underneath
1. **Parent Activity row** — the row whose Flow column shows the Workflow name. Click the chevron again to collapse the group.
2. **Step 1 task** — the first step task, indented with an `↳` marker under the parent.
3. **Step 2 task** — the next step task, also indented under the same parent.
Each step task row carries its own Flow name, schedule, status, assignee, and row actions, so you can interact with each step independently.
## Viewing Activity Details
Click the eye icon on the Activity row or on any step task row to open the **Detail Task** dialog.
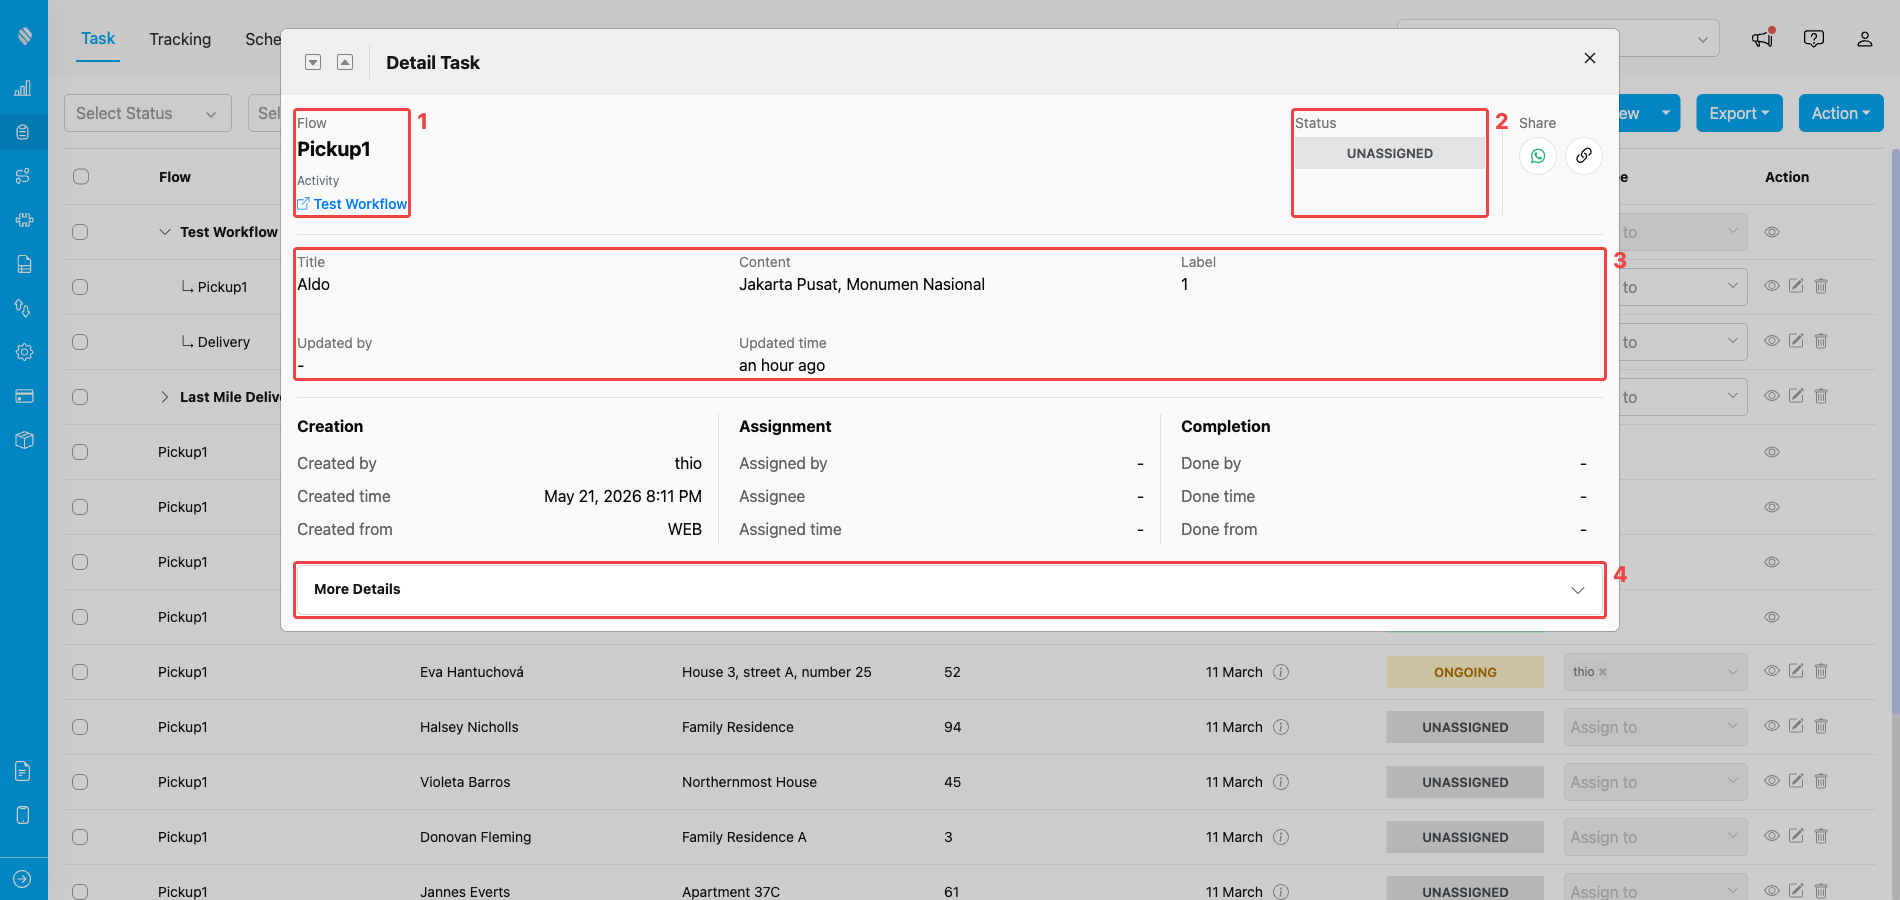
Detail Task dialog opened for a step task in an Activity
1. **Flow + Activity link** — the Flow name of the step task, plus a link back to the parent Activity (the Workflow name). Click the link to jump to the parent Activity.
2. **Status** — the current status badge of this step task.
3. **Field data area** — the captured field values for this step task, plus *Updated by* and *Updated time*.
4. **More Details toggle** — click to expand the lower section that contains the Field, History, and Other tabs.
Below the field data area, the dialog also shows three side-by-side blocks of metadata:
* **Creation** — *Created by*, *Created time*, *Created from*.
* **Assignment** — *Assigned by*, *Assignee*, *Assigned time*.
* **Completion** — *Done by*, *Done time*, *Done from* (filled in only after the step task is completed).
When you open a step task, you can also jump to the previous or next step of the same Activity using the up/down caret icons in the dialog's header.
### More Details
Click **More Details** to expand the lower section. It shows a tab bar followed by a panel for the active tab.
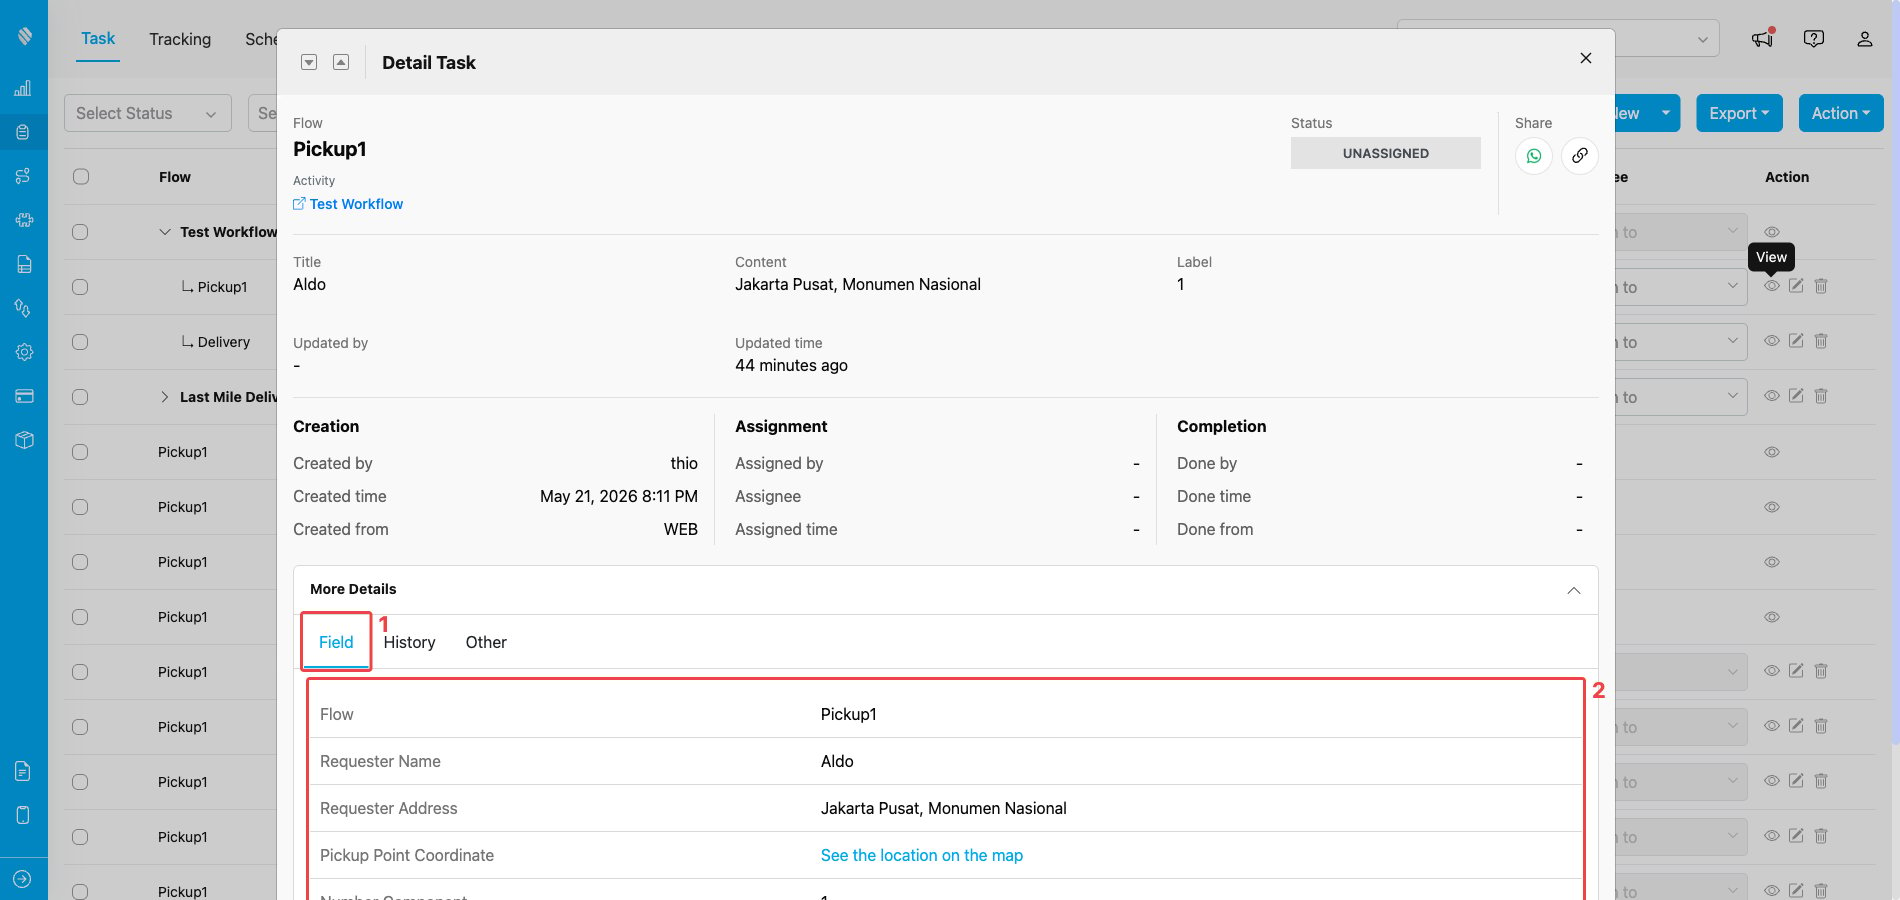
More Details expanded with the Field tab selected
1. **Tab bar** — three tabs you can switch between: **Field**, **History**, and **Other**.
2. **Field panel** — when the **Field** tab is selected, this panel lists every Flow field captured on the step task with its label and stored value.
The three tabs are:
* **Field** — all the Flow fields captured on the step task and their current values.
* **History** — a timeline of events recorded for this step task (creation, assignment, status changes, edits, completion).
* **Other** — extra metadata such as related identifiers and additional system fields.
Switching to the **History** tab replaces the Field panel with the timeline panel.
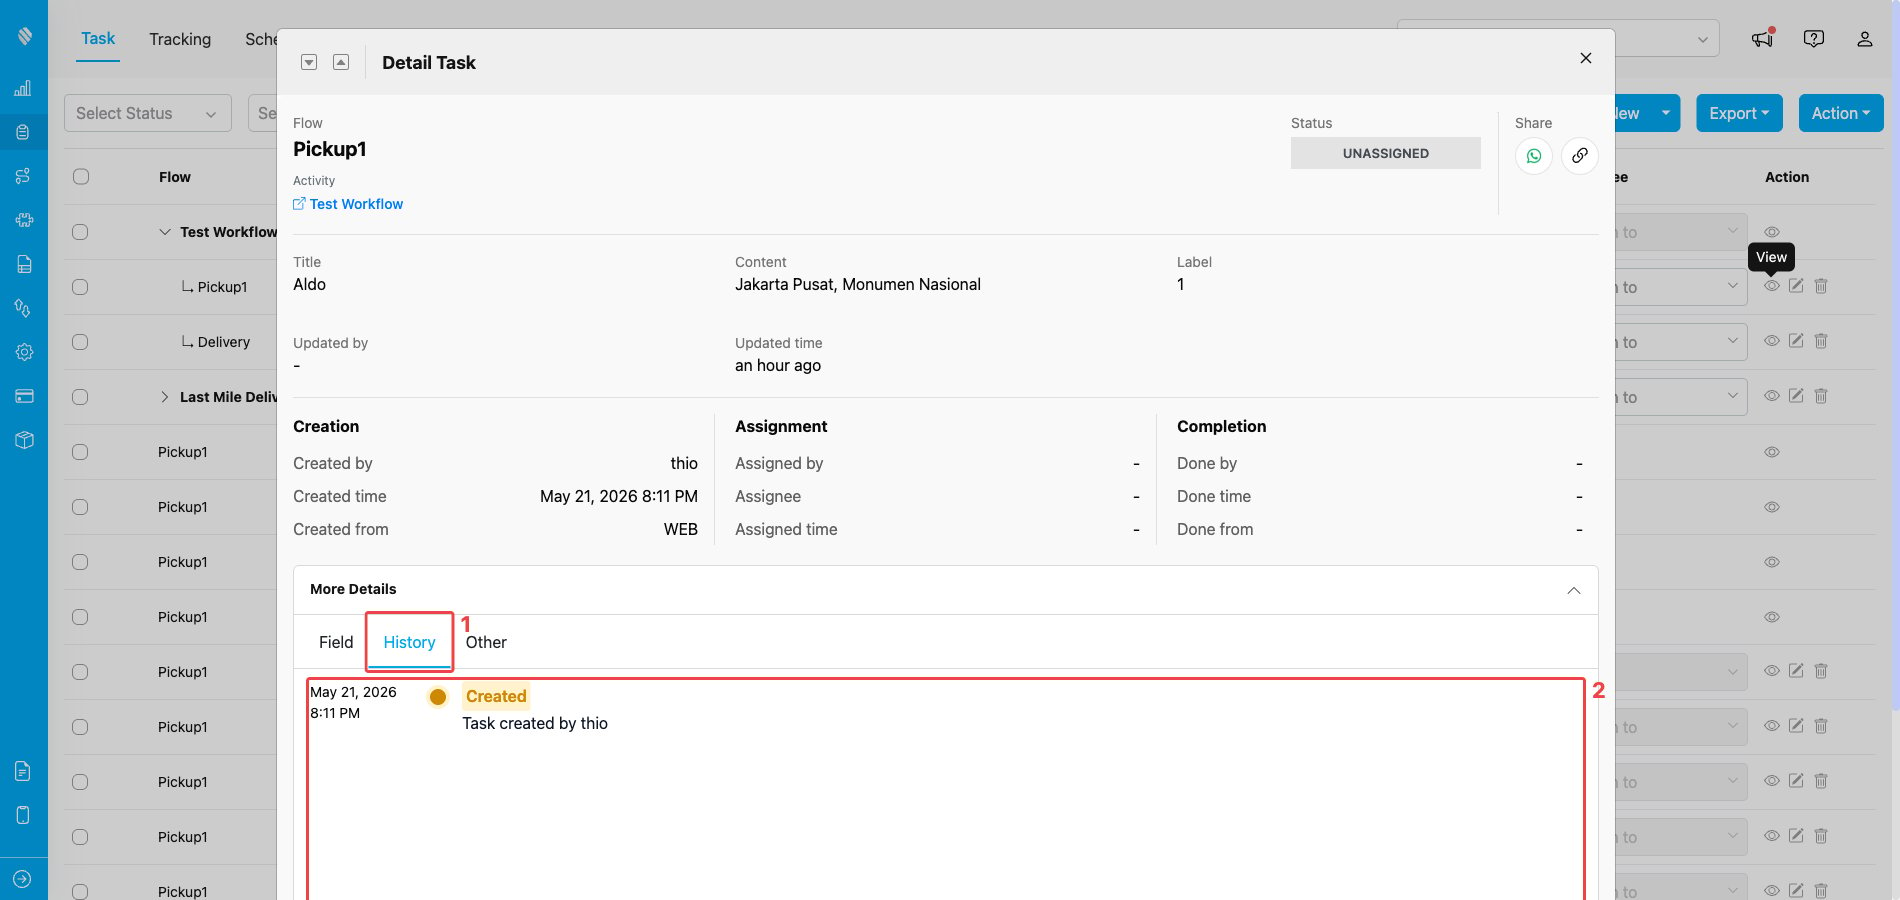
More Details with the History tab open, showing the recorded events for the step task
1. **History tab** — selected (highlighted in blue). Click any other tab to switch back.
2. **Timeline panel** — each entry shows a timestamp, the event type (for example *Created*), and a short description of what happened.
## Managing Step Tasks
Each step task row in the expanded Activity view has its own action icons:
* **View** — open the step task's detail dialog.
* **Edit** — open the edit modal to change the step task's fields, schedule, or assignee.
* **Delete** — open the deletion confirmation for the whole Activity (step tasks cannot be deleted individually).
* **Do Task** — open the task execution view to complete the step task directly from the web.
### Editing a step task
Each step task carries its own schedule and assignee, so you can edit a step task's **Start time**, **End time**, and **Assignee** independently of the other steps — unlike subtasks created from a Subflow, which inherit those fields from the parent.
When you change a step task's start time or end time, the parent Activity's overall start time and end time are recalculated automatically.
### Updating step status
Step tasks must be completed in the order defined by the Workflow: step N can only be marked **Done** after step N-1 is already **Done**. If you try to complete a step out of order, the system rejects the action and shows an error pointing to the step that still needs to be completed first.
### Deleting a step task
Step tasks cannot be deleted by themselves. Clicking the trash icon — either on a step task row or on the parent Activity row — opens the same confirmation dialog, which lists every task in the Activity. Confirming removes the parent Activity together with all of its step tasks in one action.
## Frequently Asked Questions
**Q: Where do I create or edit the Workflow used by an Activity?**
A: Workflows are configured in the Flow menu. Each Workflow defines the sequence of steps, the Flow used by each step, and any field mappings that copy data between steps.
**Q: Can I change the Workflow of an existing Activity?**
A: No. The Workflow is fixed at creation time. If you need a different sequence of steps, create a new Activity using the Workflow you want.
**Q: Can different steps of the same Activity be assigned to different users?**
A: Yes. Each step task has its own assignee, schedule, and status, so different team members can own different steps of the same Activity.
**Q: Why can't I mark a later step as Done first?**
A: Activities run their steps in order — step N can only be completed after step N-1 is Done. This ensures the workflow progresses through every required stage.
**Q: Can I delete a single step task without deleting the whole Activity?**
A: No. Step tasks cannot be deleted independently. Clicking the trash icon on either a step task row or the parent Activity row opens the same confirmation dialog that removes the entire Activity together with all its step tasks.
**Q: Can I delete the Workflow used by an active Activity?**
A: No. A Workflow cannot be deleted while there are active Activities that reference it. Complete or delete those Activities first, then remove the Workflow.
**Q: My Activity isn't showing up in the Task list — what should I check?**
A: First make sure the filter bar (Status, User, Flow, Date range, Search) isn't excluding it. If the create operation didn't return a success message, the Activity may not have been created — try again from the Create Activity modal.
## Related
* [Introduction to Workflow](/pages/workflow/introduction-to-workflow)
* [Building Workflow](/pages/workflow/building-workflow)
* [Managing Workflow](/pages/workflow/managing-workflow)
* [Subflow in Task](/pages/task/creating-task/subflow-in-task)
* [Subpage in Task](/pages/task/creating-task/subpage-in-task)
* [Component: Subflow](/pages/flow/flow-builder/component-subflow)
* [Creating a Task](/pages/task/creating-task/manual-task-input/manual-task-input)
* [Flow Components Overview](/pages/flow/flow-builder/introduction)