> ## Documentation Index
> Fetch the complete documentation index at: https://docs.mileapp.dev/llms.txt
> Use this file to discover all available pages before exploring further.
# Bulk Import Task
Bulk Import Task allows you to create multiple tasks at once by uploading an Excel spreadsheet. Instead of creating tasks one by one, you can prepare your task data in a spreadsheet and import them all in a single operation — supporting up to 1,000 tasks per import.
You can choose how you want to import:
* **Use our template** — Download a ready-made spreadsheet for your flow, fill in your data, and upload it back.
* **Use your own spreadsheet** — Upload your existing Excel file and map each column to the corresponding task field using the column mapping tool.
* **Enter manually** — Skip the file upload and enter task data manually.
Required permission:
* View Task
* Create Task
## Getting Started
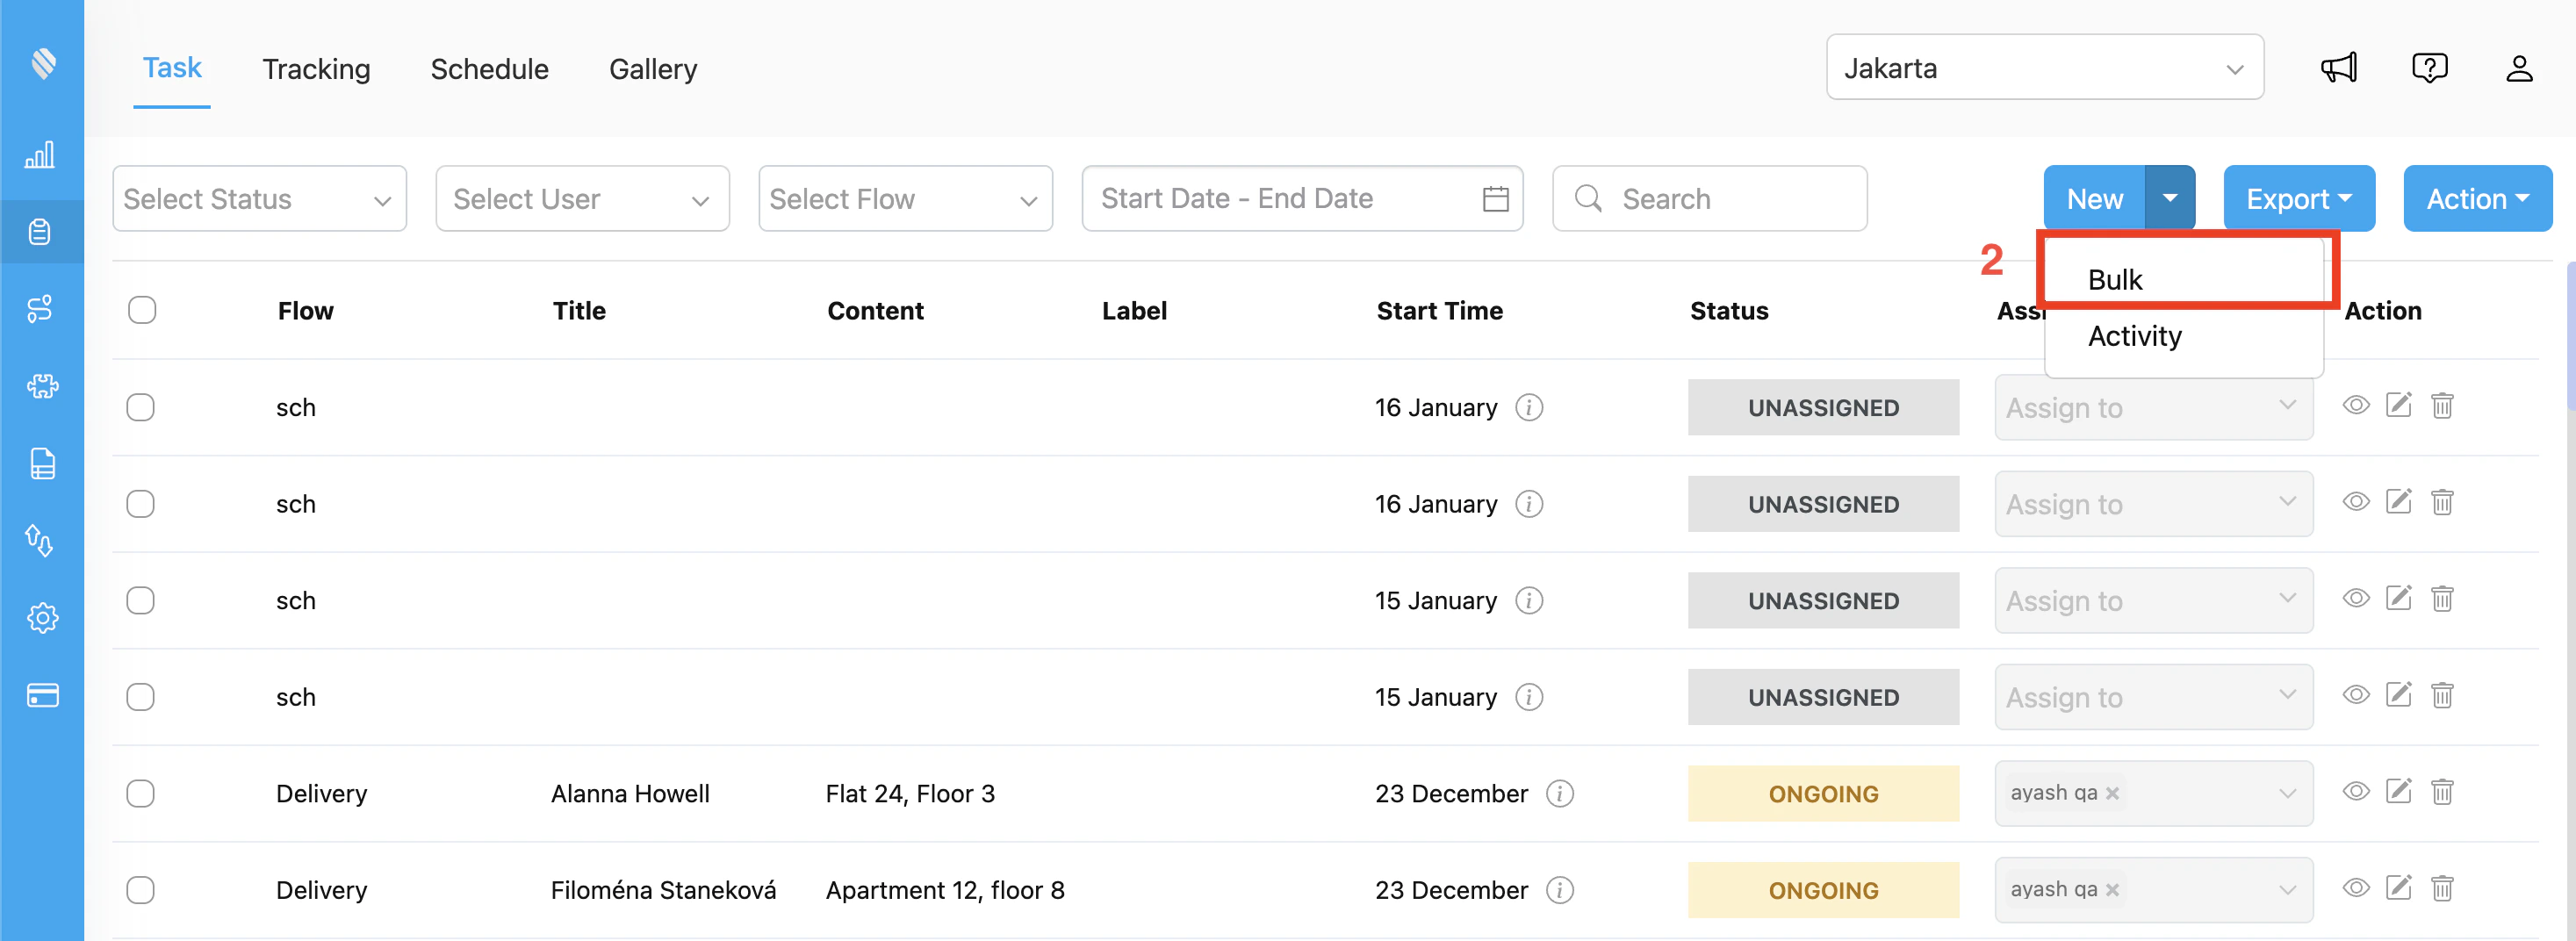
1. Go to the **Task** page.
2. Click the **arrow button** next to the New button, then click **Bulk** button.
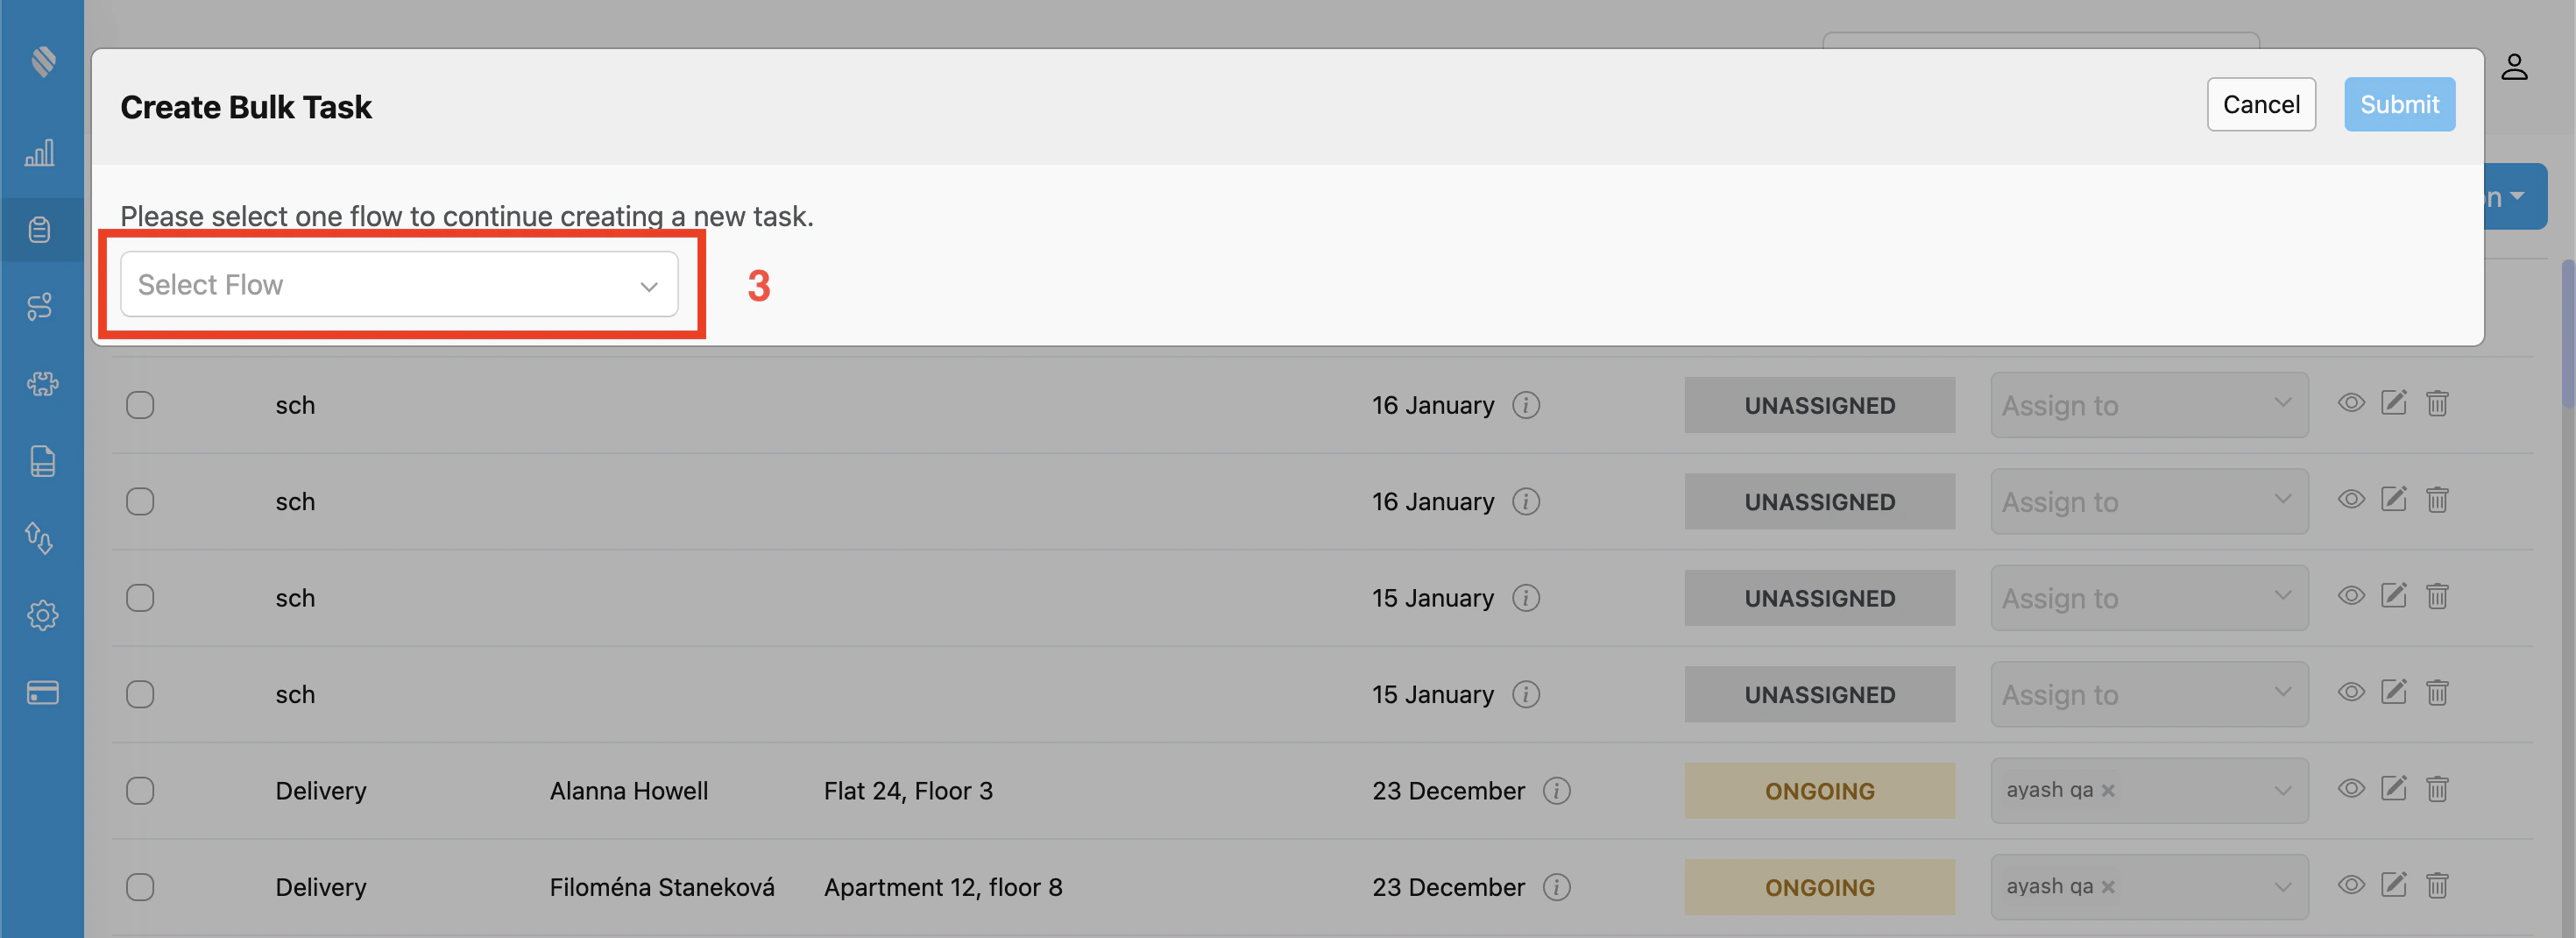
3. Choose the **Task Flow** you want to use. This determines which fields are available for your tasks.
## Step 1: Upload Your File
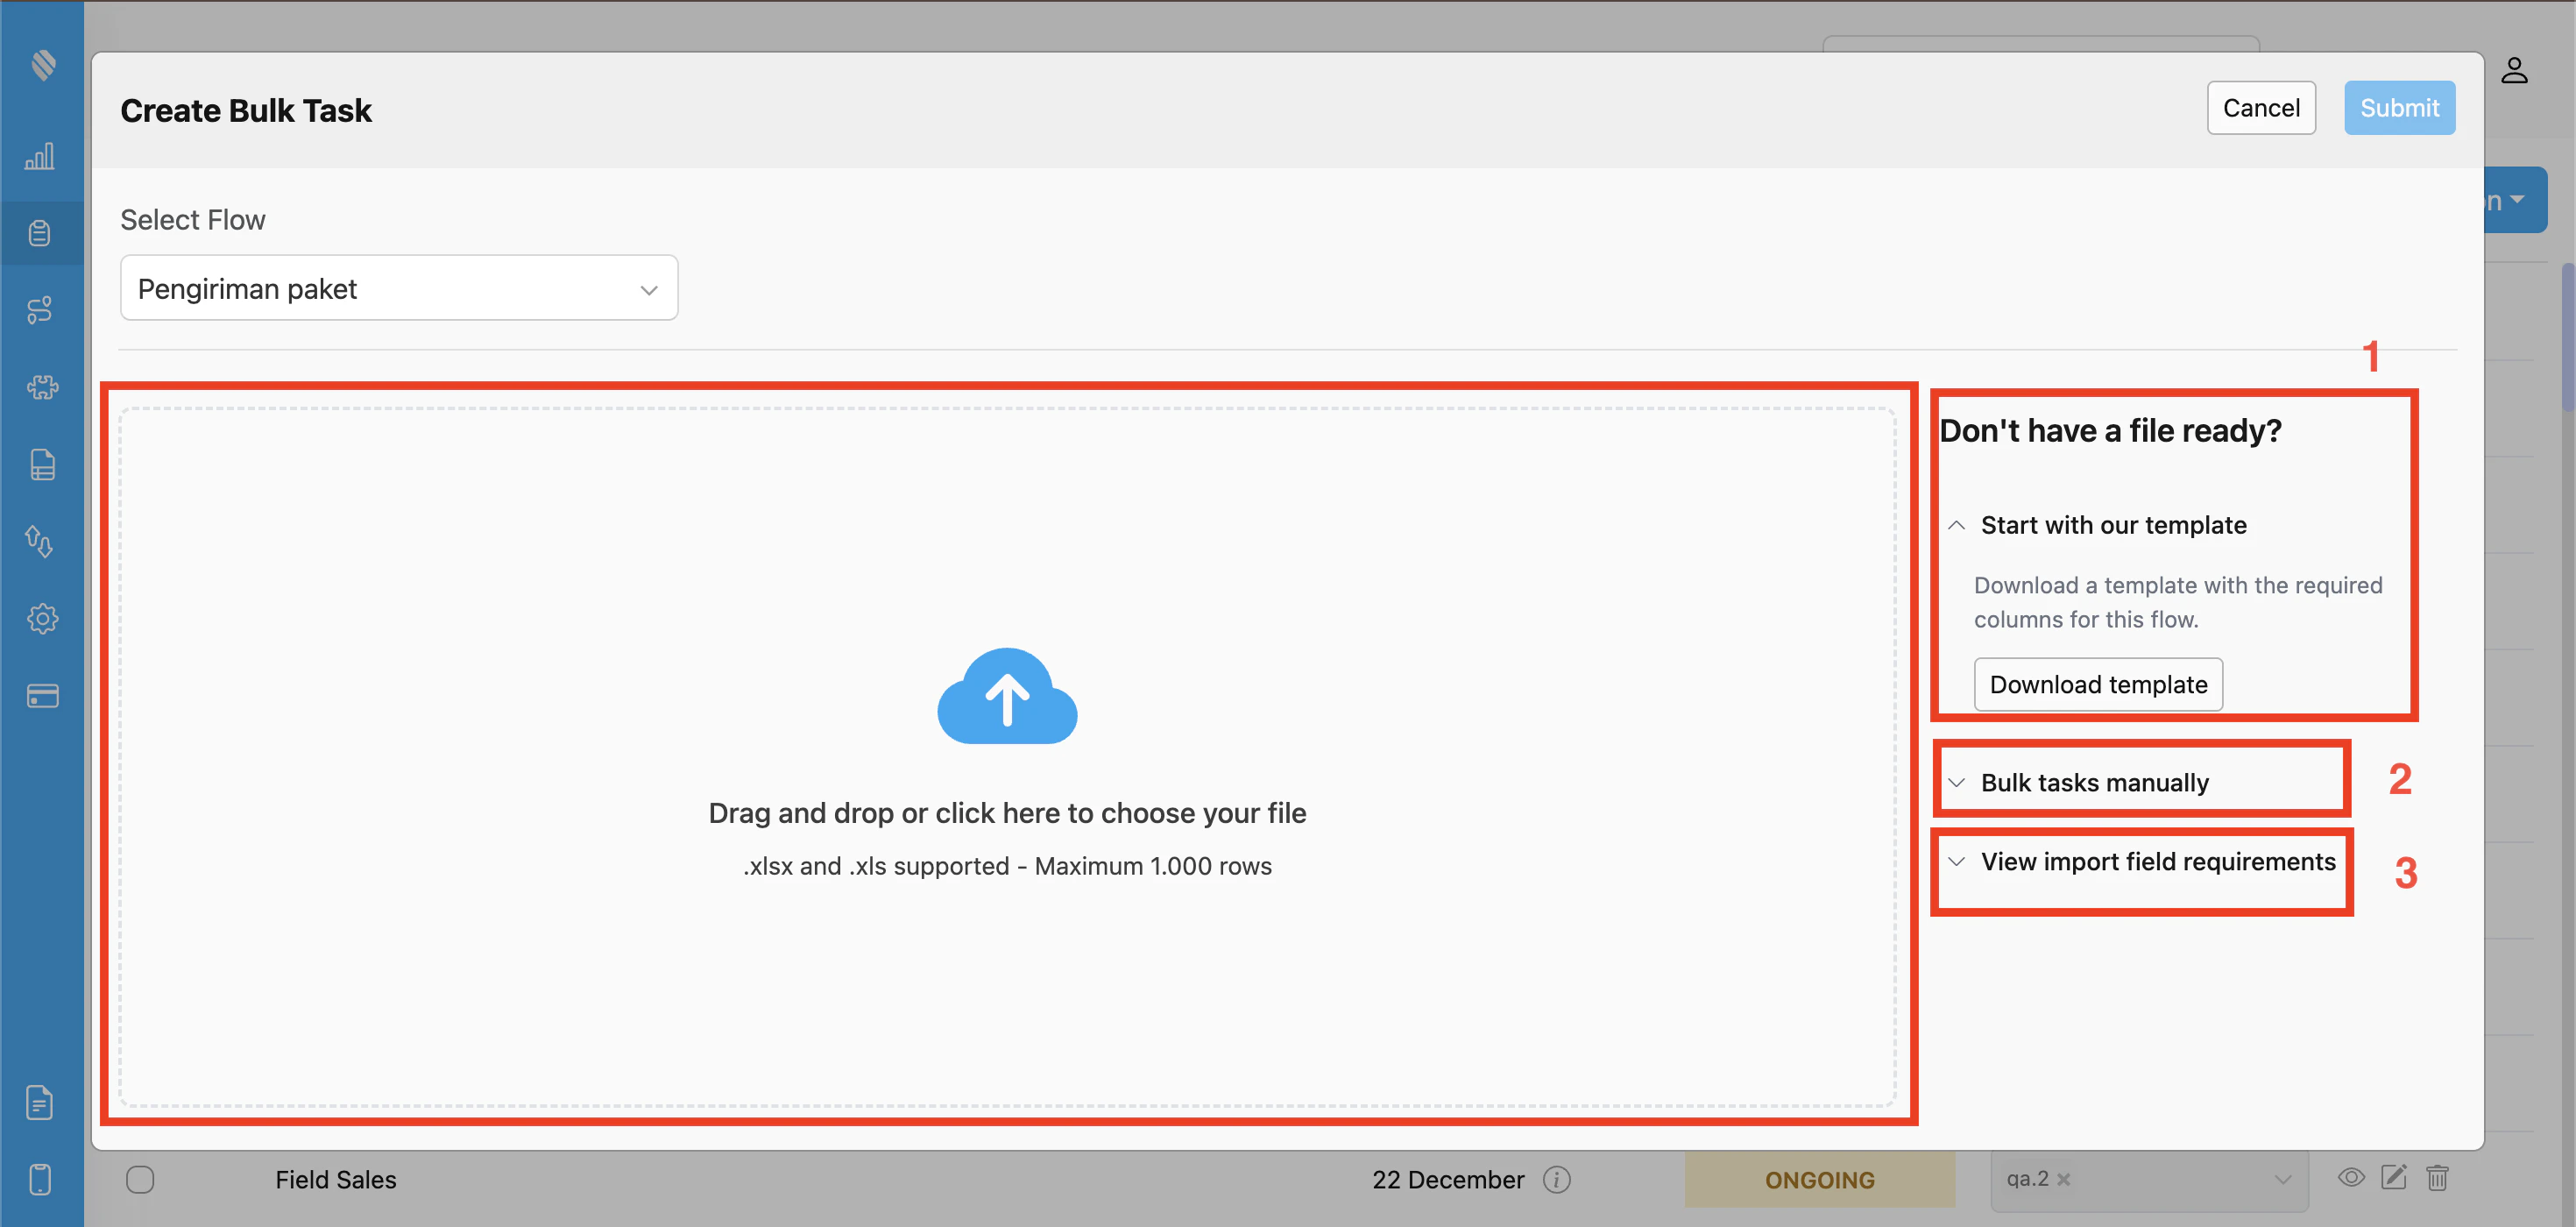
Once you have selected a flow, you will see two sections:
**Upload area** — Drag and drop your Excel file here, or click to browse your computer. We support `.xlsx` and `.xls` files with up to **1,000 rows**.
**Options panel** — Three helpful shortcuts:
1. **Start with our template** — Download a pre-made Excel template that already has the right columns for your flow. Just fill in your data and upload it.
2. **Bulk tasks manually** — Skip the file upload and type in your tasks manually.
3. **View import field requirements** — See which fields are required, what formats are accepted, and other helpful details.
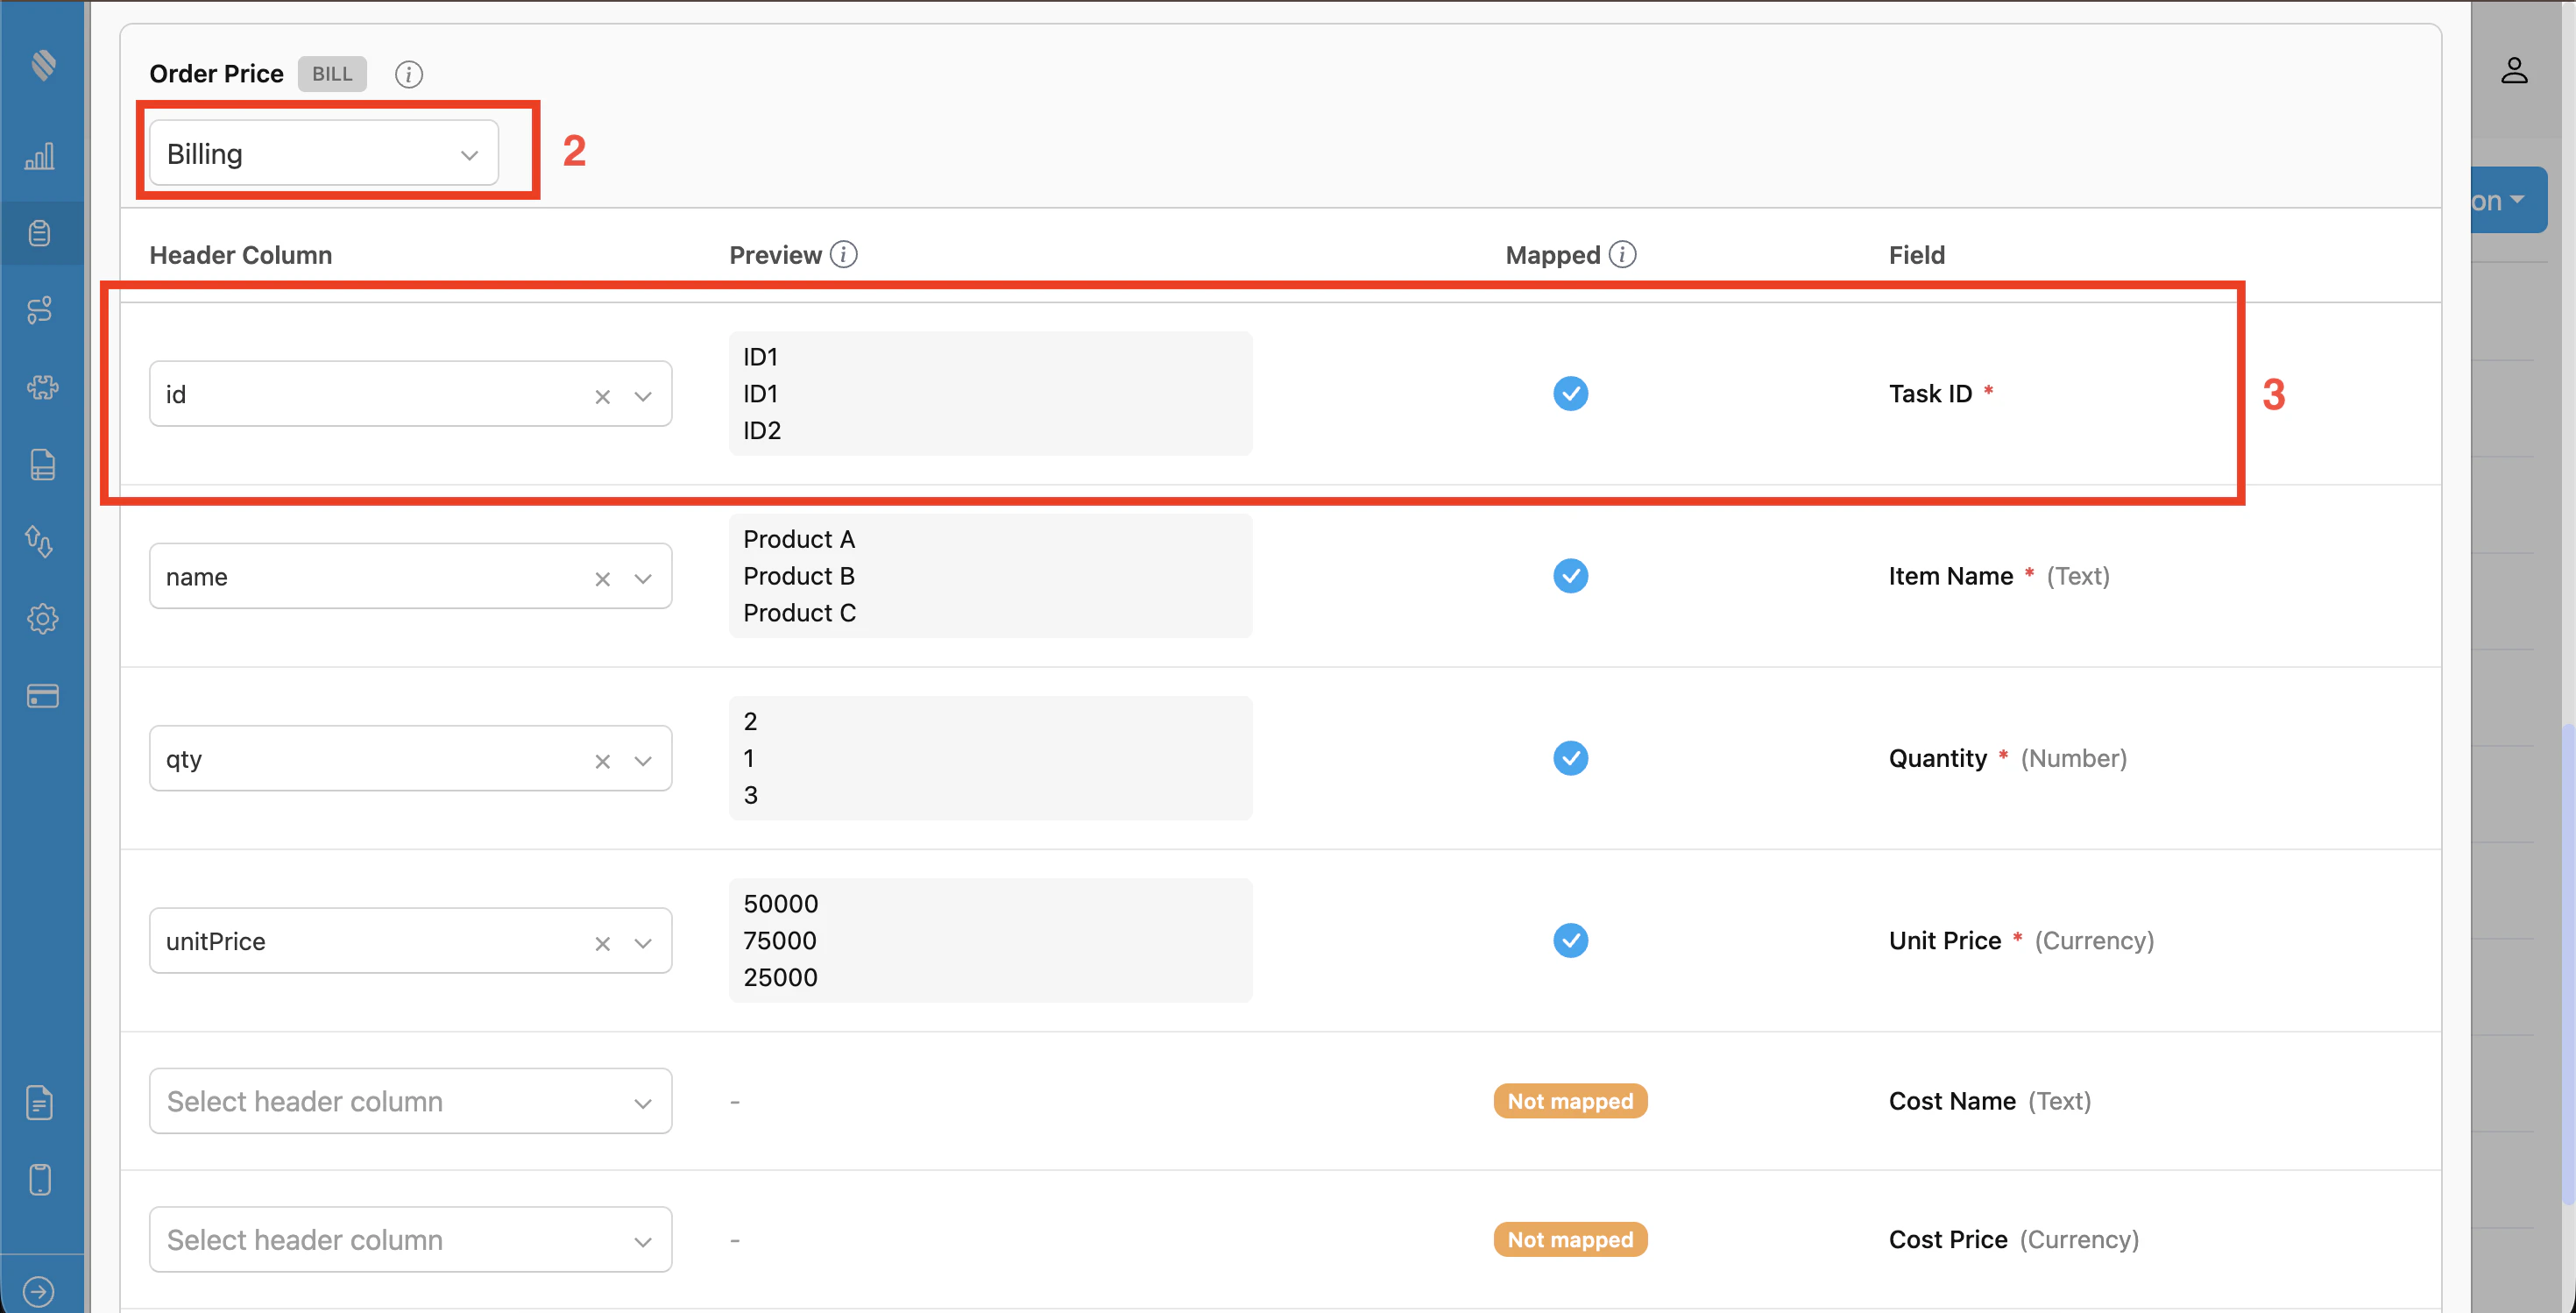
## Step 2: Map Your Columns
If you uploaded your own spreadsheet (not our template), this step helps you tell the system which Excel column goes with which field.
The mapping table has four columns:
1. **Header Column** — A dropdown showing all the column headers from your Excel file. Select which Excel column maps to each field.
2. **Preview** — Shows the first few rows from the selected Excel column, so you can verify the data looks right.
3. **Mapped** — The status of the field mapping. A blue checkmark means the field is mapped successfully. If it says "Not mapped", pick a column from the Header Column dropdown.
4. **Field** — The field name and type from your task flow.
### Mapping Bill, List, and Subpage Components
If your flow includes **Bill**, **List**, or **Subpage** components, these fields contain sub-fields that require a separate sheet in your Excel file to map correctly.
1. We will automatically try to match each sheet to the right component based on the sheet name. If we can not find a match, the first sheet will be used.
2. Once a sheet is selected, map the sub-fields to the columns in that sheet.
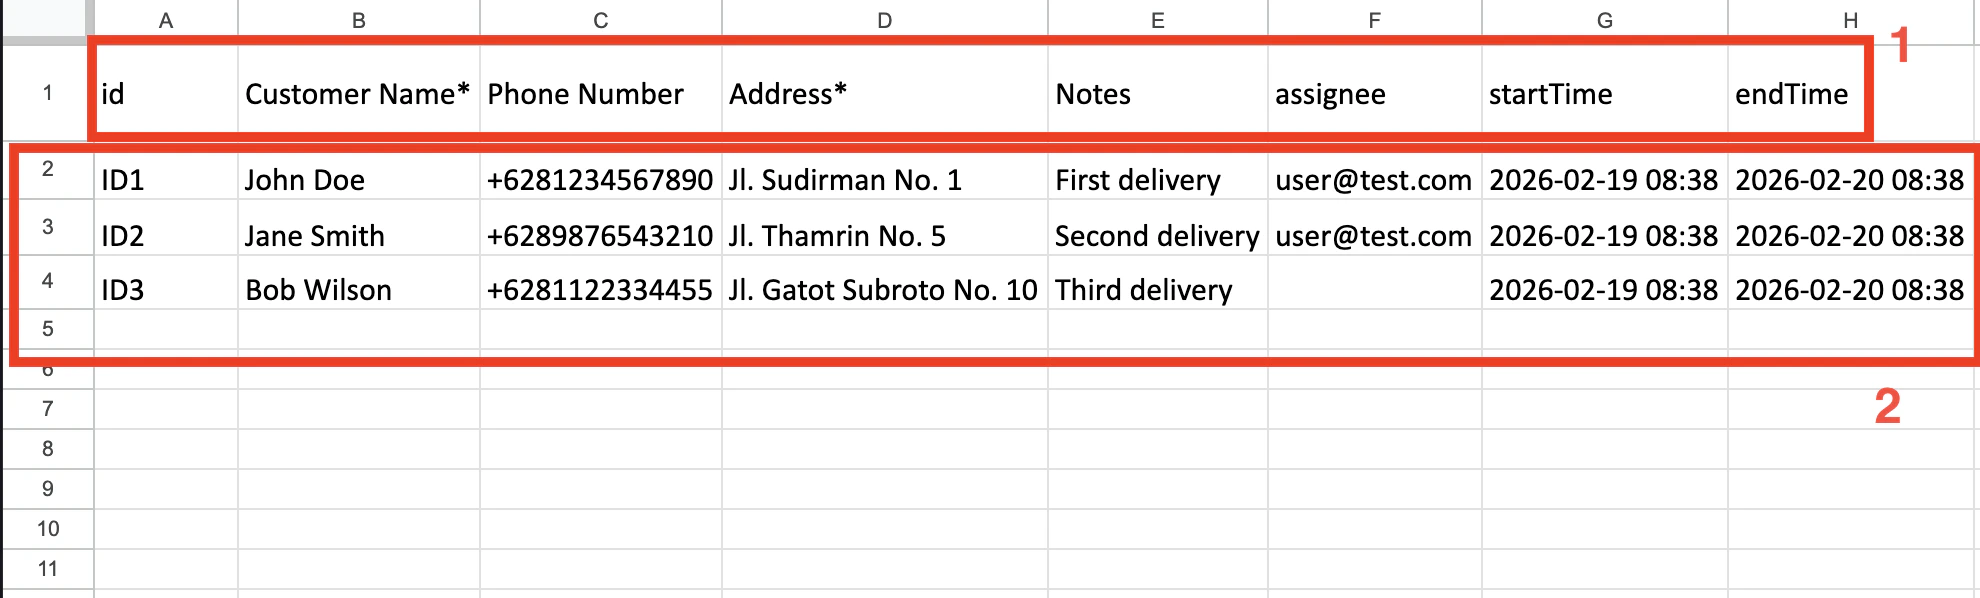
3. Use a **Temporary Task ID** column in the extra sheet to link each row back to the correct task.
#### Nested List inside a Subpage
When a Subpage contains a nested **List** component, the list items live in their own sheet (separate from the subpage sheet), and an **`entry`** column links each list row to the correct subpage entry.
* **Sheet naming**: each nested list gets a sheet named after the list's title (sanitized to fit Excel's 31-character limit and to remove forbidden characters `/ \ * ? [ ]`).
* **`entry` column**: 1-based integer. `entry=1` refers to the first subpage entry for that task (the first row with that `id` in the subpage sheet), `entry=2` the second, and so on.
* **Type-specific columns**:
| List type | Required columns | Optional columns |
| ---------- | --------------------- | ---------------------------------------------------------------------- |
| `text` | `id`, `entry`, `name` | — |
| `checkbox` | `id`, `entry`, `name` | `isChecked` (accepts `true`/`false`/`yes`/`no`/`1`/`0`/`TRUE`/`FALSE`) |
| `quantity` | `id`, `entry`, `name` | `qty` (numeric), `qtyProcessed` (numeric) |
**Example** — flow with `Inspection` subpage containing a quantity list titled `Parts`:
`Main` sheet:
```
id | startTime | endTime
TASK1 | 2026-05-13 09:00 | 2026-05-14 09:00
```
`Inspection` sheet (two rows = two subpage entries for TASK1):
```
id
TASK1
TASK1
```
`Parts` sheet (entry column scopes rows to subpage entries):
```
id | entry | name | qty | qtyProcessed
TASK1 | 1 | Brake pad | 4 | 0
TASK1 | 1 | Filter | 2 | 0
TASK1 | 2 | Light bulb| 6 | 0
```
This imports as 1 task with 2 subpage entries; entry 1 has 2 list items, entry 2 has 1 list item.
List rows whose `entry` value is out of range, non-numeric, or whose `id` does not match any task are silently dropped during import. Valid rows still import successfully.
#### Nested Bill inside a Subpage
When a Subpage contains a nested **Bill** component, bill items and costs live in their own sheet (separate from the subpage sheet), and an **`entry`** column links each row to the correct subpage entry.
* **Sheet naming**: each nested bill gets a sheet named after the bill's title (sanitized to fit Excel's 31-character limit).
* **`entry` column**: 1-based integer, same convention as nested lists.
* **Items vs Costs**: distinguished by the `reason` column — `-` for items, `Cost` or `Discount` for costs/surcharges.
* **Columns**:
| Column | Description | Items | Costs |
| -------------- | ----------------------------- | -------- | -------------------- |
| `id` | Task ID | required | required |
| `entry` | Subpage entry index (1-based) | required | required |
| `name` | Item or cost name | required | required |
| `qty` | Quantity | numeric | `-` |
| `qtyProcessed` | Processed quantity | numeric | `-` |
| `unitPrice` | Unit price per item | numeric | `-` |
| `subTotal` | Line total or cost amount | numeric | numeric |
| `reason` | Row type indicator | `-` | `Cost` or `Discount` |
**Example** — flow with `Delivery` subpage containing a bill titled `Charges`:
`Main` sheet:
```
id | startTime | endTime
TASK1 | 2026-05-26 09:00 | 2026-05-27 09:00
```
`Delivery` sheet:
```
id
TASK1
```
`Charges` sheet:
```
id | entry | name | qty | qtyProcessed | unitPrice | subTotal | reason
TASK1 | 1 | Item A | 2 | 0 | 10000 | 20000 | -
TASK1 | 1 | Item B | 1 | 0 | 25000 | 25000 | -
TASK1 | 1 | Shipping | - | - | - | 5000 | Cost
TASK1 | 1 | Discount | - | - | - | -2000 | Discount
```
This imports as 1 task with 1 subpage entry containing 2 bill items + 2 costs. The total is auto-calculated from items + costs.
Bill rows follow the same `entry` + `id` join convention as list rows. Invalid `entry` values are silently dropped.
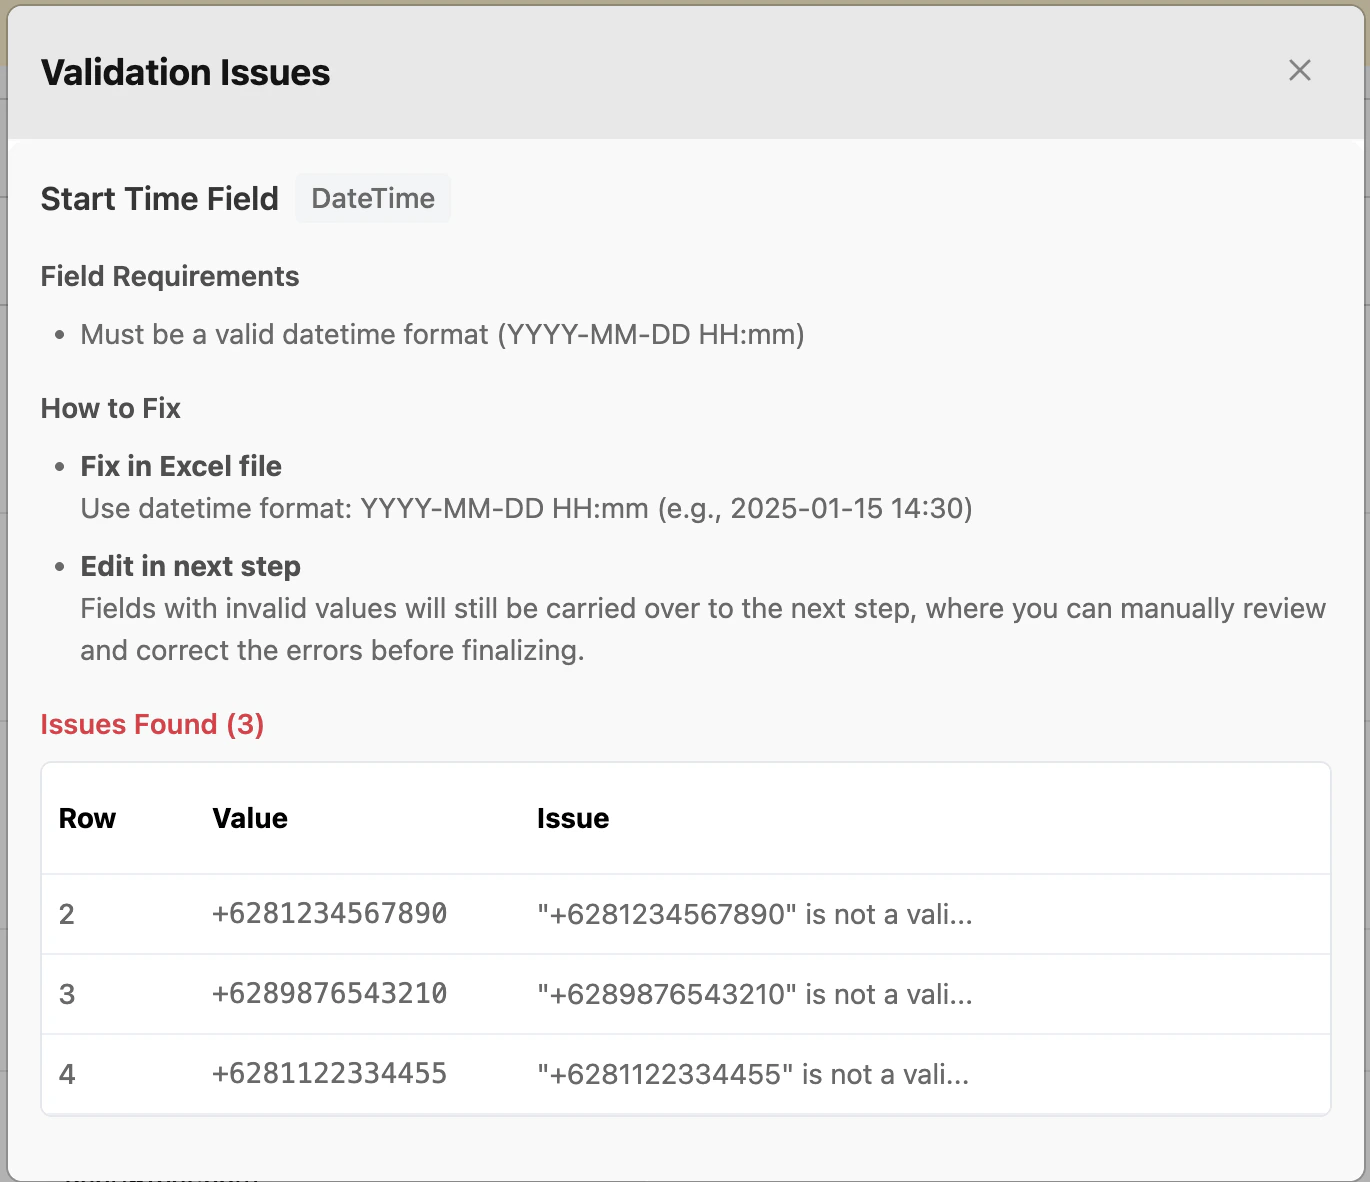
### Check for Issues
After mapping, we automatically check your data for common problems. You will see a status indicator next to each field:
1. **Blue checkmark** — Everything looks good.
2. **Not mapped** — The field is not linked to any Excel column. Pick a column from the Header Column dropdown.
3. **Issue badge** — Shows how many rows have problems and what kind (e.g., "3 issues found (required empty, invalid format)").
Click the badge to see which rows need fixing, the field requirements, and how to fix it.
If there are issues, you can fix them directly in your Excel file and re-upload, or continue to the next step and edit the data there.
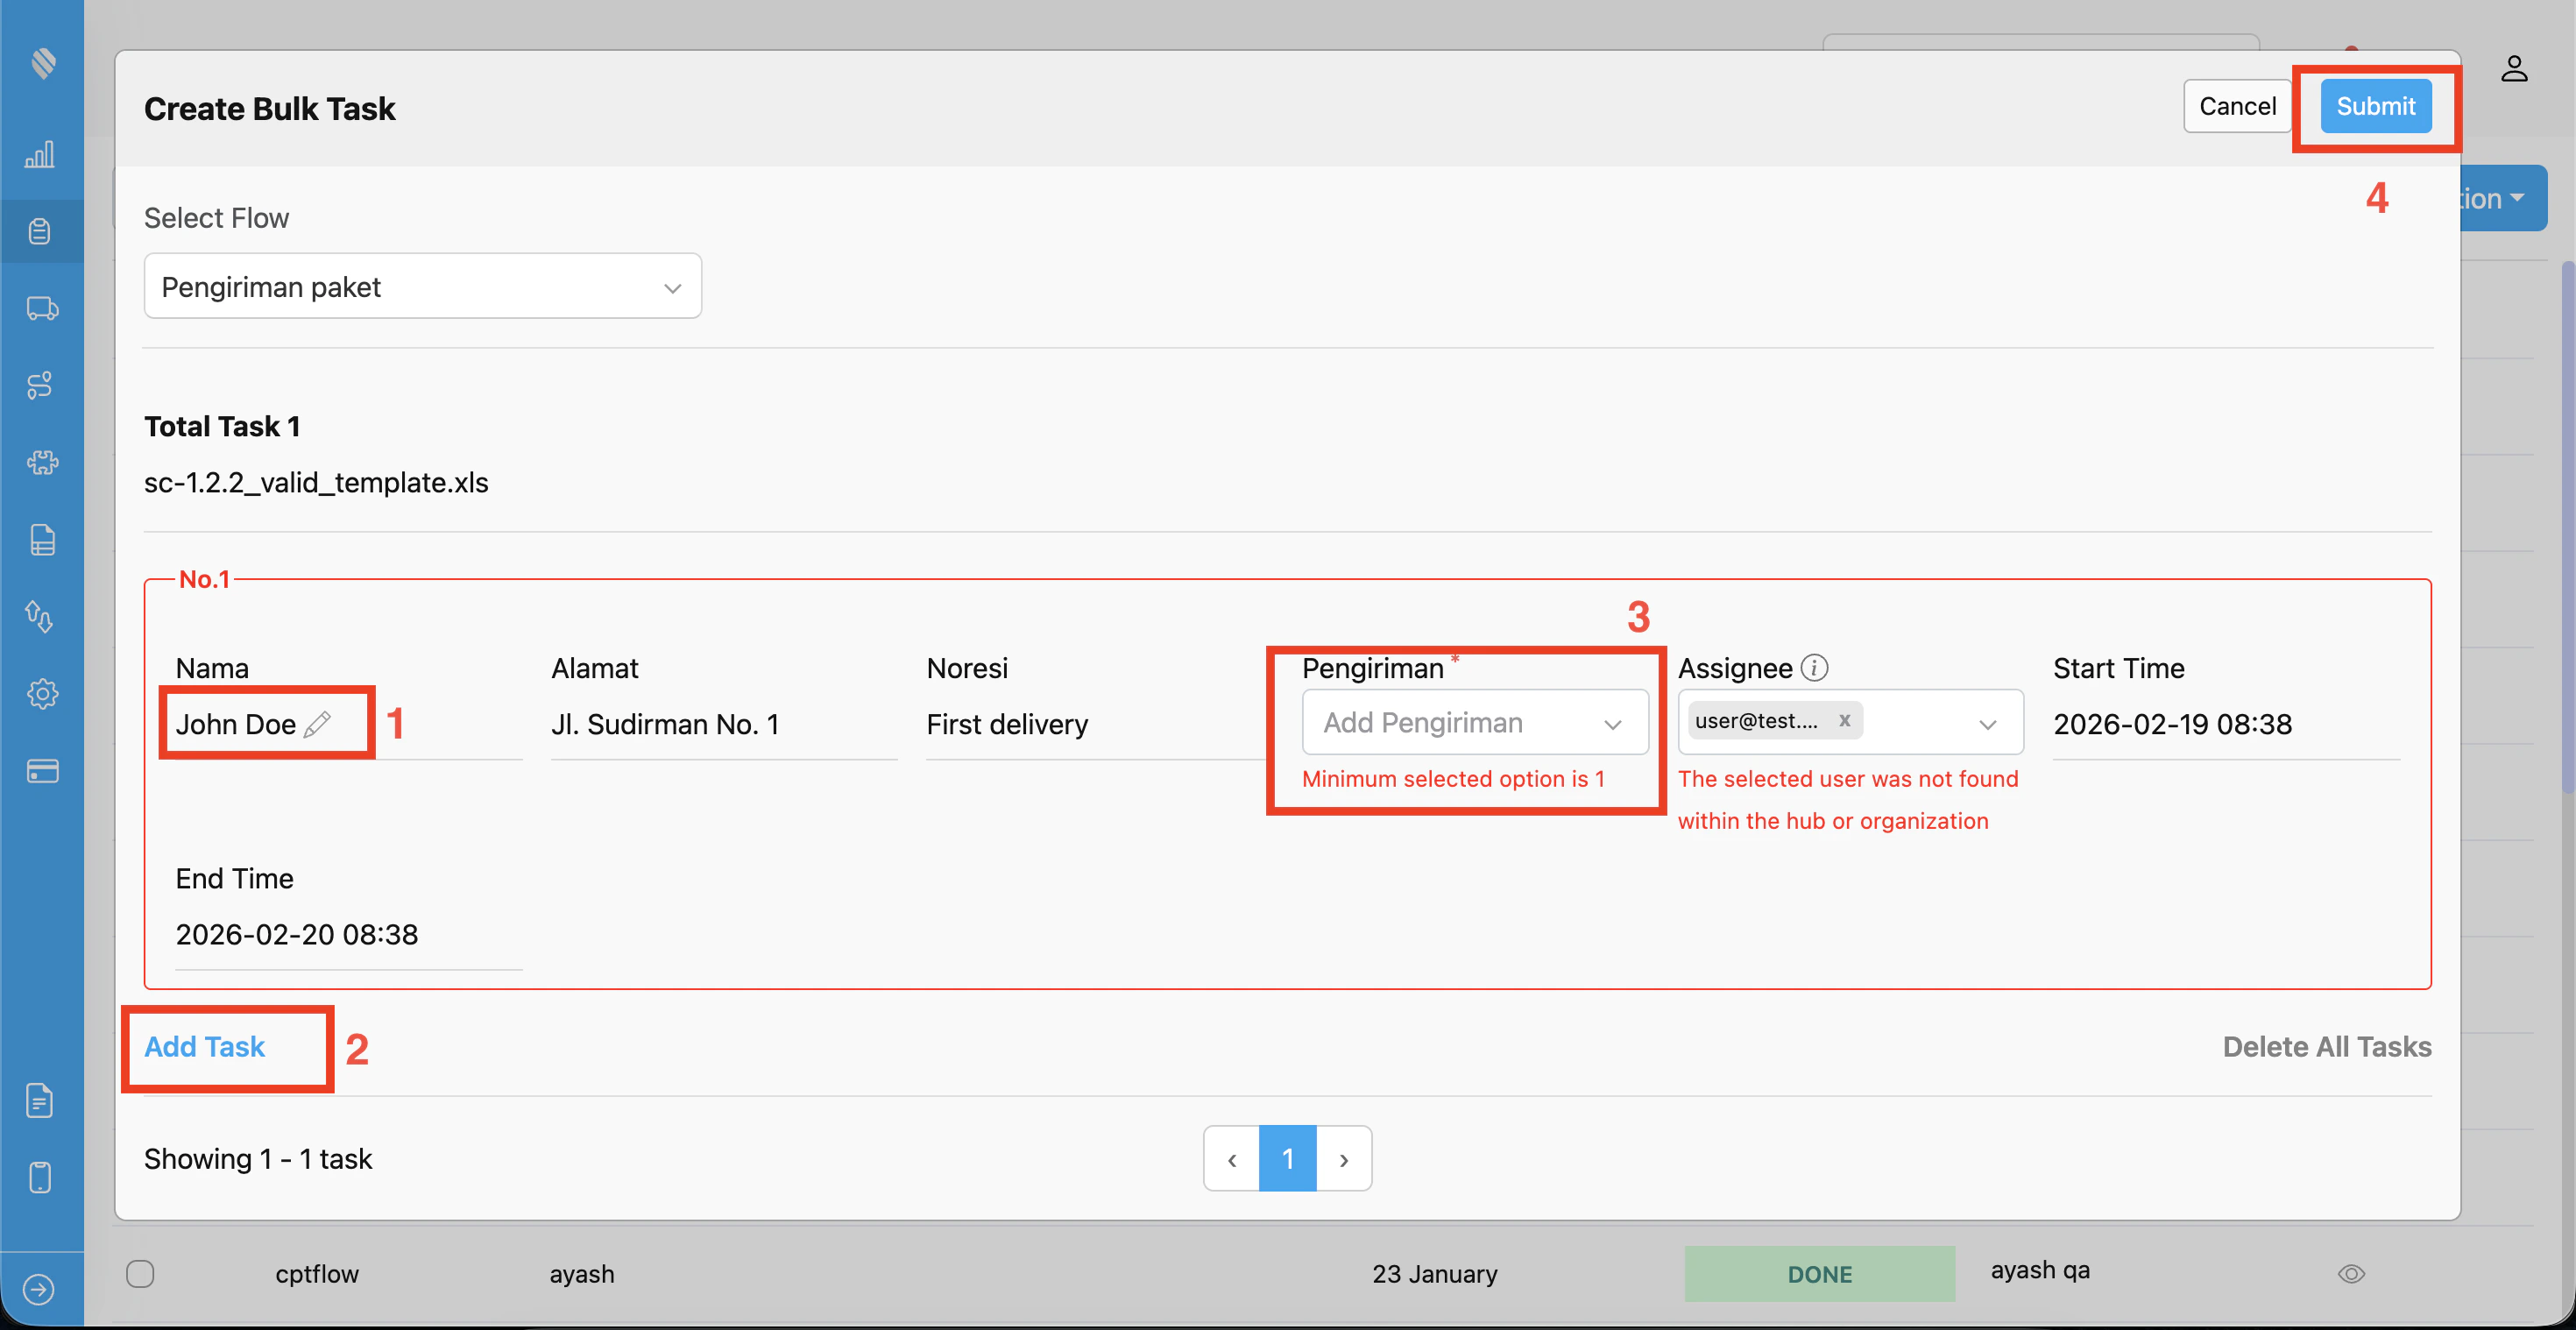
## Step 3: Review, Edit, and Submit
Your imported data now appears as a task form. Each row represents one task with all the fields filled in from your spreadsheet.
1. Click on any field to edit its value.
2. You can **add** more tasks or **delete** ones you do not need.
3. Fields with errors are highlighted. Review and fix any incorrect values before submitting.
4. When everything looks good, click **Submit** to create all your tasks.