> ## Documentation Index
> Fetch the complete documentation index at: https://docs.mileapp.dev/llms.txt
> Use this file to discover all available pages before exploring further.

# Introduction

Workflows in MileApp let you define a sequence of Flows that should run together as a single multi-step process. Each Workflow is a reusable template — pick a Workflow when creating an [Activity](/pages/task/creating-task/activity-in-task) and MileApp creates one task per step in the order you defined, with optional field mappings to copy data from one step to the next.

<Note>
  Required permission:

  * View Workflow
</Note>

## What is a Workflow?

A Workflow is a named template that lists the Flows that make up a multi-step process. For example, a logistics process might combine a *Pickup* Flow followed by a *Delivery* Flow followed by a *Confirmation* Flow — each step using its own Flow form and optionally assigned to a different team member.

Workflows themselves are not tasks. They become real tasks only when an Activity is created from them. Each Activity instantiates the Workflow into a main task plus one subtask per step, with field mappings carrying data forward through the chain.

**Use Cases:**

* **Pickup → Delivery → Confirmation**: different forms for the pickup runner, the delivery driver, and the recipient confirmation step
* **Order fulfilment**: packing, dispatch, last-mile delivery, and proof-of-delivery as separate, trackable stages
* **Inspection or audit**: opening checklist, field measurement, and reporting, completed by different roles
* **Multi-stage approval**: submission, supervisor review, and final approval, with data carrying forward between stages

Use a regular Flow (not a Workflow) when the process fits in a single form, even if it has multiple pages. Use a [Subflow](/pages/flow/flow-builder/component-subflow) when one Flow needs to embed a smaller subtask inside it. A Workflow is the right choice when each stage is independent enough to be its own task and its own form.

## Workflow Building Blocks

Every Workflow is configured from the same Create/Edit Workflow modal. The numbered boxes below highlight each building block as it appears in the modal.

<div align="center">
  <img src="https://mintcdn.com/mileapp-c1584fbc/kOzjG73dqVZXxuXL/images/workflow/workflow-building-blocks.png?fit=max&auto=format&n=kOzjG73dqVZXxuXL&q=85&s=52689da466fbbb0a5fa16a7ebab0dbe6" alt="Workflow building blocks in the Create Workflow modal" width="600" data-path="images/workflow/workflow-building-blocks.png" />

  <p><i>Create Workflow modal — the building blocks that make up a Workflow</i></p>
</div>

1. **Name** — a unique name within your organization, made of letters, numbers, and spaces only (no special characters). Must be between 2 and 100 characters.
2. **Steps** — an ordered list of between 1 and 10 stages. Each step references one Flow and runs in order (step 1 → step 2 → step 3, and so on). Click **Add Step** to append more steps, up to the 10-step limit.
3. **Flow per step** — the Flow form the field worker fills in for that step. Every step in the same Workflow must use a different Flow.
4. **Assignee per step** — one or more users assigned by default to tasks created at that step. The assignee is optional — leave empty to assign manually when the Activity is created.
5. **Status Mapping per step** — the status that the step's task is marked as when the step is completed. The dropdown lists the Workflow's default statuses (*Unassigned*, *Ongoing*, *Done*) plus any custom statuses you add. This is how a step like "Pickup" can be marked as a custom *Picked Up* status while still tracking as *Done* underneath.
6. **Field Mapping per step** — controls the field values used when the step's task is created. For step 1, set manual default values. For step 2 onwards, you can also map a field from any earlier step so that its captured value is copied into the matching field of the new step's task.
7. **Custom Statuses** — opens the **Manage Status** modal where you can add extra status labels used in Status Mapping. Each Workflow starts with three default statuses (*Unassigned*, *Ongoing*, *Done*) that cannot be removed, and you can add your own on top. A custom status name only has to be at least 1 character — keep it short and descriptive so it stays readable in the Status Mapping dropdown.

## Accessing the Workflow Page

Open the Flow section from the main sidebar, then pick the **Workflow** tab at the top of the page. The Workflow page lists every Workflow in your organization and is the entry point for creating, editing, and deleting Workflows.

<div align="center">
  <img src="https://mintcdn.com/mileapp-c1584fbc/kOzjG73dqVZXxuXL/images/workflow/workflow-list-view.png?fit=max&auto=format&n=kOzjG73dqVZXxuXL&q=85&s=ed0834ba70a9aef9d360cbe907d94a7b" alt="Workflow page entry" width="600" data-path="images/workflow/workflow-list-view.png" />

  <p><i>
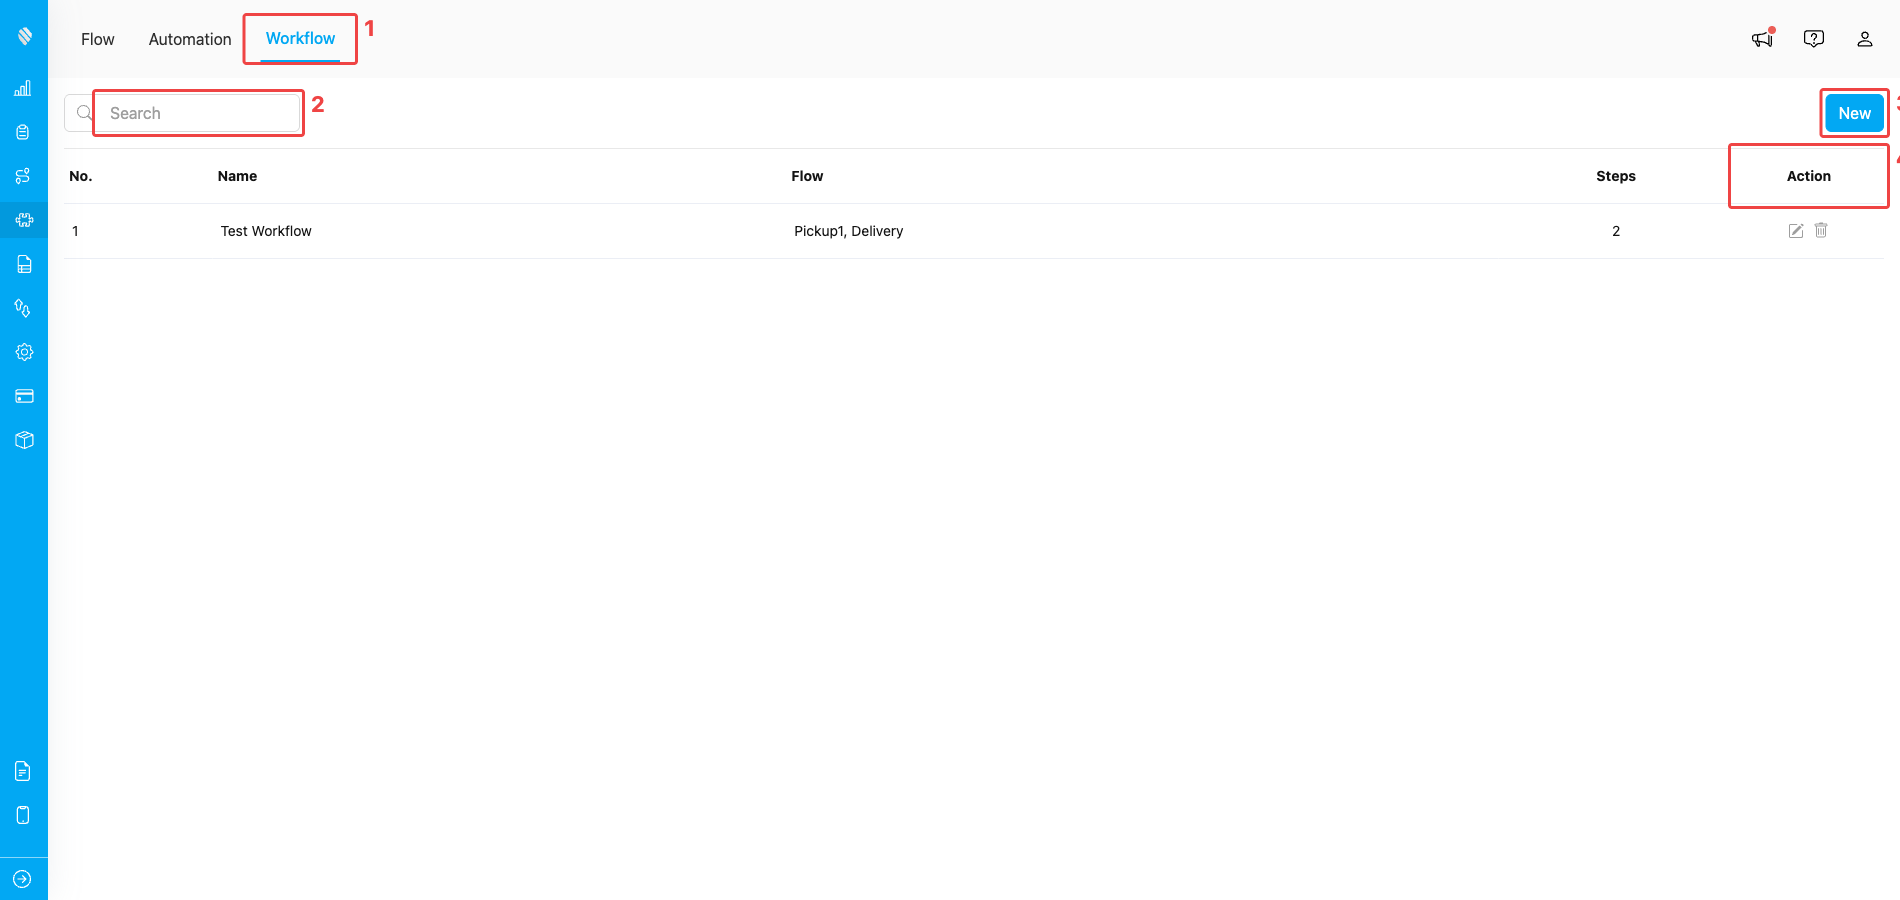
The Workflow page — open it via the Workflow tab (1), filter by name with the search bar (2), create a new Workflow with the New button (3), and edit or delete an existing one from the Action column (4)</i></p>
</div>

## What's Next

* [How to Use Workflow](/pages/workflow/how-to-use-workflow) — Run a saved Workflow by creating an Activity from it.
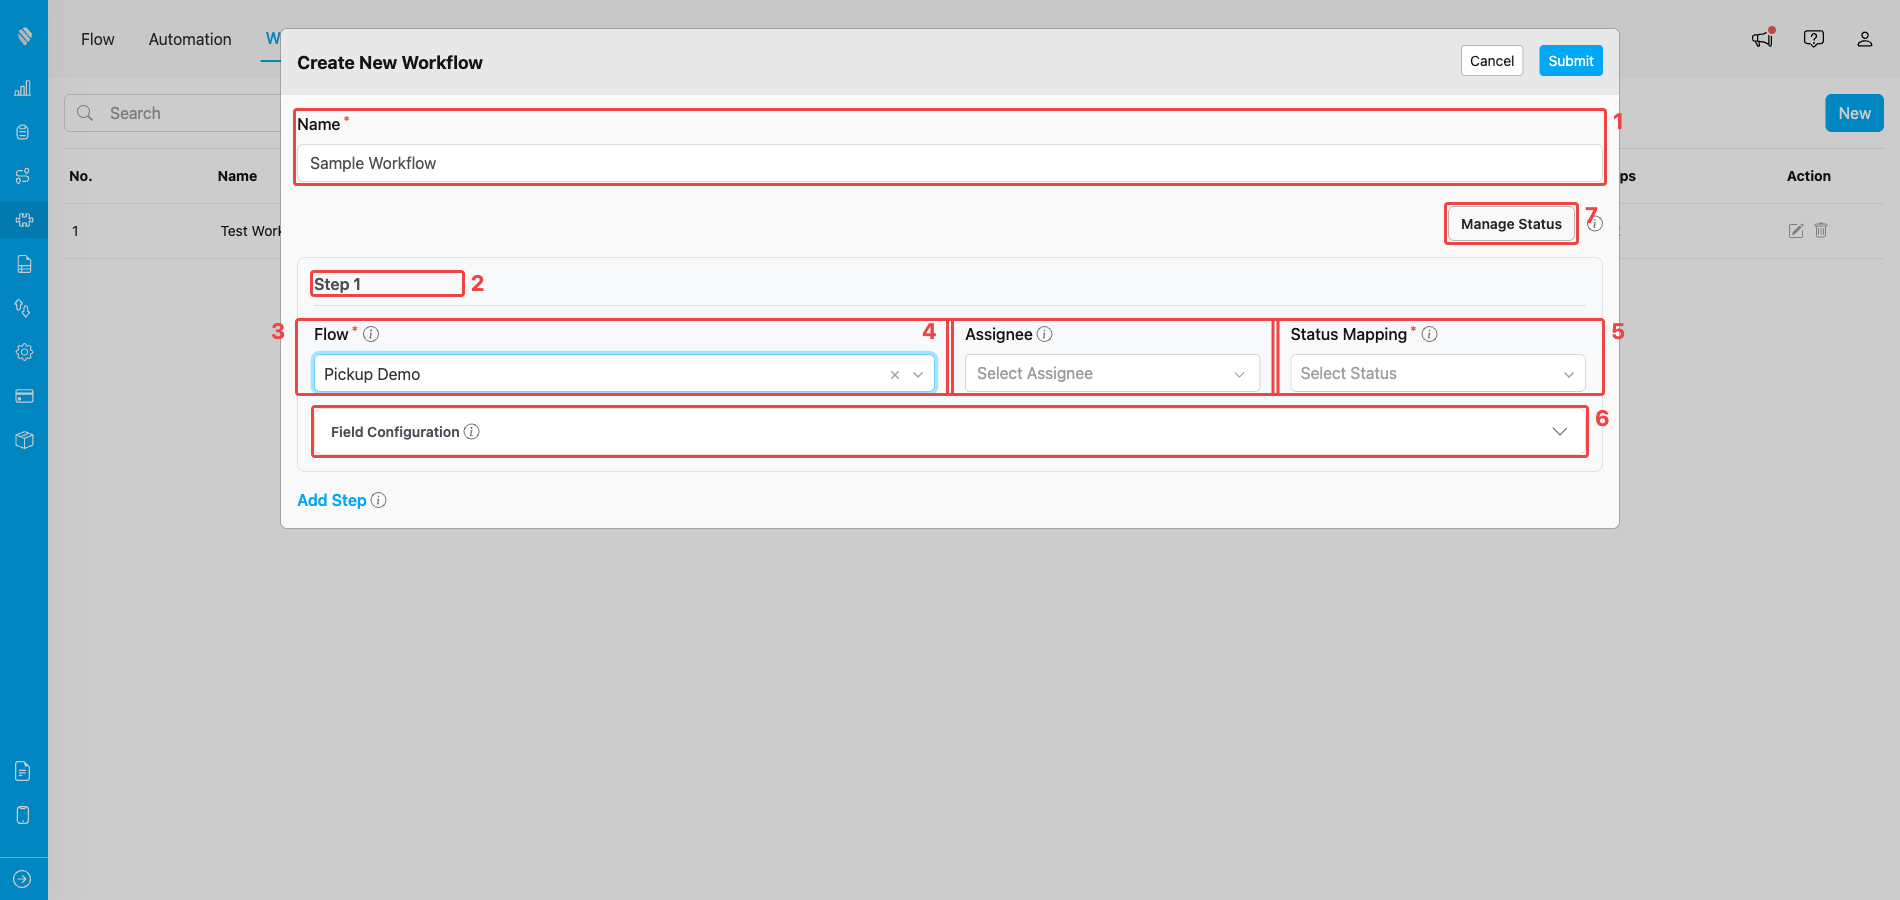
* [Building Workflow](/pages/workflow/building-workflow) — Step-by-step guide to creating a Workflow.
* [Managing Workflow](/pages/workflow/managing-workflow) — Editing, deleting, and managing custom statuses.
* [Activity in Task](/pages/task/creating-task/activity-in-task) — How a Workflow runs once it is used to create an Activity.

## Related

* [Activity in Task](/pages/task/creating-task/activity-in-task)
* [Building Workflow](/pages/workflow/building-workflow)
* [Managing Workflow](/pages/workflow/managing-workflow)
* [Introduction to Flow](/pages/flow/introduction-to-flow)
