

Required permission:
- View integration
- Create integration
- Edit integration
- Delete integration
{recipient} (the destination phone number) and {message} (the SMS text) — and sends everything else exactly as you entered it. Organizations that do not connect a gateway are unaffected: their SMS continues to go through MileApp’s default service.
Where it’s used
Once connected, your gateway delivers every SMS MileApp sends on your behalf:- OTP component — the one-time-password SMS sent from a Flow’s OTP component.
- Automation notifications — the SMS sent by an Automation notification action.
Before you begin
Check your provider’s “send SMS” API documentation and have these ready:- The endpoint URL it exposes for sending an SMS, and the HTTP method it expects (usually
POST, sometimesGET). - Your credentials — an API token, an API key, or a username/password pair — and where each value belongs in the request (a header, the URL, or a request field).
- The names of the fields your provider expects for the recipient number and the message text (for example
to/text,msisdn/message,To/Body). - The sender number or sender ID your provider requires, if any.
- A test phone number (in international format, e.g.
+6281234567890) that can receive one verification SMS.
The endpoint host must be publicly reachable. Private, loopback, and link-local addresses are rejected, and the scheme must be
http or https.Step 1: Open the SMS Gateway card
- Go to Setting ➝ Integration.
- Find the SMS Gateway card. When no gateway is connected, it shows a Connect button.
- Click Connect to open the Configure SMS Gateway form.
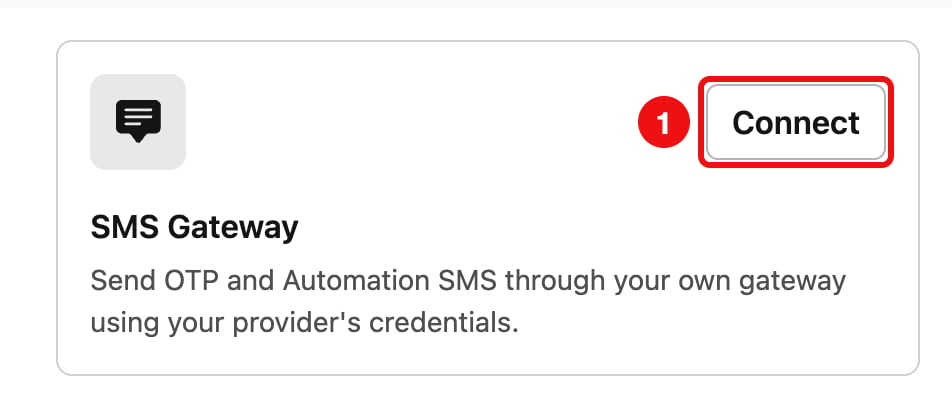
The SMS Gateway card before a gateway is connected
Step 2: Choose a starting template and set the endpoint
The Provider dropdown offers ready-made templates — Twilio, GoSMS Gateway, and Other (set up manually). A template pre-fills the endpoint, method, and header and body rows with placeholder text (shown asXXXXX / YYYYY) that you replace with your own values. Pick the template closest to your provider, or Other to build the request from scratch. The template is only a starting point — every field stays fully editable.
- Provider — pick a starting template (or Other for a fully manual setup).
- Label — a name for this gateway, so you can recognise it later.
- Endpoint URL — the URL MileApp calls to send each SMS. Enter it exactly as your provider’s API documents it. If your provider puts a credential or account identifier in the URL (some do), place it there and replace the placeholder with your value.
- Method — the HTTP method your provider expects (commonly
POST; some providers useGET).
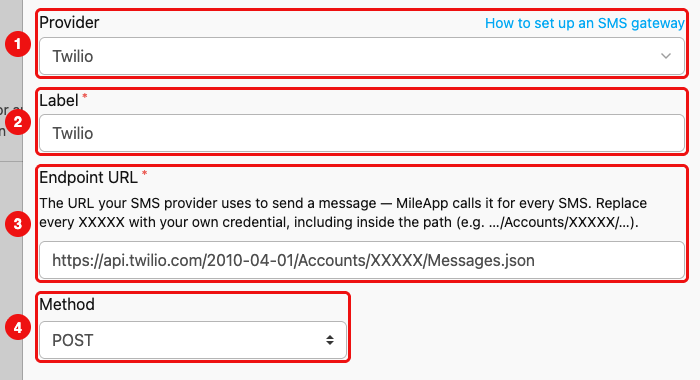
Pick a Provider template (1), then set the Label (2), Endpoint URL (3), and Method (4) — replace every placeholder (XXXXX / YYYYY) with your own value
Example — the Twilio template pre-fills the endpoint as
https://api.twilio.com/2010-04-01/Accounts/XXXXX/Messages.json. Twilio puts the Account SID in the URL path, so you replace XXXXX there with your Account SID (an identifier, not a secret). Most other providers keep the endpoint fixed and put credentials in a header instead — see the next step.Step 3: Enter your credentials
Credentials go directly into the request — you type each value into the Headers and Body / Query rows, which are always visible in the form. There is no separate “authentication” section; you put each credential wherever your provider expects it, and tick Secret on any sensitive value so it is encrypted at rest and shown blank when you reopen the form.Authentication
Most providers authenticate with an HTTP header. The templates pre-fill anAuthorization header — replace its placeholder with your credential. MileApp sends every header exactly as you type it, so enter the value in the exact form your provider expects. Tick Secret on the credential value so it is encrypted at rest and shown blank when you reopen the form (the checkbox starts unticked, so remember to tick it once you’ve entered a real credential).
- Bearer token —
Authorization: Bearer <your token>. - Basic auth —
Authorization: Basic <Base64 of username:password>. You Base64-encode theusername:password(or, for Twilio,AccountSID:AuthToken) yourself — MileApp does not encode it for you. - API-key header — a custom header such as
X-API-Key: <your key>. - Query-parameter auth — some providers (for example a GoSMS-style gateway on a
GETrequest) pass credentials as query parameters instead of a header; enter those as Secret query rows in the Body / Query section.
application/x-www-form-urlencoded for Twilio, application/json otherwise. Leave it as-is unless your provider expects a different content type; it is an ordinary editable header row.
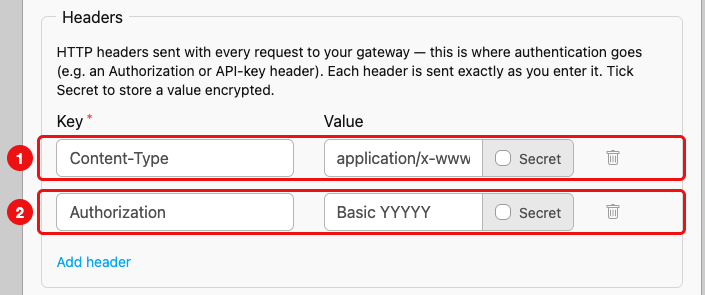
The templates pre-fill a Content-Type header (1) and an Authorization header (2) — replace the Authorization placeholder with your credential and tick Secret
Recipient, message, and other fields
The Body parameters (shown as Query parameters when the method isGET) are the fields sent to your provider. Two rows are locked — {recipient} and {message} — because MileApp fills those at send time and needs both to deliver the SMS. You only set the key each one uses, to match your provider’s field names. Add your own rows below them for anything else the request needs.
{recipient}row — set its key to your provider’s recipient field (for exampleto,msisdn, orTo). The value stays locked to{recipient}, and the row has no Secret checkbox.{message}row — set its key to your provider’s message field (for exampletext,message, orBody). The value stays locked to{message}, and the row has no Secret checkbox.- Your own rows — click Add parameter to add any other fields your provider requires, such as a sender number. These rows are fully editable and can be removed; tick Secret on any that hold a sensitive value.
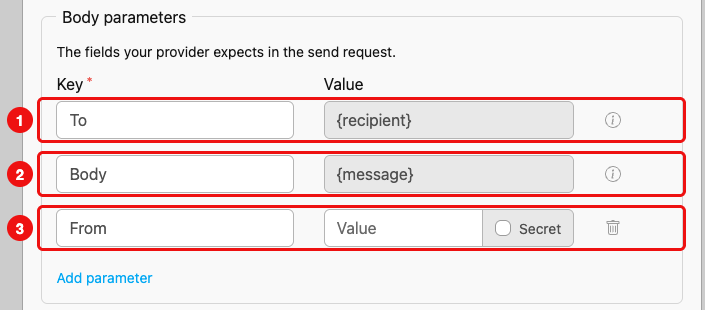
The recipient (1) and message (2) rows are locked — you only name their keys; use Add parameter for your own fields (3)
{recipient} and {message} are the only placeholders MileApp substitutes at send time — the destination number and the SMS text. Everything else is sent exactly as you enter it. Tick Secret on any header or field value to store it encrypted.Step 4: Verify and save
- Enter a Test phone number using the dial-code picker and local number. This field is required.
- Click Save. MileApp sends one real SMS to that number through your gateway to verify it works.
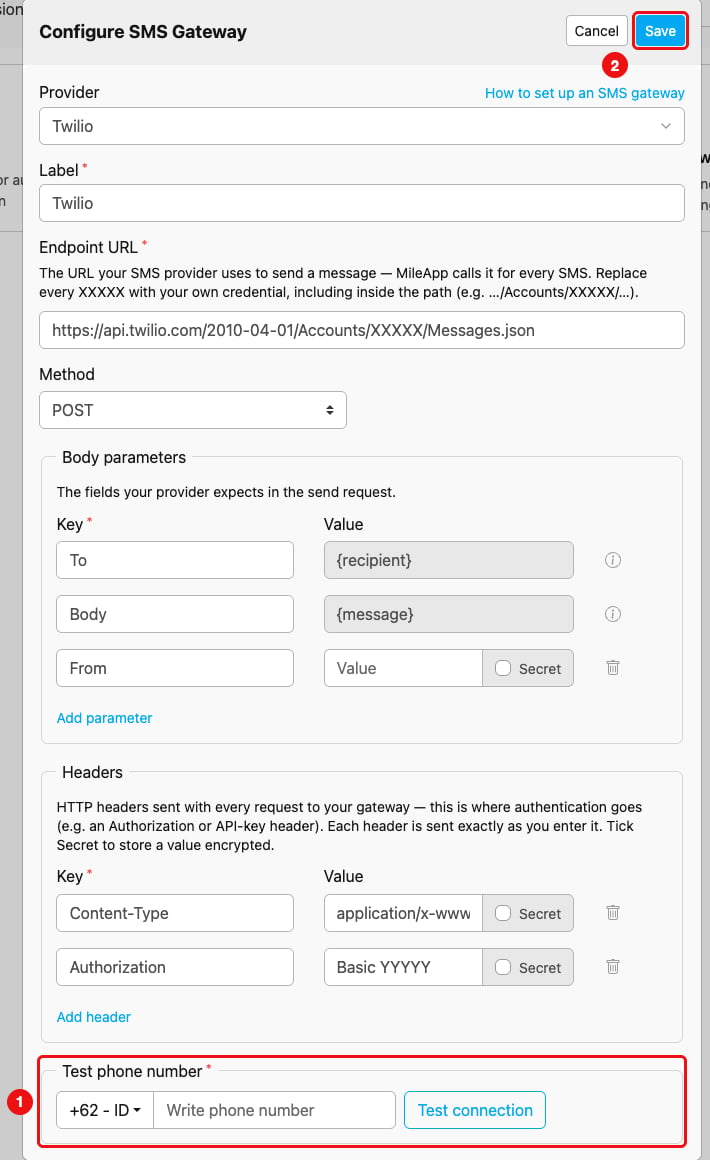
Enter a test number (1), then click Save (2) to verify and connect the gateway
The test phone number is used only for verification — it is not stored on the gateway. Verifying does not deduct MileApp SMS credits.
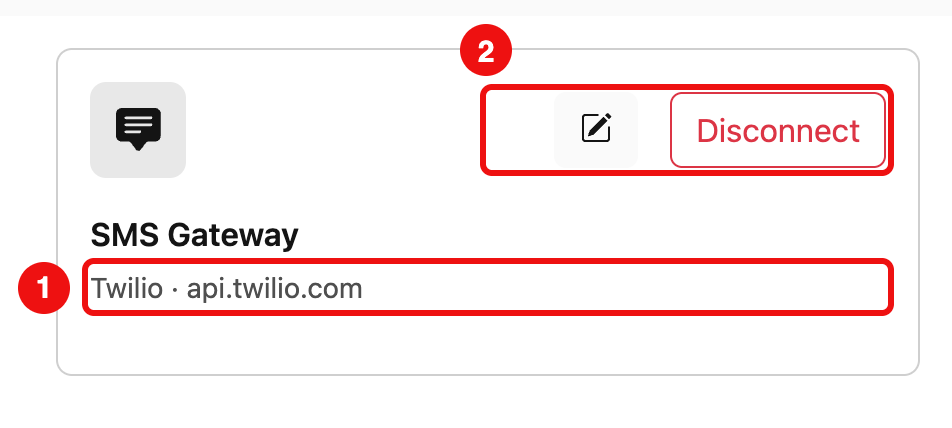
A connected gateway shows its label and endpoint host, with Edit and Disconnect actions
If verification fails
Saving verifies and blocks on failure. If your provider rejects the test SMS, the save is blocked, nothing is saved, and a red toast shows the provider’s raw error. The form stays open so you can correct the value and save again.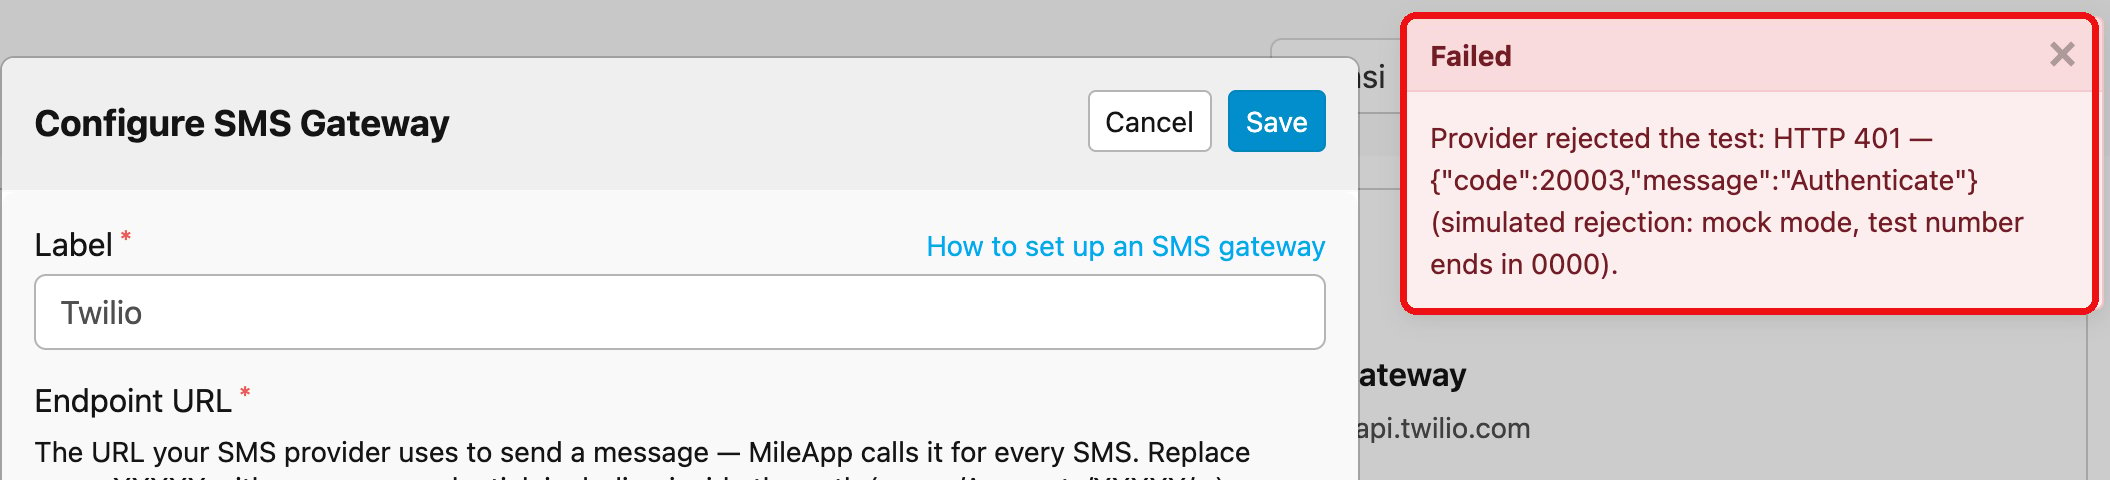
When verification fails, the provider’s error is shown and the form stays open — nothing is saved
Common causes are a wrong credential in the endpoint or a header, an authentication value in the wrong format (for example an unencoded Basic-auth header), a recipient or message field named differently from what your provider expects, or a sender number your provider does not accept. Fix the offending field and click Save again.Editing a gateway
Click the edit (pencil) icon on the connected card. The form reopens with your saved configuration. Any value marked Secret appears blank: leave it blank to keep the stored secret, or type a new value to replace it. Saving re-verifies the gateway exactly like the initial connection.Disconnecting a gateway
Click Disconnect and confirm. Your SMS will be sent through MileApp’s default service again, and MileApp credits will be charged as usual.Notes
- Billing — while a gateway is connected, OTP and Automation SMS go through your endpoint and no MileApp credits are deducted. Organizations without a gateway are charged as usual.
- No silent fallback — if your gateway is connected but a send fails, the SMS fails rather than reverting to MileApp’s default service. Fix the configuration or disconnect the gateway to return to the default service.
-
Security — the endpoint host must be publicly reachable (private, loopback, and link-local addresses are rejected) and the scheme must be
httporhttps. Secret values are encrypted at rest and are never shown again after saving.