Required permission:
- View Team, Create Team, Edit Team
- View User, Invite User, Edit User
- View Permission
Overview
The vendor configuration process follows these steps:- Create Roles for vendor admin and vendor driver
- Set Permissions so vendors can only access what they need
- Create a Team for the vendor
- Invite Vendor Users (admin and drivers) and assign them to the vendor team
Step 1: Create Vendor Roles
Go to Settings > Permission and click New to create two new roles:ADMIN VENDOR Role
This role is for the vendor’s administrator who will accept/reject orders, assign drivers, and manage vehicles.Task & User Permissions

ADMIN VENDOR role showing Task permissions (View task with “Show only my task”, Create task, Assign task) and User permissions (View user, Invite user, Edit user).
Flow Permissions
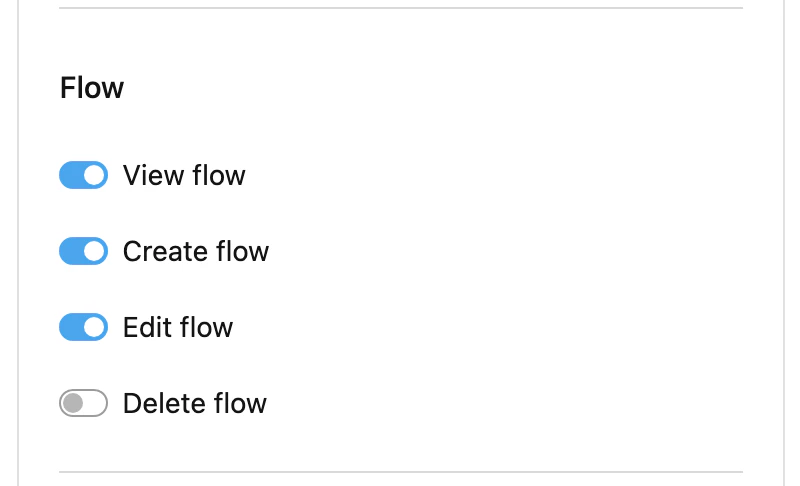
Flow permissions: View flow, Create flow, Edit flow enabled.
Automation Permissions
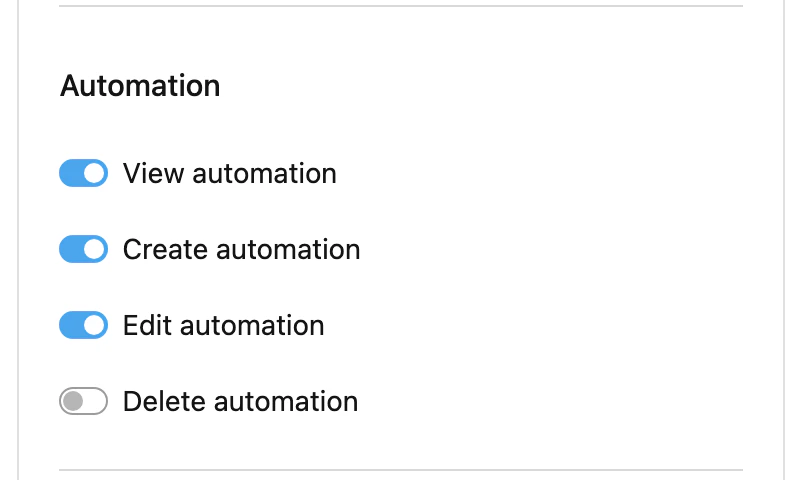
Automation permissions: View automation, Create automation, Edit automation enabled.
Data & Data Type Permissions
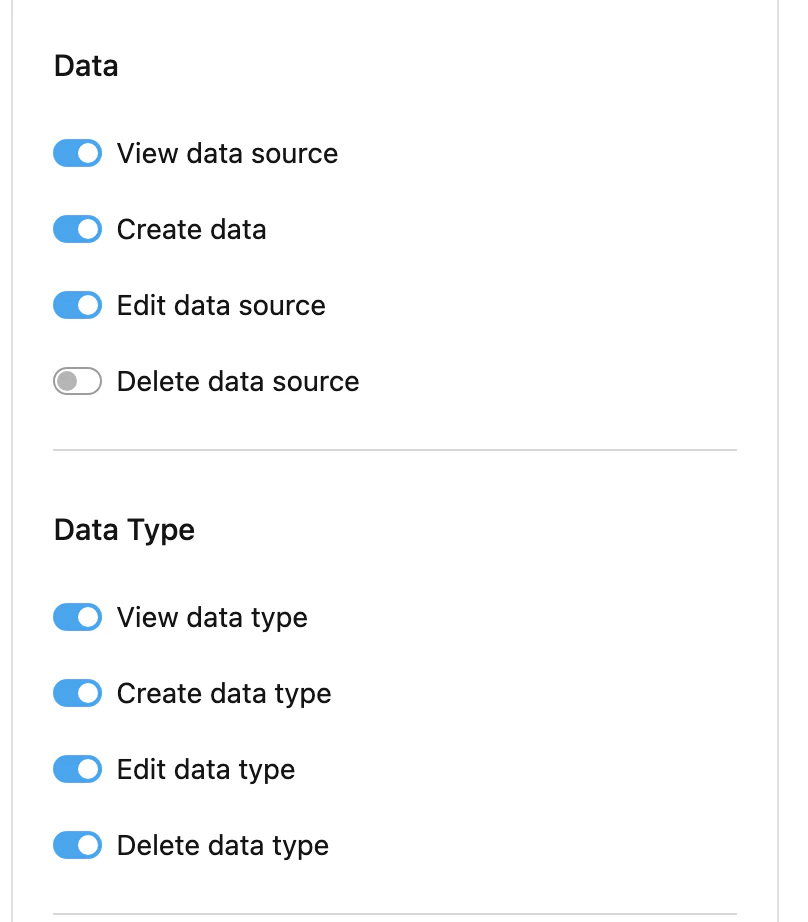
Data permissions (View, Create, Edit data source) and Data Type permissions (View, Create, Edit, Delete data type) enabled.
Team Permissions
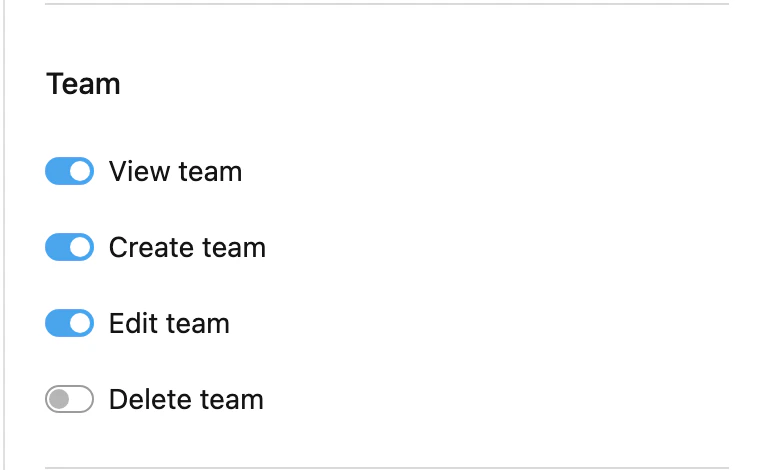
Team permissions: View team, Create team, Edit team enabled.
Custom Module & Add-on Permissions
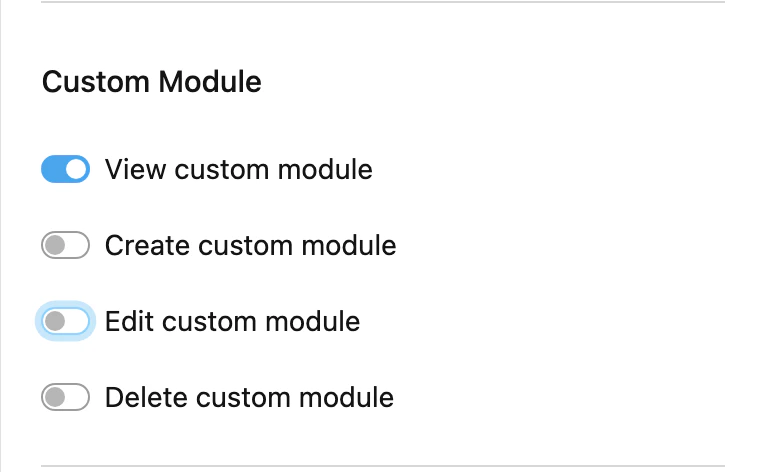
Custom Module: View custom module enabled (optional).
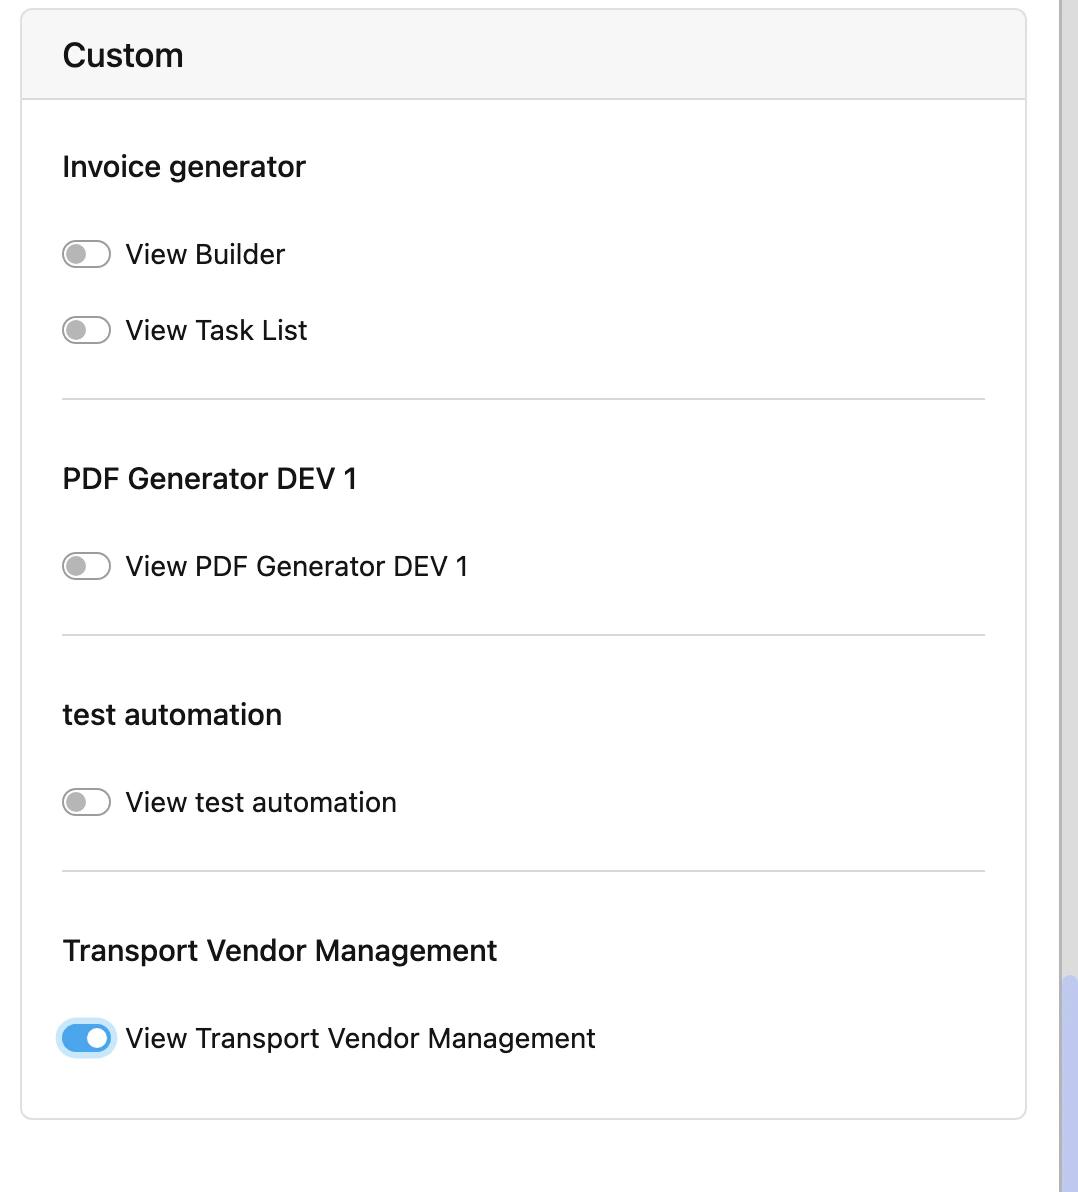
Custom section: View Transport Vendor Management must be enabled so the vendor admin can access the add-on.
ADMIN VENDOR Permission Summary
| Category | Permissions |
|---|---|
| Task | View task (with “Show only my task” enabled), Create task, Assign task |
| User | View user, Invite user, Edit user |
| Flow | View flow, Create flow, Edit flow |
| Automation | View automation, Create automation, Edit automation |
| Data | View data source, Create data, Edit data source |
| Data Type | View data type, Create data type, Edit data type, Delete data type |
| Team | View team, Create team, Edit team |
| Custom Module | View custom module (optional) |
| Custom > Transport Vendor Management | View Transport Vendor Management |
The “Show only my task” option under View Task ensures vendor admins only see tasks belonging to their own team, not tasks from other vendors or the principal organization.
DRIVER VENDOR Role
This role is for the vendor’s drivers who will complete pickup and delivery tasks on the MileApp mobile app.| Category | Permissions |
|---|---|
| Task | View task (with “Show only my task” enabled), Do task |
Step 2: Create a Vendor Team
Go to Settings > Team and click New to create a team for the vendor.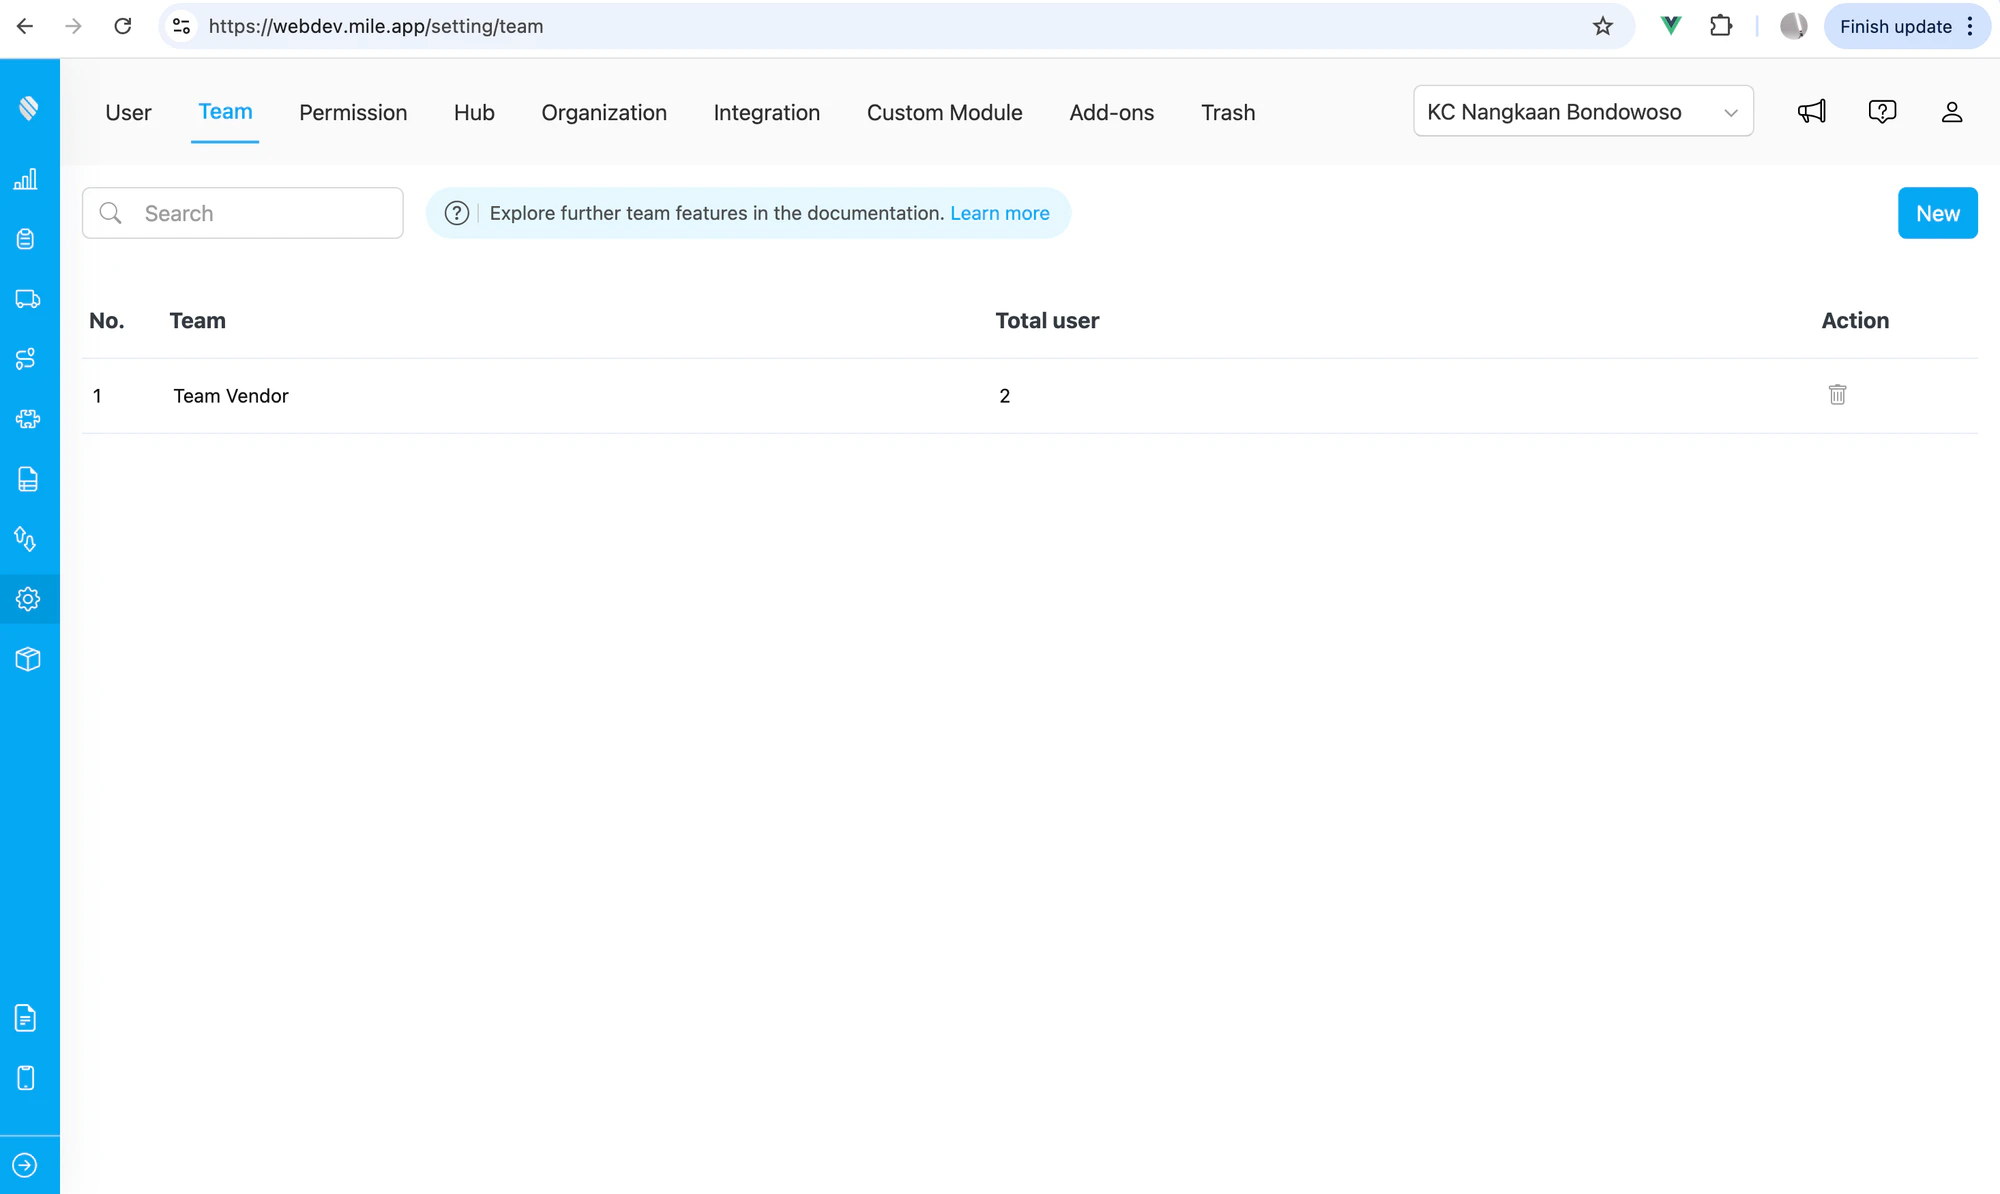
The Team management page showing a vendor team with 2 users assigned.
Enter the team name (e.g., “Team Vendor”, “PT Express Logistics”, or the vendor’s company name) and save.Each vendor should have their own dedicated team. Do not mix users from different vendor companies in the same team.
Step 3: Invite Vendor Users
Go to Settings > User and click Invite to add the vendor’s admin and driver users.Invite Vendor Admin
- Enter the vendor admin’s email address
- Select the ADMIN VENDOR role
- Assign to the vendor team created in Step 2
- Click Invite
Invite Vendor Drivers
- Enter the driver’s email address
- Select the DRIVER VENDOR role
- Assign to the same vendor team as the admin
- Click Invite
Both the vendor admin and all vendor drivers must be in the same team. This ensures:
- The admin can see and assign drivers from their team
- Drivers only see tasks assigned to their team
- Orders sent to the vendor team are visible to the admin
Step 4: Verify the Setup
After inviting all vendor users, verify the configuration:- Go to Settings > Team and confirm the vendor team shows the correct number of users
- Go to Settings > User and verify each vendor user has the correct role and team assignment
- Ask the vendor admin to log in and verify they can see the Transport Vendor Management add-on
How It Works After Setup
Once configured, the workflow between principal and vendor works as follows:| Actor | Action |
|---|---|
| Principal Admin | Creates a delivery order and sends it to the vendor team |
| Vendor Admin | Opens Transport Vendor Management, sees the order, clicks Accept, selects a driver and vehicle from their team |
| Vendor Driver | Receives a pickup task on the MileApp mobile app, completes it |
| Automation | Creates a delivery task automatically and assigns it to the same driver |
| Vendor Driver | Completes the delivery task |
| Automation | Marks the order as completed |
Adding More Vendors
To add another vendor, repeat the process:- Create a new team for the new vendor
- Invite the new vendor’s admin with the ADMIN VENDOR role
- Invite the new vendor’s drivers with the DRIVER VENDOR role
- Assign all users to the new vendor’s team
Related
- Setting Up Transport Vendor Management — Complete the Setup Wizard before configuring vendors
- Order Management — Create and send orders to vendor teams
- Team Management — Learn more about managing teams
- Role and Permission Management — Learn more about roles and permissions