What is Capacity Constraint?
Capacity Constraint allows you to create custom variables that can be used to limit what each vehicle can carry and what each visit (task) requires. This ensures that the route optimization engine respects your operational constraints when calculating optimal routes.Key Characteristics
- Organization-wide Definition: Capacity constraints are defined at the organization level and persist across all hubs
- Hub-specific Activation: Each hub can choose which capacity constraints to activate for their routing optimization
- Maximum Constraints: You can define up to 10 different capacity constraint types per organization
- Flexible Application: Constraints can represent any measurable dimension (weight, volume, quantity, pallets, etc.)
How Capacity Constraints Work
When you define a capacity constraint, you create a new variable that can be used in three places:- Vehicle Configuration: Set the maximum capacity for each vehicle (e.g., max weight: 1000 kg)
- Visit/Task Data: Specify how much of each constraint a visit requires (e.g., this delivery needs 50 kg)
- Route Optimization: The engine ensures that the total demand assigned to each vehicle doesn’t exceed its capacity
Example Scenario
Capacity Constraint Setup:- Name:
weight - Unit:
kg(kilograms)
- Vehicle A: weight capacity = 1000 kg
- Vehicle B: weight capacity = 500 kg
- Visit 1: weight = 100 kg
- Visit 2: weight = 300 kg
- Visit 3: weight = 700 kg
- Vehicle A gets visits totaling ≤ 1000 kg
- Vehicle B gets visits totaling ≤ 500 kg
- No vehicle is overloaded
Creating Capacity Constraints
Required permission:
- Edit Constraint
Step 1: Access Route Configuration
Navigate to Route Optimization → Configuration from the main menu.Step 2: Locate Capacity Constraint Section
Scroll down to find the Capacity Constraint section in the configuration page.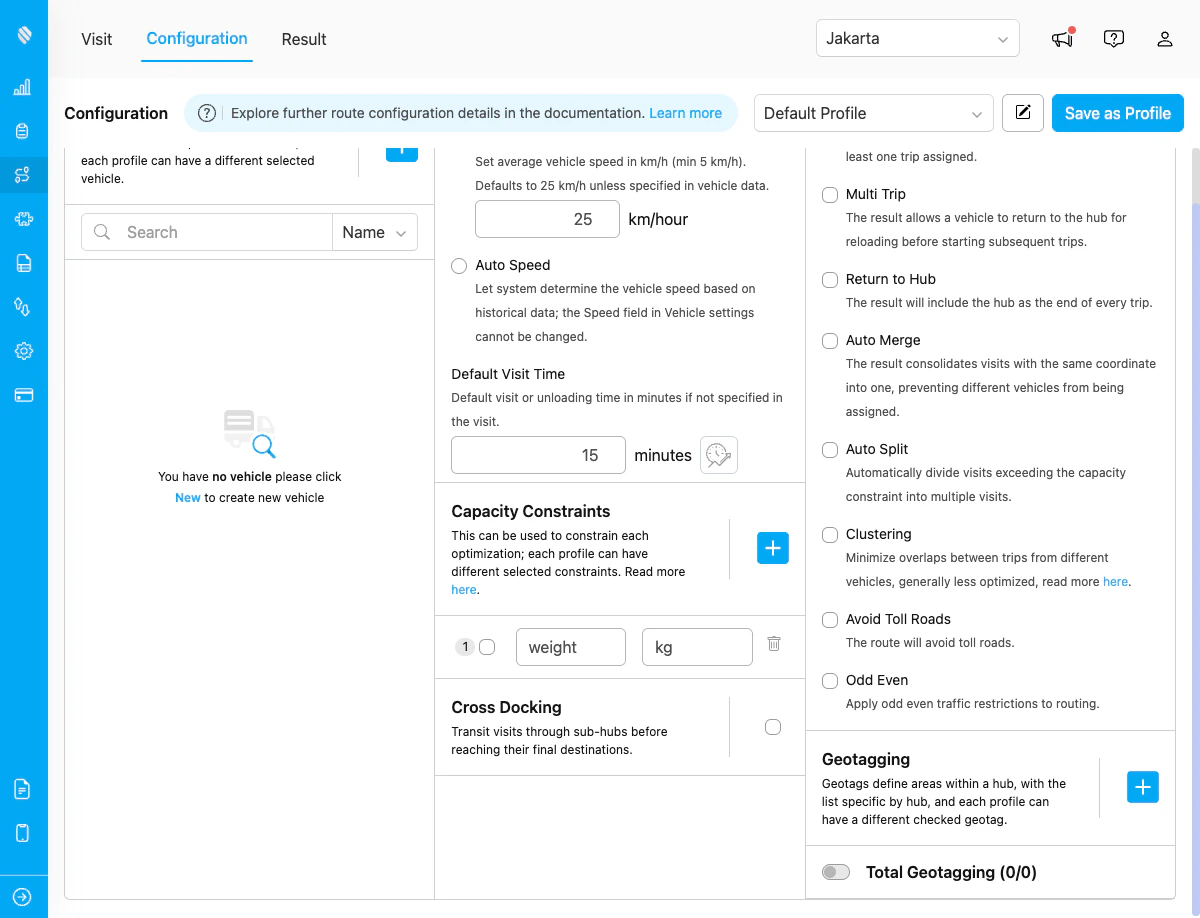
Route Configuration page with Capacity Constraint section
Step 3: Add New Constraint
- Click the plus icon (+) in the Capacity Constraint section header
- A new row will appear with two input fields
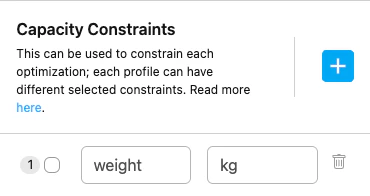
Capacity Constraint section showing constraint row with name, unit, and controls
Step 4: Define Constraint Details
Constraint Name:- Must be unique across your organization
- Use lowercase letters, numbers, and underscores only
- Cannot contain spaces or uppercase letters
- Cannot use reserved keywords:
name,address,coordinate,timeWindow,timewindows,visitTime,visittime,tags,assignee,workingTime,workingtime,multiday,speed,fixedCost,fixedcost
weightvolumeitem_countpallet_quantitycold_storage_volume
- Specify the unit of measurement for this constraint
- Can be any string (e.g.,
kg,m3,pcs,pallets,liters)
Step 5: Save the Constraint
The constraint is automatically saved when you complete both fields (name and unit).Managing Capacity Constraints
Activating Constraints for a Hub
Each hub can choose which capacity constraints to use:- In the Capacity Constraint section, you’ll see a checkbox next to each constraint
- Check the box to activate the constraint for the current hub
- Uncheck the box to deactivate the constraint
- You can have up to 10 active capacity constraints per hub
- Inactive constraints won’t be considered during route optimization
- Constraint definitions remain available across all hubs even if not activated
Editing Constraint Details
To modify an existing constraint:- Click on the name or unit field
- Update the value
- Click outside the field to save changes automatically
- Constraint names must remain unique
- Cannot use reserved keywords
- Cannot use uppercase letters in constraint names
Deleting Constraints
To remove a capacity constraint:- Click the trash icon next to the constraint you want to delete
- Confirm the deletion in the modal dialog
- The constraint will be removed from your organization
- Cannot delete all constraints - at least one must remain active
- Deleting a constraint will remove it from all vehicles and visits that use it
- This action cannot be undone
Using Capacity Constraints in Optimization
In Vehicle Configuration
When creating or editing a vehicle:- Navigate to Route Optimization → Vehicle
- In the vehicle form, you’ll see input fields for each active capacity constraint
- Enter the maximum capacity for each constraint (e.g., weight: 1000)
- Leave blank if the vehicle has no limit for that constraint
In Visit/Task Data
When creating visits or tasks:- Navigate to Route Optimization → Visit
- In the visit form or bulk upload, you’ll see fields for each active capacity constraint
- Enter the demand/requirement for each constraint (e.g., weight: 50)
- The optimization engine will sum these values per vehicle
During Optimization
When you run route optimization:- The engine calculates the total demand for each constraint per route
- Ensures no vehicle exceeds its capacity limits
- May leave some visits unassigned if capacity constraints cannot be satisfied
- Displays capacity utilization in the optimization results
Capacity Constraint Limits
You can define up to 10 capacity constraints per organization. This is a hard limit enforced at the organization level across all subscription plans.Best Practices
Naming Conventions
Use Descriptive Names:- ✅
weight_kg- Clear and specific - ✅
volume_m3- Includes unit in name - ✅
pallet_count- Easy to understand - ❌
w- Too vague - ❌
constraint1- Not descriptive
- Use underscores to separate words:
item_count - Keep names short but meaningful:
cold_storageinstead ofcold_storage_temperature_controlled_volume - Use industry-standard terminology
Constraint Strategy
Start Simple: Begin with the most critical constraint (usually weight or volume), then add more as needed. Combine Related Constraints: If you have multiple related dimensions, consider combining them:- Instead of:
length,width,height - Use:
volume_m3(calculate volume before creating visit)
- Capacity limits are realistic
- Units are consistent between vehicles and visits
- Optimization produces feasible routes
Common Use Cases
Delivery Operations:Dynamic Visit Time Integration
Capacity constraints can be integrated with Dynamic Visit Time to automatically adjust service time based on capacity:- Navigate to Dynamic Visit Time configuration
- Select a capacity constraint as the basis for time calculation
- Define the time multiplier (e.g., 2 minutes per unit)
- The system will automatically calculate visit duration based on constraint values
Troubleshooting
Cannot Add New Constraint
Problem: The ”+” button is disabled or shows an error. Possible Causes:- You’ve reached the maximum of 10 constraints
- The last constraint row is incomplete (missing name or unit)
- You don’t have “Edit Constraint” permission
- Complete or delete the last constraint before adding a new one
- Contact your organization administrator for permission access
- Delete unused constraints to make room for new ones
Constraint Name Rejected
Problem: Error message when entering constraint name. Common Issues:-
“Constraint name already exists”
- Each constraint name must be unique
- Check for similar names with different formatting
-
“Constraint name contains reserved keyword”
- Cannot use system reserved words
- Choose a different name that doesn’t conflict
-
“Constraint name contains uppercase letters”
- Use only lowercase letters
- Replace spaces with underscores
-
“Constraint name must use alphanumeric and underscore only”
- Remove special characters (-, @, #, etc.)
- Use only: a-z, 0-9, _ (underscore)
Optimization Fails with Capacity Constraints
Problem: Route optimization fails or produces unexpected results. Possible Causes:- Vehicle capacities are too small for visit demands
- Constraint values are inconsistent (different units)
- Some visits have missing capacity data
- Review vehicle capacity settings - ensure they’re realistic
- Verify all visits have capacity values defined
- Check that units are consistent (don’t mix kg and grams)
- Try optimization with fewer active constraints to isolate the issue
Constraint Not Showing in Vehicle/Visit Forms
Problem: Newly created constraint doesn’t appear in vehicle or visit forms. Solution:- Ensure the constraint is activated (checkbox is checked) for the current hub
- Refresh the page to load the latest constraint configuration
- Verify you’re in the correct hub where the constraint is active
Related Documentation
- Route Optimization Configuration Introduction
- Dynamic Visit Time
- Vehicle Management
- Visit Management
Frequently Asked Questions
Q: Can I change a constraint name after creating it? A: Yes, you can edit the constraint name at any time. However, if the constraint is already used in vehicles or visits, updating the name won’t automatically update historical data. It’s recommended to plan constraint names carefully before widespread use. Q: What happens to vehicle and visit data if I delete a constraint? A: When you delete a constraint, it will be removed from all vehicles and visits that reference it. Historical optimization results may still show the old constraint values, but new optimizations won’t consider the deleted constraint. Q: Can I have different capacity constraints for different hubs? A: Capacity constraints are defined at the organization level, meaning all hubs see the same constraint definitions. However, each hub can independently activate or deactivate which constraints to use. This allows flexibility while maintaining consistency across your organization. Q: How does the optimization engine handle vehicles with no capacity limit? A: If a vehicle has no value (blank) for a capacity constraint, the optimization engine treats it as unlimited capacity for that specific constraint. The vehicle can carry any amount for that dimension. Q: Can capacity constraints be negative? A: No, capacity constraints must be positive numbers. Negative values don’t make logical sense in the context of capacity limitations. Q: What happens if visit demand exceeds all available vehicle capacity? A: The optimization engine will flag these visits as “dropped” in the results. You can resolve this by:- Adding more vehicles with sufficient capacity
- Enabling auto-split configuration to automatically divide large visits
- Adjusting vehicle capacity limits